Merge in a blender
The merge tool allows the user to merge all selected vertices to a unique one, dissolving all others. We can choose the location of the remaining vertices in the main menu.
source
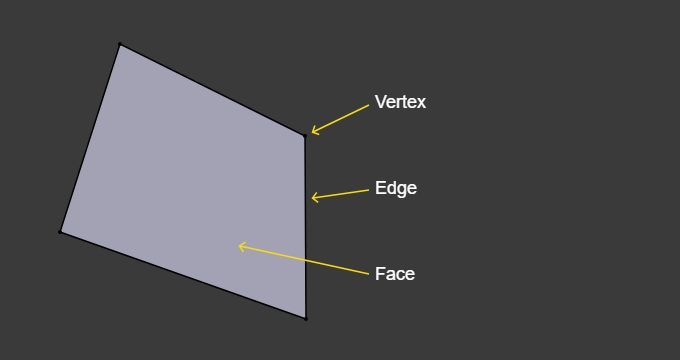
Mesh Description
Previous Blender versions are supported only by a face with three edges (triangles) or four edges (called quads). However, faces with five or more edges are supported by Blender from version 2.63. Before Blender 2.63, to create a new look, you must select 3 or 4 ounces in a row and make a face, repeating the process of all the new polygons required. In version 2.63 and subsequent versions with BMesh, you can create N-gon, regardless of the number of vertices.
When you edit objects in Blender, you will see the entire vertex and edge. However, vertices and edges are never provided; only faces are provided. The purpose of the vertices is to provide 3D control points on the front side.

source
Merge
Merge contains various tools which pop up before the execution of the objects.
At center
This tool will place the remaining vertex at the center of the selection. It is available in all the selection modes.
At Cursor
This tool will place the remaining vertex at the 3D Cursor.
At First
This tool will place the remaining vertex in the location of the first one selected. It is only available in the vertex.
Collapse
This tool will merge all the selected edges with its median center.
At last
This tool will place the remaining vertex at the location of the last one selected. It is only available in the Vertex select mode.
UV
This tool is used; if mapping coordinates exist, they will be corrected to avoid image distortion.
Joining mesh objects
When we are trying to join the mesh object, there may be the chance of multiple mesh objects exist. For merging them, we will use the new version of Blender, which is Blender 2.8+/2.9+.
Joining
source
Joining an object is one of the most straightforward processes. Although it is one of the most widely used tools, it does not work as a user expects. Joining is still useful when working with complex areas or characters. You can enter the pieces in their combined form and print them individually.
If the objects are only touching, joining them would not mean connecting them. That's why it is not recommended to print if there are contradictory or contradictory elements in the model.
To join the two objects :
- Left-click to select the first object:
- If you don’t want that this object should not become the parent, then just hold down “Shift” and left-click the other objects you want to join.
- Once everything you want to be joined is selected, then click on the join button. This will make objects look, move and act as one.
Adding
source
If you need to combine two items, joining will not work, as we have seen above. However, with the help of modifiers, we can achieve just that with a bit of effort!
This method only works for two items, so just repeat the process for each additional item if you have more. Once again, you will need to choose something outstanding.
Here's how to add one item to another:
- Select your highlighted item with the left click. In our example, we will use the lower cube as our highlight. Make sure the only object is selected. Then, find the Properties editor. In the default view (and in our example), it is located to the right of the screen under the Outliner. Select the Modifiers tab.
- Click the "Add modifier" button to display a list of available modifiers. You can select a modifier by left-clicking, scrolling, and clicking in the middle (or with the keyboard and Enter arrows). In this case, select the "Boolean" modifier. Once added, the modifier name may be highlighted in red.
- To proceed, you need to know the item's name you are trying to attach. In our case, the object we are trying to connect is called "cube_top." If you look to the right of the modifier, you will see an empty button under the section marked "Object." Click on an open space, and a list of items will appear. Select the item you are trying to attach.
- Something must have happened, but not in the way we intended. To fix this, find the "Operations" section in the editor, and then click "Union." Both items are now ready for attachment.
Subtracting
source
Sometimes, we will find it necessary to cut a piece of one thing using another. This is useful when you want to record text or shape in an object. This can be quickly done using a Boolean modifier in the image.
Here's how to get one thing done:
- Follow the first two steps shown above from the previous method. Remember that the first thing you choose should be something you cut out.
- Once you've added your modifier, find the "Working" section. Select "Differences."
- Next, click the empty box under the text "Object" to the right of the modifier. In the new list that appears, select the item you want to cut the selected item from the parent object. In our case, we want to miss the bottom cube with the top cube.
- Note that you will not see the results of the cut right now.
Applying Modifiers

source
To see results, you need to click the "Apply" button in the editor, located on the drop-down tab, to save changes to the selected item (s). Alternatively, you can use the shortcut "Ctrl + A."
FAQs
What are the steps required to merge mesh in a blender?
Once it's selected, hold “Shift” and left-click the other objects which you want to join. The last object which you select will be the parent. Once everything you want to be joined is selected, then click on the “Join” button in the Object menu or simply press “Ctrl + J”.
What is the difference between the mesh and merge in the Blender?
- We will use mesh when joining elements together in edit mode. E.g., joining vertices together.
-
We will use merge when we attach separate objects into the single editable mesh.
What are the different tools used in the mesh?
Different tools used in the mesh are:
- Cursor
- Center
- First
- Last
- Collapse
Conclusion
Through this article, we gained insights on 3d mesh and merge in a blender and specifically about an overview of mesh and merge in detail. To know more about Mesh, blender, click on the respective links. For more such topics, visit Coding Ninjas. We hope that this blog helped you enhance your knowledge regarding Redundant Physical Infrastructure.
For peeps out there who want to learn more about can refer to our guided paths on Coding Ninjas Studio to learn more about DSA, Competitive Programming, JavaScript, System Design, etc. Enroll in our courses and refer to the mock test and problems available, interview puzzles, take a look at the interview experiences, and interview bundle for placement preparations. Do upvote our blog to help other ninjas grow.
Until then, keep learning and keep exploring.


 9+ registered

