


Introduction
Android app development is an exciting and rewarding skill that opens the door to creating innovative mobile applications for millions of users worldwide. Whether you’re looking to build your first app or expand your programming knowledge, learning Android development can be an enjoyable journey. In this blog, we’ll guide you through 7 easy and practical steps to help you get started with Android app development.

7 most significant steps to learn Android App Development:
Step 1: Foremost, get hands-on knowledge about any programming language
Coding should never be considered distinct from development. Coding and development are the two aspects of software development, but they are not independent of each other, rather coding is a pre-requisite for development. The Android Studio is driven by two programming languages: Java and Kotlin. Both Java and Kotlin are object-oriented programming languages. Kotlin has a very dictating advantage over Java; it can be used for developing cross-platform applications.
See more, android operating system
The decision of selecting now from Java and Kotlin totally depends on the target audience of your project. If your target audience doesn’t include around one million iPhone users, then you can go ahead with Java, else you can spare some time and learn Kotlin.
If you know C++, it will be smooth for you to switch over Java, and then you can go another step higher and move to Kotlin. But if you don’t know any of the programming languages, then you opt for Kotlin as it the latest, most user-friendly, and least bug-prone programming language.
In the year 2019, Kotlin substituted Java and became the preferred language for App development in the Android Studio. To maintain the integrity of Java Developers, Java is still supported in the Android Studio. The documents related to the use of Java libraries in Android are quite in-depth and extended. The Android Studio comes with an in-built feature that allows developers to typecast the Java codes into Kotlin, without any explicit effort.
There are two ways for converting a Java code into Kotlin:
- To convert Java code to Kotlin, open the Java file in Android Studio. And select Code > Convert Java File to Kotlin File.
- Alternatively, create a new Kotlin file (File > New > Kotlin File/Class), and then paste your Java code into that file.
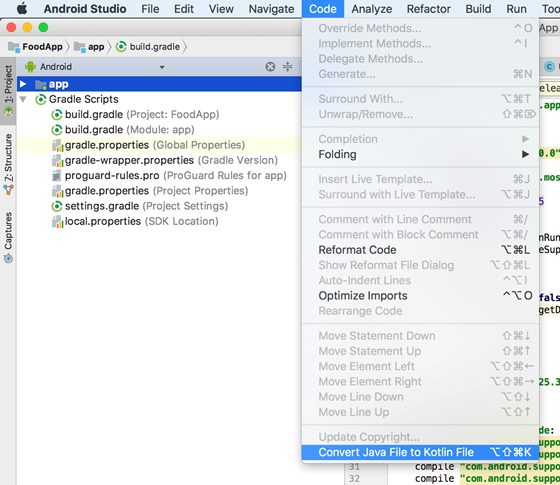 Image depicts code conversion feature of the Android Studio
Image Source: Stack Overflow
Step 2: Collect all the relevant learning resources
If you have no prior experience with Android, you don’t need to worry. You can refer to the myriads of tutorials, blogs, and courses available online. We highly recommend that your first stop should be the developers.google website is the official website hosted by Android itself.
Each of its libraries, their functionalities, and implementation procedure are explained very distinctly here. Apart, from these, you can check out the blogs written by various experienced Android developers. These developers have been through the learning stage and guide the beginners, referring to their own journey of learning.
However, many learners grasp more quickly if the content is delivered through any media elements such as video tutorials. If you are one of them, then you might get enrolled in any of the professional Android development courses. Nowadays, many courses are available online, some of them have been really fruitful for budding developers and have a wide set of accomplished alumni members.
If you intend to purchase any course, make sure that the course provides you a certification of completion and there should be a decent number of assessments, assignments, and projects for self-evaluation, exploration, and growth.
You can also refer to the pre-existing GitHub repositories for learning the various implementation strategies. Before forking any repository, go through their README file and ensure that the necessary hardware and software requirements are fulfilled.
Do not publish any of these repositories that there are copyrights associated with them. But you can always learn from them and get an idea. GitHub also allows you to connect with the owner of the repository.
Step 3: Install the android studio and a few productivity tools
There are a number of open-source Developer productivity tools that assist collaboration and accelerates the overall development process, this makes the projects scalable and narrows the overall critical path of the project in progress. Before installing the productivity tools, make sure that you have got the essential tool, which is the Android Studio.
You can download the Android Studio from its official site.
The Android Studio is a complete package of Android development tools ranging from code editor to emulator. Before, the ingress of Android Studio, Eclipse was used as the primary IDE for native Android app development. The Android Studio is compatible with the major operating systems including Windows, macOS and Linux systems.
This eradicates all the compatibility issues. For elementary development, Android Studio is the most recommended software, but for graphics designers and game developers, highly configured platforms such as Visual Studio with Xamarin or Unity, are recommended.
There are numerous productivity tools that accelerate development procedures such as the TimeToggle, Cloud app, Jamboard. These keep developers on their toes, and allow them to keep a track of the time and the deadline; this confines them from fleeting their time.
In the actual scenario, multiple developers work on the same project, in this case, collaboration plays an intrinsic role. Therefore, it is necessary to have collaborative tools such as GitHub, SourceTree, Meld, TeamViewer, AnyDesk and so on.
Step 4: Get familiarised with data structures and algorithms
Before taking the major leap of creating your first Android project, you need to get familiarised with various data structures used in Java or any other programming language. Learning any object-oriented programming language can help you in understanding the Android Studio better, but doesn’t ensure that the app you are going to create will be an efficient one.
For increasing the efficiency of any Android and making sure that it doesn’t crash, the developer should be familiar with the following concepts:
- Algorithm Design: Algorithm design refers to a method or a mathematical process of problem-solving and creating algorithms. The design of algorithms is part of solution building or logic designing, such as backtracking, dynamic programming, greedy technique, and divide-and-conquer. The algorithm should incur the minimum space and time and must be consistent for any given input.
- Time Complexity: The time complexity of an algorithm depicts the total time required by the program to run till its completion. The time complexity of any given algorithm is most widely expressed using the asymptotic notation, big O.
There are three possible cases:
- The best case is the function that performs the minimum number of steps on input data of n elements.
- The worst case is the function that performs the maximum number of steps on input data of size n.
- The average case is the function that performs an average number of steps on input data of n elements.
 Image depicts big-O notation for time complexity
Image Source: Dev Community
- Space Complexity: The space complexity of an algorithm or a computer program is the amount of memory space required to solve an instance of the computational problem as a function of characteristics of the input. It is the maximum memory required by an algorithm to execute a program and produce output, throughout its lifecycle.
- Data Structures: There are numerous data structures in Java and Kotlin such as arrays, vectors, graphs, trees, trie, linked lists, stacks, queues that have the potential of compressing the time and space complexity exponentially. The use of data structures reduces the run time of any app and saves memory units. There is a significant reduction in the number of floating-point operations, which prevents the app from getting crashed during execution.
Step 5: Locating the files and folders
You need to understand the contents and locations of the various files and folders present in the Android Studio. The most significant file is MainActivity.java or MainActivity.kt, which changes with the programming language being used.
You also need to understand the various XML folders and the folder which is responsible for hosting the Gradle files. Getting lost between the activities, will lapse time and delay your project.
Step 6: Enhance your debugging skills
Once you have learnt working on Android Studio, you need to learn to read the logcat and working on the back stack. This allows you to locate the thread that contains the bug. Many times if your code logic has any other or segmentation fault, it is not highlighted not the code editor, but it causes system failure. During app execution, your app will crash due to space complexities.
If you know how to read the logcat in the error and verbose mode, you can trace the bug and fix it. Else, you might end up scanning a thousand lines of app code.
Step 7: Become a part of the android community
Finally, you must become a part of the global Android community. The Android developers’ community is the most remarkable community in the world consisting of millions of developers. Some of the members of this community are the creators of the Android Studio itself, freshers can post their queries when they stumble across anything on the Android studio and get instant assistance from experienced developers. This creates a friendly as well as competitive environment, in both aspects, you grow as a developer.


 9+ registered

