Table of contents
1.
Introduction
2.
Methods of Alert
2.1.
alert()
2.2.
prompt()
3.
Example on Alert
4.
Frequently Asked Questions
4.1.
What is the work of StyleSheet in react-native?
4.2.
What is the use of the render() function in react-native?
4.3.
How is Linking used in react-native?
5.
Conclusion
Last Updated: Mar 27, 2024
Easy

Alert in React Native

Introduction

React Native Alert is an API that displays an alert dialogue with a title and message that you specify. An alert dialog is triggered using the alert() method. This API can display static alerts and works on both android and iOS. Alert features only one positive (OK) button by default.

In iOS, users will receive an alert asking them to submit some information, and you can specify any number of buttons on iOS.

In android, This Alert dialogue has three separate lists of action buttons (neutral, negative, and positive). Any of these buttons will invoke the onPress callback method, which will dismiss the alert. To manipulate the alerts according to the way we want, we've different methods and type definitions.

Click on the following link to read further: Hooks in React JS

Methods of Alert

Alerts in react-native have two methods alert() and prompt() (iOS)

alert()

Syntax:

static alert (title, message?, buttons?, options?)

Parameters:

  • title: It is of string type, it contains the main title of the dialog.
  • message: It is of string type, it contains an optional message that appears below the dialog’s title. 
  • buttons: It is of type Button, an array containing alert buttons.
  • options: It is of type Option, it is an optional alert configuration. Only available for android.

prompt()

Syntax:

static prompt(title, message?, callbackOrButtons?, type?, defaultValue?, keyboardType?)

Parameters:

  • title: It is of string type, it contains the main title of the dialog.
  • message: It is of string type, it contains an optional message that appears below the dialog’s title.
  • callbackOrButton: It can be passed either as a button or as a function, it does the work of a button.
  • type: It is of AlertType type and configures the text input.
  • defaultValue: It is of string type, it contains the default text of input text.
  • keyboardType: It is of string type, it contains the keyboard type of the first text field.

Apart from these methods, alert in react-native has several types of definitions also, you can find them on official documentation. We've had enough theories let's consider an example to get a good grasp on the alerts in react-native.

Example on Alert

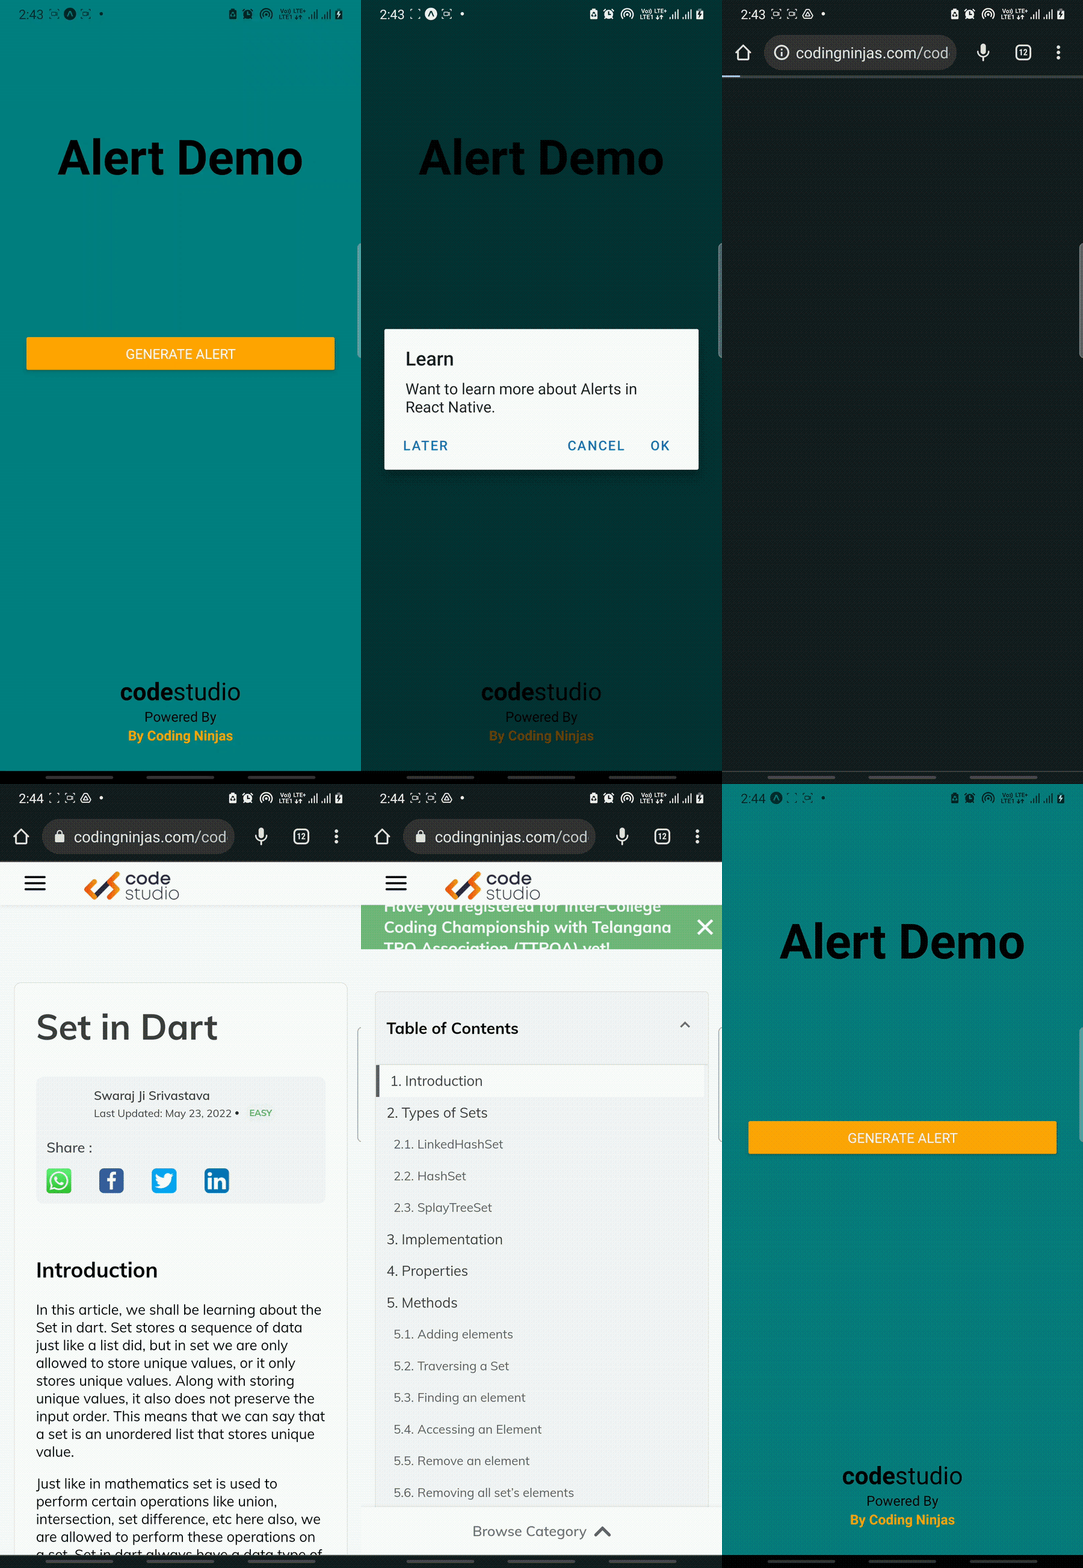
In this part, we will create an app using react-native. In this app, first, we will create a normal screen in the App.js file with the button "GENERATE ALERT". After clicking the button, you will get an alert dialog having the title "Learn", message as "Want to Learn more about Alerts in React Native" and three buttons:

  1. Later: “Ask me later pressed” is printed on the console.
  2. Cancel: “Not interested” is printed on the console.
  3. OK: You be directed to this article’s link on your virtual or physical device.

App.js file

Code:

import React, { Component } from 'react';  
import { Text, Alert, AppRegistry, Button, StyleSheet, View, Linking } from 'react-native';  
  
export default class AlertDemo extends Component {  
    showAlert() {  
        Alert.alert(  
            'Learn',  
            'Want to learn more about Alerts in React Native.',  
            [  
                {text: 'Later', onPress: () => console.log('Ask me later pressed')},  
                {  
                    text: 'Cancel',  
                    onPress: () => console.log('Not interested'),  
                    style: 'cancel',  
                },  
                {text: 'OK', onPress: () => Linking.openURL('https://www.codingninjas.com/studio/library/set-in-dart')},  
            ],  
            {cancelable: false}  
        ) 
    }  
    render() {  
        return (  
            <View style={styles.container}> 
                <View
                  style={{
                    flex: 1,
                    justifyContent: "center",
                    alignItems: "center",
                  }}>
                  <Text style={styles.titleText}>Alert Demo</Text>
                </View>
                <View style={styles.buttonContainer}>  
                    <Button  
                        onPress={this.showAlert}  
                        title="Generate Alert" 
                        color="orange"
                    />  
                </View>
                <View style={styles.bottomText}>
                  <Text>
                  <Text style={styles.bottomText1}>code</Text>
                  <Text style={styles.bottomText2}>studio</Text>
                  </Text>
                  <Text>Powered By</Text>
                  <Text style={styles.bottomText3}>By Coding Ninjas</Text>
                </View>  
            </View>  
        );  
    }  
}  
  
const styles = StyleSheet.create({  
    container: {  
        flex: 1,  
        justifyContent: 'center',
        backgroundColor: 'teal'
    },  
    buttonContainer: {
        flex: 1,  
        margin: 30  
    },
    titleText: {
      fontSize: 50,
      color: 'black',
      fontWeight: "bold"
  },
  bottomText: {
      marginBottom:30,
      textAlign: 'center',
      alignItems: "center",
    },
    bottomText1: {
      fontSize: 25,
      fontWeight: 'bold',    
    },
    bottomText2: {
      fontSize: 25,
    },
    bottomText3: {
      fontWeight: 'bold',
      color: 'orange'
    }   
})  


Output:


Explanation: In the code written above alert () function is liable for showing the alert, it provides all the data and functionalities to the alert. We are calling this alert from the onPress property of the button, which is present inside the render() function.

Also see,  React Native Reanimated

Frequently Asked Questions

What is the work of StyleSheet in react-native?

React Native StyleSheet is a technique for customizing an application with JavaScript code. Its primary use is to style and structure components in an application.


What is the use of the render() function in react-native?

The render function in React is used to render HTML to a web page (). The objective of the method is to display the provided HTML code within the specified HTML element. We can read props and states in the render() method and deliver our JSX code to the app's root component.


How is Linking used in react-native?

Linking allows you to engage with both incoming and outgoing app links from a single interface. In the example illustrated above, we have used the linking for outgoing app links.

Conclusion

In this article, we've extensively discussed the Alert in React Native. We've discussed its properties, methods and definition, along with an example.

We hope this blog has helped you enhance your knowledge regarding the Alert in React Native. Do check out the awesome content on the Coding Ninjas Website, Android DevelopmentCoding Ninjas Studio Interview ExperiencesCoding Ninjas CoursesCoding Ninjas Studio ProblemsCoding Ninjas Studio Interview BundleCoding Ninjas Studio Contests, and Coding Ninjas Studio Test SeriesDo upvote our blog to help other ninjas grow. 

Happy Coding!

Live masterclass