Use Cases
The following are some valuable examples that demonstrate the advantages of Amazon AppFlow.
- Salesforce opportunities should be transferred to Amazon Redshift tables
Create a pipeline that evaluates the sales potential for each new record created in Salesforce Cloud and then sends the changed record to an Amazon Redshift database.
- Examine your Slack interactions
Create a flow that sends discussion data from a Slack channel to Amazon Redshift, Snowflake, or Amazon S3 for storage and analysis regularly.
- Transfer Zendesk support tickets for storage and analysis
Create a Zendesk flow that transmits ticket data to Amazon Redshift, Snowflake, or Amazon S3 for storage and accounting for all tickets with the same case number.
- Weekly data transfer to S3 at a rate of 100GB per-flow
Create a flow that will move Salesforce, Marketo, ServiceNow, and Zendesk data to Amazon S3 in batches of up to 100GB per flow with low latency every week.

Read about Amazon Hirepro here.
Getting Started with Amazon AppFlow
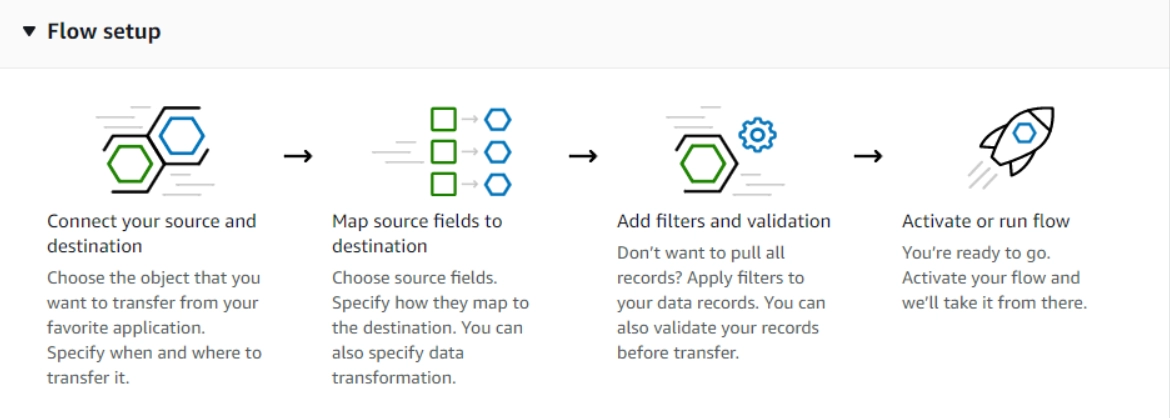
This section introduces Amazon AppFlow and describes how to create a flow using the AWS console, AWS CLI, APIs, or CloudFormation resources. The diagram below shows how to move and enrich data from a data source to a data destination in your flow using Amazon AppFlow:

Prerequisites Required
Before you begin using Amazon AppFlow, you must first complete the following criteria:
- If you don't already have an AWS account, you'll need to create one.
- AWS account setup - If you don't already have an AWS account, you'll need to create one.
- Setup of SaaS applications - Make sure you have all of the necessary information regarding the source and destination applications and that they meet all of the appropriate configuration criteria.
- Identity and access management - If you use AWS as an IAM(Amazon Identity and Access Management) user, your administrator must provide you with the permissions necessary to construct and run flows.
- AWS CloudFormation OAuth (Optional) - Suppose you wish to utilise AWS CloudFormation to construct a connection profile for connectors that use OAuth (such as Salesforce, Slack, Zendesk, and Google Analytics). In that case, you'll need to retrieve the access and refresh tokens first. You can create your OAuth user interface or obtain them from another source. Alternatively, you can construct the connector profile in the Amazon AppFlow dashboard and then utilise it in the AWS CloudFormation template for flow formation.
- Data encryption (optional) - During transit and at rest, Amazon AppFlow encrypts your data and connection details. You provide an AWS Key Management Service CMK for encryption when configuring a flow. You can use the AWS managed customer master key (CMK) entitled AWSDefaultEncryptionKey that Amazon AppFlow creates by default or construct your own customer-managed CMK.
Creating Flow using AWS Console
The AWS console user interface, AWS CLI commands, APIs, or specifying CloudFormation resources are all options for getting started with generating your first flow. The console allows you to enter basic flow information and connect to the related SaaS application.
To use the console to design a flow
The procedures to create and configure a flow using the Amazon AppFlow console user interface are outlined in the following process.
-
Go to Amazon AppFlow Console to access the Amazon AppFlow console.
- Select Create Flow.
- Enter a name and description for the flow in the Flow details section. An acceptable flow name contains alphanumeric characters and unique characters!@#.-_.
- (Optional) Choose Data encryption, Customize encryption settings, and then select an existing CMK (Customer Master Key) or build a new one instead of using the default AWS managed CMK.
- (Optional) Go to Tags, Add tag, and input the key name and value to create a tag. Tags are subject to the following limitations:
- Per resource, the maximum number of tags is 50.
- Each tag key must be unique for each help, and each tag key can only have one value.
- The ultimate key length is 128 characters.
- UTF-8 Unicode characters
- Use UTF-8-compatible letters, numbers, and spaces, as well as the following characters: : / @. + - =
- The case of tag keys and values matters.
- The aws: prefix is only used by AWS. You can't alter or delete a tag's key or value if it includes this prefix in its tag key. The aws: prefix does not count towards your tag limit per resource.
6. Select Next.
To set up the flow
- Select the source and enter the relevant information for Source Details. Provide connection information and select objects or events, for example. For more information, go to the Supported source and destination applications page and look up your source application to find application-specific connection instructions. Keep in mind that to successfully configure a connection for a flow, the user or role you use to construct the flow must have permission to utilise the UseConnectorProfile permission-only action for the flow's connection (connectorprofile). The AmazonAppFlowFullAccess managed policy includes this permission. If you're using a custom policy, you'll need to add the connector profile resource and the permission to the policy.
- Select the destination and give the relevant information about the place in the ‘Destination Details’ section. For more information, go to the Supported source and destination applications page and look up your destination application. You'll find application-specific connection instructions there.
- Choose how to start the flow in the Flow trigger. The flow trigger possibilities are as follows:
- Run-on Demand - Run the flow manually or on-demand.
-
Run-on Event - Run the flow in response to the provided change event.
- This option is only accessible for SaaS apps that support change events. When you select the source, you must also select the event.
-
Run-on Schedule - Run the flow according to the parameters and transfer the data.
- For schedule-triggered flows, you can choose between full or gradual transfer.
- When you choose full transfer, Amazon AppFlow transmits a snapshot of all records from the source to the destination at the time of the flow run.
- When you choose incremental transfer, Amazon AppFlow only sends the records that have changed or been added since the last successful flow run. You may also configure how Amazon AppFlow recognises new or updated entries by selecting a timestamp field. Choose this option if you have a Created Date timestamp column to tell Amazon AppFlow to only transfer freshly created entries (not updated data) since the last successful flow execution. At the time of the first flow run, the first flow in a schedule-triggered flow will pull 30 days of historical records.
- The frequency of the scheduling is determined by the frequency supported by the source application.
4. Select Next.
Mapping Data Fields
-
Select a mapping method for the fields and complete the field mapping. The field mapping possibilities are as follows:
- Manually map fields - Specify field mapping using the Amazon AppFlow user interface. Choose Source field name, Bulk actions, and Map all fields directly to map all fields. Select one or more fields from the Source field name, and Source fields, and then directly choose Map fields.
- Upload a .csv file containing mapped fields - To specify field mappings, use a comma-separated values (CSV) file. The source field name appears first in the CSV file, followed by a comma, and then the destination field name.
- (Optional) To add a formula that concatenates fields, pick Add formula after selecting two fields from Mapped fields.
- (Optional) Select one or more fields from Mapped fields and then Modify values to mask or truncate field values.
- Add validations to verify if a field has bad data (optional). Select the criterion that signals faulty data for each field and the action that Amazon AppFlow should do when a field in a record is bad.
- Select Next.
Adding Filters
To select which records to transfer, apply a filter. You can filter data fields in Amazon AppFlow by using multiple filters and adding criteria to a filter.
- Select Add filter, select the field name, select a condition, and then specify the criteria to add a filter.
- (Optional) Select Add criteria to add more criteria to your filter. You can add up to 10 criteria per filter, depending on the field and condition.
- (Optional) Select Add filter again to add another filter. You can choose which data fields to use in your flow using up to ten filters. Amazon AppFlow will apply each filter in the order you set it, and only records that fulfil all filter criteria will be transferred.
- Choose Remove next to the filter to remove it.
- Choose Next once you've completed adding filters.
- Examine the data in relation to your flow. Choose Edit to alter the information for a step. When you're done, select Create flow.
Creating Flow using the AWS CLI
You may also use the AWS CLI commands create-connector-profile and create-flow to create a connector profile and construct a flow. The particular information required for connection establishment will vary due to the various methods of authentication used by each target application. Salesforce and ServiceNow are used as examples in this comparison.
To establish a connector profile for your flow, use the create-connector-profile command. The following example builds a new Salesforce Amazon AppFlow connection. It's important to note that this uses a Salesforce Connected App, which requires multiple processes to set up between AWS and Salesforce.
Create Salesforce Connection
aws appflow create-connector-profile \
    --connector-profile-name MySalesforceConnection \
    --connector-type Salesforce \
    --connection-mode Public \
    --connector-profile-config ' {
                "connectorProfileProperties": {
                    "Salesforce": {
                        "instanceUrl": "https://<instance-name>.my.salesforce.com",
                        "isSandboxEnvironment": false
                    }
                },
                "connectorProfileCredentials": {
                    "Salesforce": {
                        "accessToken": "<access-token-value>",
                        "refreshToken": "<refresh-token-value>",
                        "oAuthRequest": {
                            "authCode": "<auth-code-value>",
                            "redirectUri": "https://login.salesforce.com/"
                        },
                        "clientCredentialsArn": "<secret-arn-value>"
                    }
                }
            }'
To start building your flow, run the create-connector-profile command. The following example creates a new ServiceNow Amazon AppFlow connection. It's worth noting that, unlike Salesforce, neither AWS nor ServiceNow requires any prior configuration.
Create ServiceNow Connection
aws appflow create-connector-profile \
    --connector-profile-name MyServiceNowConnection \
    --connector-type Servicenow \
    --connection-mode Public \
    --connector-profile-config ' {
                "connectorProfileProperties": {
                    "ServiceNow": {
                        "instanceUrl": "https://<instance-name>.service-now.com"
                    }
                },
                "connectorProfileCredentials": {
                    "ServiceNow": {
                        "username": "<username-value>",
                        "password": "<password-value>"
                    }
                }
            }'
To start building your flow, use the create-flow command. Using a previously constructed Salesforce connection and S3 bucket, the following code constructs a flow from Salesforce to S3, delivering data in CSV format with all Salesforce source fields mapped directly.
Create Salesforce to S3 Flow
aws appflow create-flow \
    --flow-name MySalesforceToS3Flow \
    --trigger-config '{
                "triggerType": "OnDemand"
            }' \
    --source-flow-config '{
                  "connectorType": "Salesforce",
                  "connectorProfileName": "MySalesforceConnection",
                  "sourceConnectorProperties": {
                      "Salesforce": {
                          "object": "Account"
                    }
                }
            }' \
    --destination-flow-config '[{
                "connectorType": "S3",
                "destinationConnectorProperties": {
                    "S3": {
                        "bucketName": "<s3-bucket-name>",
                        "s3OutputFormatConfig": {
                            "fileType": "CSV"
                        }
                    }
                }
           }]' \
    --tasks '[
                {
                    "sourceFields": [],
                    "taskType": "Map_all",
                    "taskProperties": {}
                }
            ]'
Start your flow with the start-flow command. The following procedure starts the flow immediately for on-demand flows. This procedure starts the flow for schedule and event-triggered flows. The flow ‘MySalesforceToS3Flow’, which was built in the previous stage, now begins.
aws appflow start-flow --flow-name MySalesforceToS3Flow
The describe-flow command is useful for deciphering the structure of previously constructed flows, especially those established through the Console.
Create a flow:
aws appflow describe-flow --flow-name MySalesforceToS3Flow
Creating Flow using using the Amazon AppFlow APIs
The CreateConnectorProfile and CreateFlow APIs can also be used to create a connector profile and configure a flow. The particular information required for connection establishment will vary due to the various methods of authentication used by each target application. Salesforce and ServiceNow are offered as comparison examples below.
Create a connector profile connected with your AWS account using the CreateConnectorProfile API. Each AWS account has a soft limit of 100 connection profiles. You can make a request to the Amazon AppFlow team through the Amazon AppFlow support channel if you require more connector profiles than this quota allows. The following examples build a new Salesforce Amazon AppFlow connection. It's important to note that this uses a Salesforce Connected App, which requires multiple processes to set up between AWS and Salesforce.
Create Salesforce Connection
POST /create-connector-profile HTTP/1.1
Content-type: application/json
{
    "connectorProfileName": "MySalesforceConnection",
    "connectorType": "Salesforce",
    "connectionMode": "Public",
    "connectorProfileConfig": {
        "connectorProfileProperties": {
            "Salesforce": {
                "instanceUrl": "https://<instance-name>.my.salesforce.com",
                "isSandboxEnvironment": false
            }
        },
        "connectorProfileCredentials": {
            "Salesforce": {
                "accessToken": "<access-token-value>",
                "refreshToken": "<refresh-token-value>",
                "oAuthRequest": {
                    "authCode": "<auth-code-value>",
                    "redirectUri": "https://login.salesforce.com/"
                },
                "clientCredentialsArn": "<secret-arn-value>"
            }
        }
    }
}
The examples below show how to set up a new Amazon AppFlow connection to ServiceNow. It's worth noting that, unlike Salesforce, neither AWS nor ServiceNow requires any prior configuration.
Create ServiceNow Connection
POST /create-connector-profile HTTP/1.1
Content-type: application/json

{
    "connectorProfileName": "MyServiceNowConnection",
    "connectorType": "Servicenow",
    "connectionMode": "Public",
    "connectorProfileConfig": {
        "connectorProfileProperties": {
            "ServiceNow": {
                "instanceUrl": "https://<instance-name>.service-now.com",
                "isSandboxEnvironment": false
            }
        },
        "connectorProfileCredentials": {
            "ServiceNow": {
                "username": "<username-value>",
                "password": "<password-value>"
            }
        }
    }
}
Using a previously constructed Salesforce connection and S3 bucket, the following code constructs a flow from Salesforce to S3, delivering data in CSV format with all Salesforce source fields mapped directly.
Create Salesforce to S3 Flow
POST /create-flow HTTP/1.1
Content-type: application/json

{
    "flowName": "MySalesforceToS3Flow",
    "triggerConfig": {
        "triggerType": "OnDemand"
    },
    "sourceFlowConfig": {
          "connectorType": "Salesforce",
          "connectorProfileName": "MySalesforceConnection",
          "sourceConnectorProperties": {
              "Salesforce": {
                  "object": "Account"
            }
        }
    },
    "destinationFlowConfigList": [{
        "connectorType": "S3",
        "destinationConnectorProperties": {
            "S3": {
                "bucketName": "appflow-demo-destination",
                "s3OutputFormatConfig": {
                    "fileType": "CSV"
                }
            }
        }
    }],
    "tasks": [
        {
            "sourceFields": [],
            "taskType": "Map_all",
            "taskProperties": {}
        }
    ]
}
The flow ‘MySalesforceToS3Flow’, which was built in the previous stage, now begins.
Start a Flow
POST /start-flow HTTP/1.1
Content-type: application/json

{
   "flowName": "MySalesforceToS3Flow"
}
Creating Flow using CloudFormation resources
Using the AWS::AppFlow::ConnectorProfile and AWS::AppFlow::Flow resources, you can also utilise CloudFormation to create a connector profile and configure a flow. The following example builds a new Salesforce Amazon AppFlow connection. It's important to note that this uses a Salesforce Connected App, which requires multiple processes to set up between AWS and Salesforce. For further information, see the Salesforce global connected app.
Declare the AWS::AppFlow::ConnectorProfile object with the following JSON syntax in your CloudFormation template:
{
  "AWSTemplateFormatVersion":"2010-09-09",
  "Resources": {
    "MySalesforceConnection": {
      "Type" : "AWS::AppFlow::ConnectorProfile",
      "Properties": {
        "ConnectorProfileName": "MySalesforceConnection",
        "ConnectorType": "Salesforce",
        "ConnectionMode": "Public",
        "ConnectorProfileConfig": {
          "ConnectorProfileProperties": {
            "Salesforce": {
              "InstanceUrl": "https://<instance-name>.my.salesforce.com",
              "IsSandboxEnvironment": false
            }
          },
          "ConnectorProfileCredentials": {
            "Salesforce": {
              "AccessToken": "<access-token-value>",
              "RefreshToken": "<refresh-token-value>",
              "ConnectorOAuthRequest": {
                "AuthCode": "<auth-code-value>",
                "RedirectUri": "https://login.salesforce.com/"
              },
              "ClientCredentialsArn": "<secret-arn-value>"
            }
          }
        }
      }
    }
  }
}
An example of YAML syntax is as follows:
AWSTemplateFormatVersion: '2010-09-09'
Resources:
  MySalesforceConnection:
    Type: AWS::AppFlow::ConnectorProfile
    Properties:
      ConnectorProfileName: MySalesforceConnection
      ConnectorType: Salesforce
      ConnectionMode: Public
      ConnectorProfileConfig:
        ConnectorProfileProperties:
          Salesforce:
            InstanceUrl: https://<instance-name>.my.salesforce.com
            IsSandboxEnvironment: false
        ConnectorProfileCredentials:
          Salesforce:
            AccessToken: <access-token-value>
            RefreshToken: <refresh-token-value>
            ConnectorOAuthRequest:
              AuthCode: <auth-code-value>
              RedirectUri: https://login.salesforce.com/
            ClientCredentialsArn: <secret-arn-value></secret-arn-value>
The examples below show how to set up a new Amazon AppFlow connection to ServiceNow.
Establish a ServiceNow Connection- JSON
{
  "AWSTemplateFormatVersion":"2010-09-09",
  "Resources": {
    "MyServiceNowConnection": {
      "Type" : "AWS::AppFlow::ConnectorProfile",
      "Properties": {
        "ConnectorProfileName": "MyServiceNowConnection",
        "ConnectorType": "Servicenow",
        "ConnectionMode": "Public",
        "ConnectorProfileConfig": {
          "ConnectorProfileProperties": {
            "ServiceNow": {
              "InstanceUrl": "https://<instance-name>.service-now.com",
            }
          },
          "ConnectorProfileCredentials": {
            "ServiceNow": {
              "Username": "<username-value>",
              "Password": "<password-value>"
            }
          }
        }
      }
    }
  }
}
The YAML syntax for creating a new Amazon AppFlow connection to ServiceNow is shown below.
Create a ServiceNow Connection- YAML
AWSTemplateFormatVersion: '2010-09-09'
Resources:
  MyServiceNowConnection:
    Type: AWS::AppFlow::ConnectorProfile
    Properties:
      ConnectorProfileName: MyServiceNowConnection
      ConnectorType: Servicenow
      ConnectionMode: Public
      ConnectorProfileConfig:
        ConnectorProfileProperties:
          ServiceNow:
            InstanceUrl: https://<instance-name>.service-now.com
        ConnectorProfileCredentials:
          ServiceNow:
            Username: <username-value>
            Password: <password-value></password-value>
Using a previously constructed Salesforce connection and S3 bucket, the following code constructs a flow from Salesforce to S3, delivering data in CSV format with all Salesforce source fields mapped directly.
Create Salesforce to S3 Flow- JSON
{
  "AWSTemplateFormatVersion":"2010-09-09",
  "Resources": {
    "MySalesforceToS3Flow": {
      "Type" : "AWS::AppFlow::Flow",
      "Properties": {
        "FlowName": "MySalesforceToS3Flow",
        "TriggerConfig": {
          "TriggerType": "OnDemand"
        },
        "SourceFlowConfig": {
          "ConnectorType": "Salesforce",
          "ConnectorProfileName": "MySalesforceConnection",
          "SourceConnectorProperties": {
            "Salesforce": {
                "Object": "Account"
            }
          }
        },
        "DestinationFlowConfigList" : [{
          "ConnectorType": "S3",
          "DestinationConnectorProperties": {
            "S3": {
              "BucketName": "<s3-bucket-name>",
              "S3OutputFormatConfig": {
                "FileType": "CSV"
              }
            }
          }
        }],
        "Tasks": [
          {
            "TaskType": "Map_all",
            "SourceFields": [],
            "TaskProperties": [{
              "Key": "EXCLUDE_SOURCE_FIELDS_LIST",
              "Value": "[]"
            }],
            "ConnectorOperator": {
              "Salesforce": "NO_OP"
            }
          }
        ]
      }
    }
  }
}
Using a previously constructed Salesforce connection and S3 bucket, the following code constructs a flow from Salesforce to S3, delivering data in CSV format with all Salesforce source fields mapped directly.
Create Salesforce to S3 Flow- YAML
AWSTemplateFormatVersion: '2010-09-09'
Resources:
  MySalesforceToS3Flow:
    Type: AWS::AppFlow::Flow
    Properties:
      FlowName: MySalesforceToS3Flow
      TriggerConfig:
        TriggerType: OnDemand
      SourceFlowConfig:
        ConnectorType: Salesforce
        ConnectorProfileName: MySalesforceConnection
        SourceConnectorProperties:
          Salesforce:
            Object: Account
      DestinationFlowConfigList:
        - ConnectorType: S3
          DestinationConnectorProperties:
            S3:
              BucketName: <s3-bucket-name>
              S3OutputFormatConfig:
                FileType: CSV
      Tasks:
        - TaskType: Map_all
          SourceFields: []
          TaskProperties:
          - Key: EXCLUDE_SOURCE_FIELDS_LIST
            Value: '[]'
          ConnectorOperator:
            Salesforce: NO_OP
Source and Destination Applications Supported
Here is the list of source and destination applications which are supported in Amazon AppFlow which is mentioned below:

Amazon AppFlow Connections
You create connections between your source and destination applications to enable data flows in Amazon AppFlow. Connections maintain the configuration information and credentials required by Amazon AppFlow to transport data between applications on your behalf. User names, passwords, secret keys, and API access tokens are examples of these details. You can assign a connection to new or existing flows without having to manually enter the setup details again.
Work with your connections using the Amazon AppFlow GUI, AWS CLI, or the Amazon AppFlow API in the areas below. In the AWS CLI and Amazon AppFlow API, connections are referred to as connector profiles.
Amazon AppFlow console
Using the Amazon AppFlow console, complete the steps below to manage your connections.
-
Go to AppFlowConsole to access the Amazon AppFlow console.
- Select Connections from the navigation window.
- Choose the application that your connection accesses from the Connectors section of the Manage connections page. If your connection allows data to move to or from Amazon Redshift, for example, you should use Amazon Redshift.
- Following your connector selection, you can do one of the following:
- Create a connection by selecting Create connection and entering the required information. Each type of connector application has its own set of details. Find your application under Supported source and destination applications for application-specific instructions.
- Select a connection's name from a Connection name column to see its details.
- Select a connection and then choose Edit.
- Select the connection you want to destroy and click Delete
AWS CLI
Run commands with the AWS CLI to manage your connections in Amazon AppFlow.
To Create a Connection
- Run the command create-connector-profile. For the --connector-profile-config parameter, you supply configuration details and credentials in this command. Each sort of connector application has different requirements.
The example below builds a SAP OData connection and gives the setup details in a JSON file:
$ aws appflow create-connector-profile \
> --connector-profile-name sap-odata-connection \
> --connector-type SAPOData \
> --connection-mode Public \
> --connector-profile-config file://sap-odata-connector-profile-config.json
The sap-odata-connector-profile-config.json file contains the following configuration details:

{
  "connectorProfileProperties":
  {
    "SAPOData":
    {
      "applicationHostUrl": "https://example.connection.url",
      "applicationServicePath": "/sap/opu/odata/example/path;v=2",
      "portNumber": 443,
      "clientNumber": "100",
      "logonLanguage": "EN"
    }
  },
  "connectorProfileCredentials":
  {
    "SAPOData":
    {
      "basicAuthCredentials":
      {
        "username": "username",
        "password": "password"
      }
    }
  }
}
The command answer includes the new connection's Amazon Resource Name (ARN):
{
    "connectorProfileArn": "arn:aws:appflow:us-east-1:111122223333:connectorprofile/sap-odata-connection"
}
To view the details for all of your connections
- Run the command describe-connector-profiles:
$ aws appflow describe-connector-profiles
The JSON body of the command response contains details for each of your connections. The details for an SAP OData connection are shown in the example answer below:
{
    "connectorProfileDetails": [
        {
            "connectorProfileArn": "arn:aws:appflow:regionus-east-1:111122223333:connectorprofile/sap-odata-connection",
            "connectorProfileName": "sap-odata-connection",
            "connectorType": "SAPOData",
            "connectionMode": "Public",
            "credentialsArn": "arn:aws:secretsmanager:us-east-1:111122223333:secret:appflow!111122223333-sap-odata-connection",
            "connectorProfileProperties": {
                "SAPOData": {
                    "applicationHostUrl": "https://example.connection.url",
                    "applicationServicePath": "/sap/opu/odata/example/path;v=2",
                    "portNumber": 443,
                    "clientNumber": "100",
                    "logonLanguage": "EN"
                }
            },
            "createdAt": "2022-02-22T15:31:41.467000-08:00",
            "lastUpdatedAt": "2022-02-22T15:31:41.467000-08:00"
        }
    ]
}
To view the details for specific connections
- Use the --connector-profile-names or --connector-type options to filter the results of the describe-connector-profiles command. The details for a single connection are obtained in the following example:
$ aws appflow describe-connector-profiles --connector-profile-names sap-odata-connection
To edit a connection
- Run the command update-connector-profile. The new configuration details for the --connector-profile-config parameter are provided for this command. The revised configuration is provided in a JSON file as follows:
$ aws appflow update-connector-profile \
> --connector-profile-name sap-odata-connection \
> --connection-mode Public \
> --connector-profile-config file://sap-odata-connector-profile-config.json
To delete a connection
- Run the command delete-connector-profile.
$ aws appflow delete-connector-profile --connector-profile-name sap-odata-connection
Amazon AppFlow API
The Amazon AppFlow API provides the following methods for managing your connections:
- CreateConnectorProfile: Establishes a connection.
- DescribeConnectorProfiles: This command displays information about your connections.
- UpdateConnectorProfile: Changes the connection profile.
- DeleteConnectorProfile: Removes a connection from the system.
Amazon AppFlow Flows
A flow in Amazon AppFlow transports data from a source to a destination. Amazon AppFlow supports a wide range of AWS services and SaaS apps as sources or destinations.
Data from the source placed in the destination is determined by data mapping. Each source object's fields can be mapped to fields in the destination. Multiple fields in a source object can be concatenated to a single field in the destination. You can conceal the values of sensitive fields so that just an asterisk (*) appears in the destination field. Fields can also be truncated to a specific length.
A filter controls the data records that are sent to the destination. Amazon AppFlow transfers only the records that fulfil the filter criteria.
A flow's behaviour is determined by its trigger. The following flow trigger types are supported:
- Run-on Demand: Users can execute the flow manually whenever they want.
- Run-on Event: Amazon AppFlow executes the flow in response to a SaaS application's event.
- Run-on Schedule: Amazon AppFlow executes the flow regularly.
When you run a flow, Amazon AppFlow checks to see if the data is in the source, processes it according to the flow configuration, and sends the processed data to the destination.
To establish a flow
Follow the instructions in Amazon AppFlow: Getting Started.
To see flow specifics
-
Go to AppFlowConsole to access the Amazon AppFlow console.
- Select Flows from the navigation pane.
- In the Flow name column, type the name of the flow.
- See Flow specifics for information on the flow's source and destination.
- See Data field settings for details on how data is mapped between the source and destination.
- Choose Execution history to see details about the flow's runs.
To work with a flow
To work with a flow, we can perform all these operations which are mentioned below:
- Activate a flow
- Edit a flow
- Delete a flow
- Flow triggers
- Private flows
- Flow notifications
Amazon AppFlow Security
With availability in many Regions and built-in redundancy, Amazon AppFlow provides a safe environment for moving data bi-directionally between AWS services and software (SaaS) applications.
At AWS, cloud security is a principal focus. As an AWS customer, you have access to a data centre and network architecture designed to fulfil the needs of the most security-conscious businesses.
AWS and you both share responsibility for security. This is referred to as cloud security and cloud security under the shared responsibility model:
- Security of the Cloud: AWS is in charge of safeguarding the infrastructure that runs AWS services in the AWS Cloud. AWS also supplies you with services that are safe to utilise. As part of the AWS Compliance Programs, third-party auditors examine and certify the effectiveness of our security.
- Security in the Cloud: The AWS service you utilise determines your obligation. Other considerations, such as the sensitivity of your data, your company's requirements, and applicable laws and regulations, are also your responsibility.
Read about Batch Operating System here.
Frequently Asked Questions
What is Amazon AppFlow all about?
Amazon AppFlow is a fully managed integration solution that allows you to securely transmit data between SaaS apps like Salesforce, Marketo, Slack, and ServiceNow and AWS services such as Amazon S3 and Amazon Redshift in only a few clicks. You may perform data flows at nearly any scale and any frequency with AppFlow: on a schedule, in response to a business event, or on-demand.
Which AWS services does Amazon AppFlow support?
Amazon S3, Amazon RedShift, Amazon Connector Customer Profiles, Amazon Lookout for Metrics, and Amazon Honeycode have supported AWS services, and we're always adding more.
Is there a Service Level Agreement in place for AppFlow?
Yes, AWS will make commercially reasonable efforts to make AppFlow available with a Monthly Uptime Percentage of at least 99.9% for each AWS region during any monthly payment cycle.
What are the advantages of using AppFlow?
AppFlow saves you time and money by removing the need to design and maintain proprietary API connectors for AWS services to exchange data with SaaS apps. Most of the integrations that SaaS application administrators and business analysts require can be implemented rapidly without waiting months for IT to complete integration projects.
What are some flow examples that I can create with Amazon AppFlow?
AppFlow allows you the freedom to create your Flows. Here are some instances of flows:
- Create an Amazon S3 copy of a Salesforce object (such as an opportunity, case, or campaign).
- Send Zendesk case tickets to an Amazon Redshift table.
- Using transactional data from SAP S/4HANA ERP, hydrate an Amazon S3 data lake.
Conclusion
In this article, we have discussed Amazon AppFlow in detail. We have also discussed how it works and what Amazon AppFlow is. This article explains how to use Amazon AppFlow to apply the shared responsibility model. It explains how to set up Amazon AppFlow to achieve your security and compliance goals. Other AWS services that help you monitor and secure your Amazon AppFlow resources are also covered.
Refer to our guided paths on Coding Ninjas Studio to learn more about DSA, Competitive Programming, JavaScript, System Design, etc. Enroll in our courses and refer to the mock test and problems available; look at the Top 150 Interview Puzzles, interview experiences and interview bundle for placement preparations.
Do upvote our blog to help other ninjas grow.
Happy Coding!


 8+ registered

