Components of Amazon ECS
Cluster
A cluster of Amazon ECS services or tasks is a logical grouping. Combining Fargate and EC2 can create a Cluster. Amazon ECS automatically creates a default cluster for you when you first log in, but you can have multiple clusters in an account so that you can separate your resources.
Task Definition
A task definition is created in order to prepare your application for Amazon ECS. Task definitions are text files in JSON format that describe one or more containers, up to a maximum of ten, that make up the application.
Your application can be considered a blueprint. Each task definition specifies different parameters. A task definition parameter is a type of container to use, the type of launch to use, which ports your application should be using, as well as what data volumes should be used with the containers. Depending on which launch type you choose, different parameters are available for defining the task.
Task
Cluster tasks are instances of task definitions. The number of tasks that will run on your cluster can be specified after the task definition has been created in Amazon ECS.
The Fargate launch type isolates tasks so that no differences in underlying kernels, CPU resources, memory resources, or elastic network interface are shared between tasks.
You place tasks within your Amazon ECS cluster using the task scheduler. The task scheduler offers a number of options. A service can run and maintain multiple tasks at the same time, for instance.
Providing you with the ability to manage and execute any number of specified/desired tasks.
ECS service scheduler launches another task based on your task definition if any task fails or stops for any reason.
Container
Development can be performed at a high velocity with containers and scalability can be achieved quickly to meet the application's demands. In order to understand containers, you have to understand how they enable teams to move faster.
Fargate
It enables containers to run on Amazon ECS without the need to manage servers or clusters. To run containers, you do not have to provision, configure, and scale virtual machine clusters with AWS Fargate.
Choosing a server type, controlling cluster scalability, or optimizing cluster packing no longer need to be dealt with. You don't need to interact with servers or clusters using AWS Fargate. You can concentrate on creating and building your applications rather than managing the infrastructure on which they run with Fargate.
Amazon ECS use cases
Microservices - By enabling continuous integration and continuous deployment pipelines (CI/CD) and integrating natively with AWS, Amazon ECS aids microservices applications in operating.
Batch processing - You can run batch workloads on AWS Reserved Instances, Spot Instances, and On-Demand Instances with custom or managed schedulers.
Virtual machines - Create and operate Linux virtual machines (VMs) in the cloud using Amazon Elastic Compute Cloud (Amazon EC2) via its web service. These VMs are called instances. EC2 instances running on a host operating system can be configured by developers to ensure superior performance and portability.
Machine learning - Amazon ECS makes it easy to train and infer machine learning models. ML models can easily be created with loosely coupled, distributed services that can reside on a variety of platforms or close to the data that's being analyzed by the application.
Migrating apps to the cloud - The containerization and migration of legacy enterprise applications to Amazon ECS can be accomplished without requiring any code changes.
Setting up the Amazon ECS
This guide will help you launch your first ECS cluster in Amazon Web Services. Set up Amazon ECS by completing the following steps.
Step-1: Sign up for AWS
If you register for an Amazon account, all services, including Amazon EC2 and Amazon ECS, are automatically activated on your account, and you are only charged for the services you use. Continue to the next task if you already have an Amazon account. Create an Amazon account if you don't already have one.
Step-2: Create an IAM user
IAM users should be created, then added to IAM groups with administrative permissions, or granted administrative rights. By using the IAM user's credentials and a special URL, you can access Amazon. The IAM console allows you to create an IAM user if you haven't already created one.
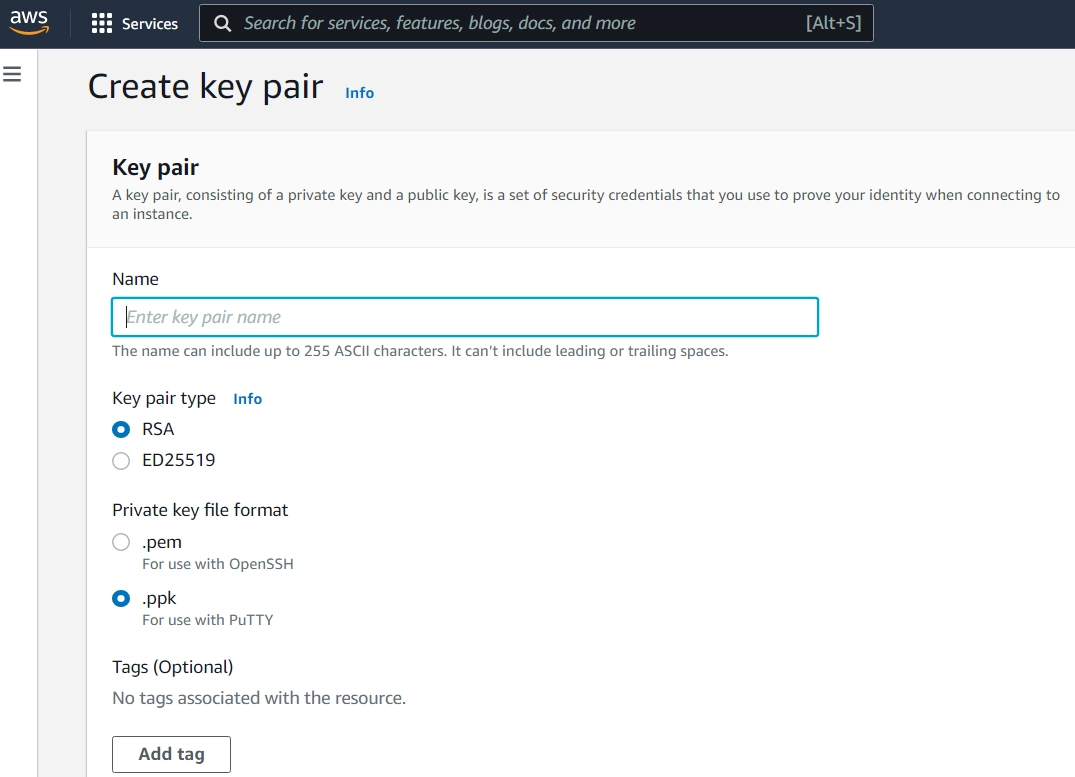
Step-3: Create a key pair
The EC2 launch type is the only way to use a key pair for Amazon ECS. An Amazon ECS container instance, for example, does not require a password for SSH access. Your instance is secured by a key pair. In your container instance, you specify the name of your key pair, then use SSH to log in using the private key. Using the Amazon EC2 console, you can create a key pair if you haven't already.
Step 4: Create a virtual private cloud
You can launch AWS resources in a virtual network you define by using Amazon Virtual Private Cloud (Amazon VPC). Container instances should be launched in a VPC.
This part can be skipped (if you have a default VPC) and moved to the next step, Creating a security group. You can create VPC if you do not want to use the default VPC in your account.
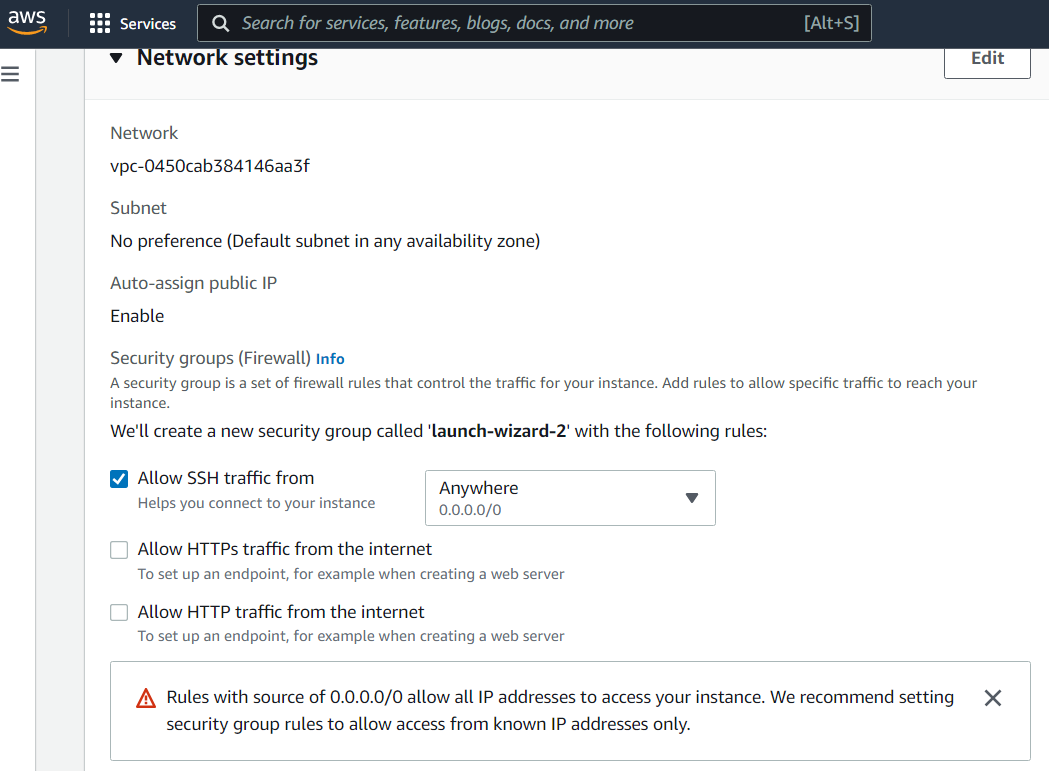
Step 5: Create a security group
Regardless of which container instance their security group is associated with, security groups act as firewalls, controlling both inbound and outbound traffic. Add rules to a security group to enable SSH connections from your IP address to your container instance. The rules can also allow HTTP and HTTPS traffic from anywhere.
Step:6: Install the AWS CLI
You can manage all operations manually with the Amazon Web Services Management Console, but you can automate common management tasks in Amazon ECS if you install the Amazon Command Line Interface (CLI) on your local desktop. The latest Amazon CLI version must be installed in order to use Amazon ECS with the Amazon CLI.
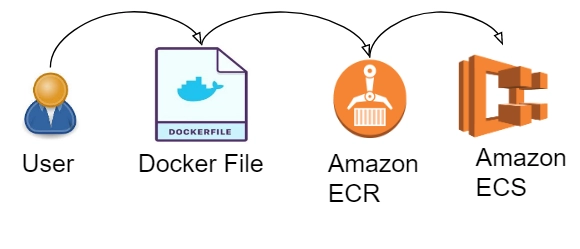
Creating a container image for use on Amazon ECS
Prerequisites:
- You need to install Docker
- AWS CLI must be installed and configured
- Be sure you know the basics of Docker and AWS commands. You should also be familiar with AWS EC2.
How to Create a Docker Image
Your project directory should contain a file named Dockerfile without any extension. The Dockerized app runs as a container when built as a Docker image.
touch Dockerfile
Docker image can be built using the docker build command. The command accepts many parameters. Here, we will use -t. With this, your image has a name tag, making it easy to remember.
docker build -t Coder
The command will execute steps in the same order as the Dockerfile at runtime. A successful build of <baseID> will be prompted in the terminal. You can access a Docker image by its baseID instead of its name tag.
The Docker app's Images section allows you to verify this. In the Containers/Apps section, you can also see the local container.
In the meantime, let's use our local Docker image.
docker run -t -i -p 80:80 Coder
Access the container's server through a browser. Use the docker-machine ip command instead of the machine-name argument to find the IP address of the VirtualBox VM that hosts Docker on a Windows or Mac computer.
docker-machine ip machine-name
Now you can see a web page having the statement “Hey Ninjas”.
How to Create a Repo in ECR
For storing your Coder image, then create an Amazon ECR.
aws ecr create-repository --repository-name new-repository --region US-east-1
Suppose you are unsure of the region, select US-east-1. Your repo would be created in the US EAST-1 region. Now in the terminal, it will prompt a JSON response.
Output:
{
    "repository": {
        "registryId": "aws_account_id",
        "repositoryName": "new-repository",
        "repositoryArn": "arn:aws:ecr:region:aws_account_id:repository/new-repository",
        "createdAt": 1505337806.0,
        "repositoryUri": "aws_account_id.dkr.ecr.region.amazonaws.com/new-repository"
    }
}
How to Tag a Local Docker Image
Docker images can be tagged with the ECR Repo using this command.
docker tag <source_image_tag> <target_ecr_repo_uri>
- Source image tag: The name given to the docker build command. You can follow along with username/image_name:tag.
-
target_ecr_repo_uri: ECR Repository URI.
Get the password for your AWS account using the aws ecr get-login-password command. Provide the registry URI to authenticate with.
aws ecr get-login-password | docker login --username AWS --password-stdin aws_account_id.dkr.ecr.region.amazonaws.com
How to Push the Docker Image into the ECR
Now that the docker image is created, we will push it to AWS ECR and finally deploy it to AWS ECS.
- Creating a repository using ECR
Create the repository by hitting Create repository. The following command is used to push the local Docker file to the remote ECR repository. This will take time, depending on how large the image is.
docker push <ecr-repo-uri>
Cleanup
Next, launch a task with your container image as part of an Amazon ECS task definition. Not to incur image storage charges, you can delete your Amazon ECR repository when you're done experimenting with it.
aws ecr delete-repository --repository-name new-repository --region region --force.
Read about Batch Operating System here.
Getting started with Amazon ECS using AWS Copilot
The command-line interface of AWS Copilot makes it easy to model, create, release, and manage production-ready containerized applications on Amazon ECS from a local development environment.
Prerequisites:
The following prerequisites must be met before you begin:
- Create an Amazon Web Services account.
- Docker, the Git, must be installed.
- AWS CLI must be installed and configured.
- To set up a default profile for managing your application and services, run aws configure.
-
Download and install the AWS Copilot CLI.
Step-1: Run aws configure to set up a default profile that the AWS Copilot CLI uses to manage your application and services.
aws configure
Step-2: Clone the demo app by writing the below command.
git clone https://github.com/aws-samples/amazon-ecs-cli-sample-app.git Ninja-app
Step 3: Set up your application.
1.From within the Ninja-app directory, run the init command.
copilot init
AWS Copilot helps you with the initial service and application setup with the next step. You are prompted to select an application name if you have already deployed an application using AWS Copilot.
2.Write the name of your application.
What would you like to name your application? [? for help]
=> Type Ninja and press Enter.
Step 4: Set up an ECS Service in your "Ninja" Application.
1.A service type must be selected. A small API is served by a simple Flask application.
Which service type best represents your service's architecture? [Use arrows to move, type to filter, ? for more help]
=> Consider opting for the Load Balanced Web Service.
2. Provide a name for your service.
What do you want to name this Load Balanced Web Service? [? for help]
=> Enter API for your service name.
3. Select the Dockerfile.
Which Dockerfile would you like to use for api? [Use arrows to move, type to filter, ? for more help]
4. Define the port number.
Which port do you want customer traffic sent to? [? for help]
=> Enter the port number 80 or select the default.
5. As the application resources are created, a log will appear.
Creating the infrastructure to manage services under the application demo.
6. Deploy a test environment after creating the application resources.
Would you like to deploy a test environment? [? for help] (y/N)
=> Then enter Y.
The deployment status will be displayed in a log.
Step 5: Verify if your application is running.
AWS Copilot applications are listed here.
copilot app ls
Display environment and service information for your application.
copilot app shows
Give a description of your environment.
copilot env ls
Display endpoints, capacity and related information about the service.
copilot svc show
Contains a list of all services within the application.
copilot svc ls
Display the logs for a deployed service.
copilot svc logs
Display the service status.
copilot svc status
List the available options and commands.
copilot --help
copilot init --help
Step 6: Build your own CI/CD pipeline
We provide instructions for setting up a CI/CD pipeline, as well as for automating a git workflow, in the ECS Workshop.
Step 7: Clean up
You can delete all the resources by running the below command.
copilot app delete
Getting started with Amazon ECS using the AWS CDK
You will learn to install a containerized Web server using the Amazon Elastic Container Service and AWS Cloud Development Kit (CDK). The AWS CDK is a fully-featured programming language that allows you to create AWS infrastructure using an Infrastructure as Code framework (IAC). Writing an application containing one or more stacks in one of the CDK's supported languages, converting it into a CloudFormation template, and deploying the resources to your AWS account, is how the CDK works.
npm install -g aws-cdk
Step-1: You need to set up your AWS CDK project.
Initiate your AWS CDK app by creating a directory.
mkdir ecs-cdk
cd ecs-cdk
cdk init --language java
It varies slightly depending on which programming language you use to import these libraries into your CDK application. Listed below is the CDK name for each of the supported programming languages. Here we have used Java, so we have:
software.amazon.awscdk.services.ecs
software.amazon.awscdk.services.ecs.patterns
Step-2: Defining a containerized Webserver on Fargate can be done using the AWS CDK.
Edit the src/main/java/com.myapp/EcsStack.java to read as follows.
package com.myapp;
import software.constructs.Construct;
import software.amazon.awscdk.Stack;
import software.amazon.awscdk.StackProps;
import software.amazon.awscdk.services.ecs.ContainerImage;
import software.amazon.awscdk.services.ecs.patterns.ApplicationLoadBalancedFargateService;
import software.amazon.awscdk.services.ecs.patterns.ApplicationLoadBalancedTaskImageOptions;
public class EcsStack extends Stack {
    public EcsStack(final Construct scope, final String id) {
        this(scope, id, null);
    }
    public EcsStack(final Construct scope, final String id, final StackProps props) {
        super(scope, id, props);
        ApplicationLoadBalancedFargateService.Builder.create(this, "MyWebServer")
         .taskImageOptions(ApplicationLoadBalancedTaskImageOptions.builder()
         .image(ContainerImage.fromRegistry("amazon/amazon-ecs-sample"))
         .build())
         .publicLoadBalancer(true)
         .build();
    }
}

You can also try this code with Online Java Compiler
Step-3: Test the Web server
Put the URL into your browser by copying and pasting it from the deployment output. A welcome message should appear.
Step-4: Clean up
You can now tear down the service using the CDK once you've finished with the Web server (it simply displays the Congratulations message). Execute the CDK destroy command in the app's main directory. In this way, unintentional charges will not be incurred.
Check this out Amazon Hirepro in detail.
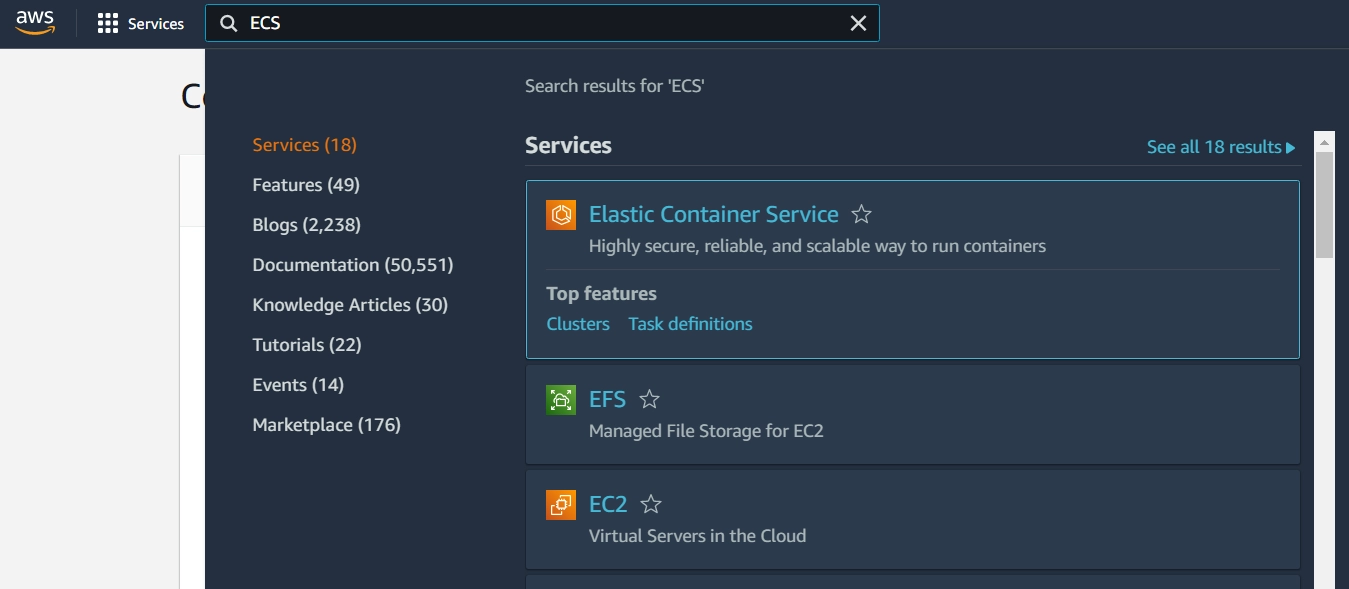
Getting started with Amazon ECS using the classic console
This guide explains how to use the classic AWS Management Console to run your containers from Amazon ECS and AWS Fargate using Amazon ECS.
First, create an AWS account. Set up and run our first ECS cluster. Then create a task definition that will tell us the size or number of the container.
Start with creating a cluster by clicking on the getting started button.
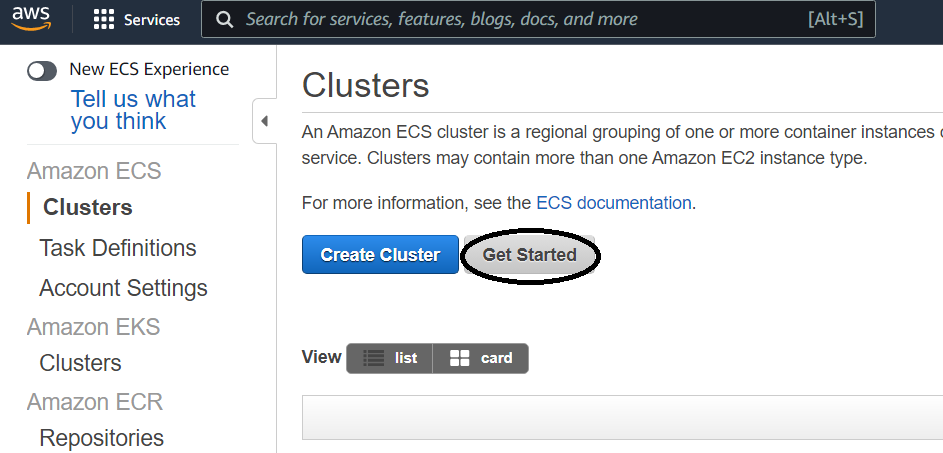
Here you can see the steps-wise method for creating the cluster, including four steps.

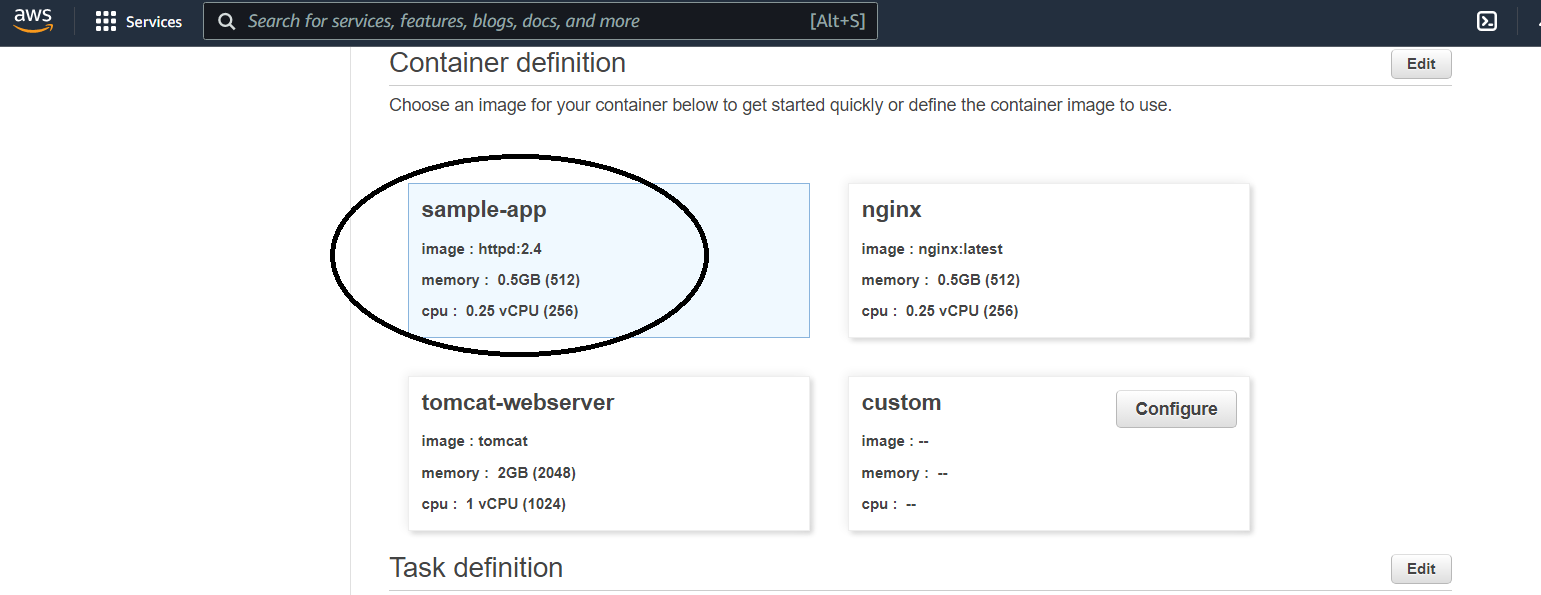
So first, we need to define the container definition as an image httpd:2.4. And we can also click on edit to make some changes to our selected image.
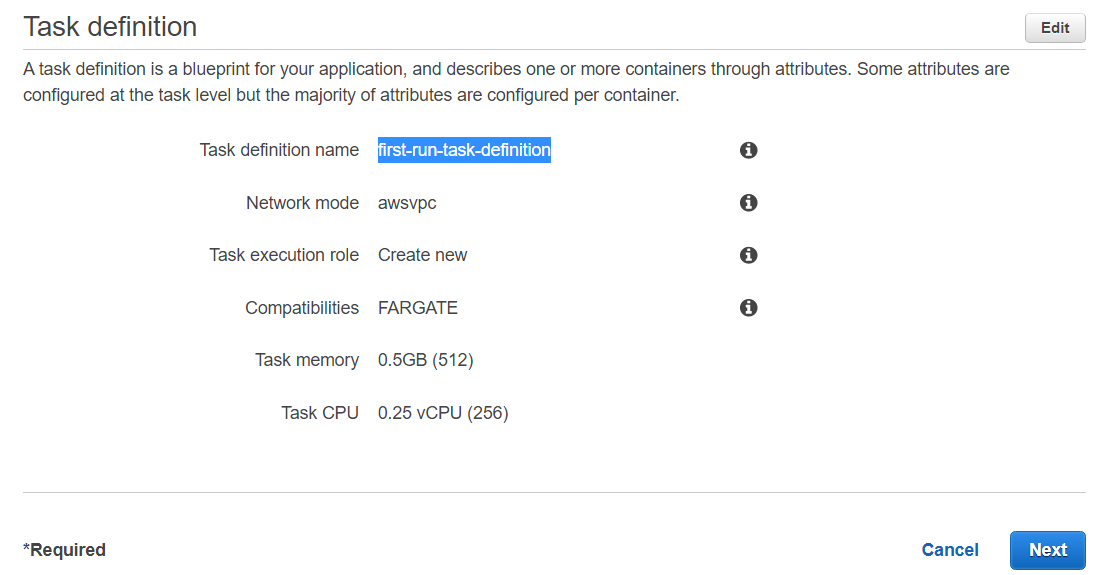
Now we have a task definition named first-run-task-definition. Then click on the Next button.
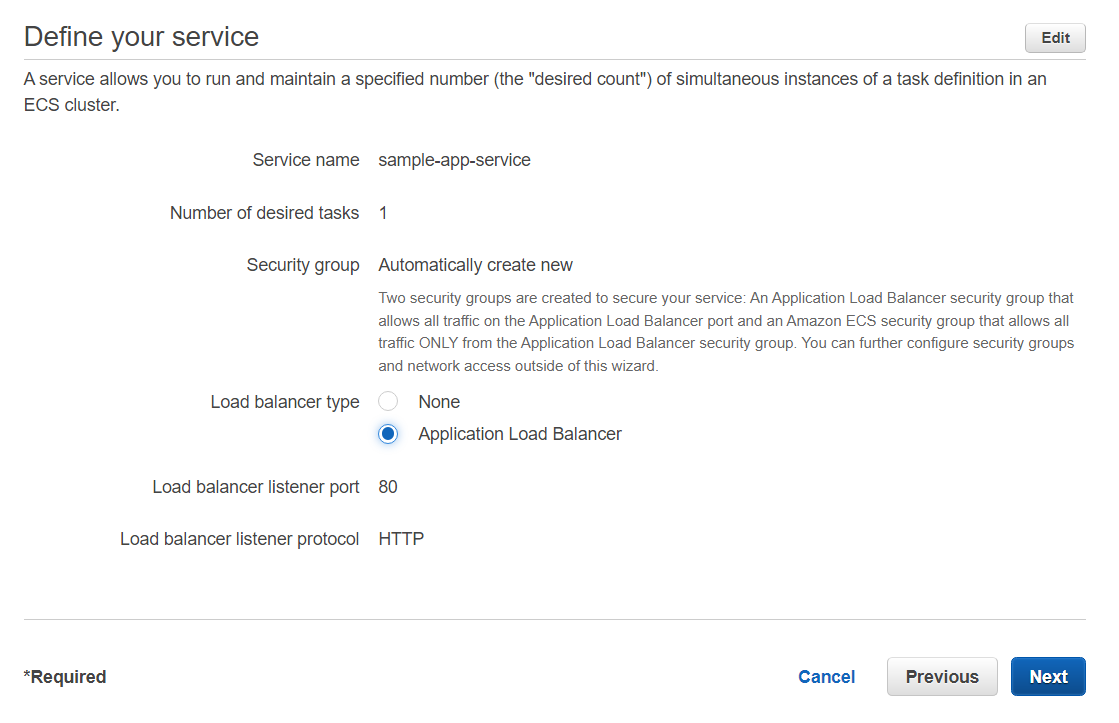
Now we have to define our service.
And finally, the last step is creating the cluster. Here we have named it as CodingNinjas.
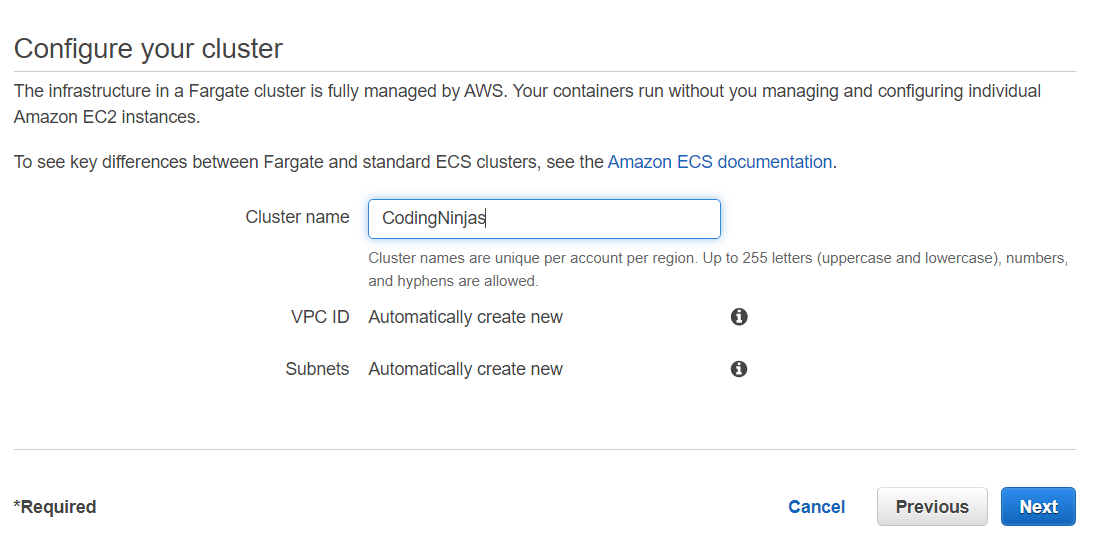
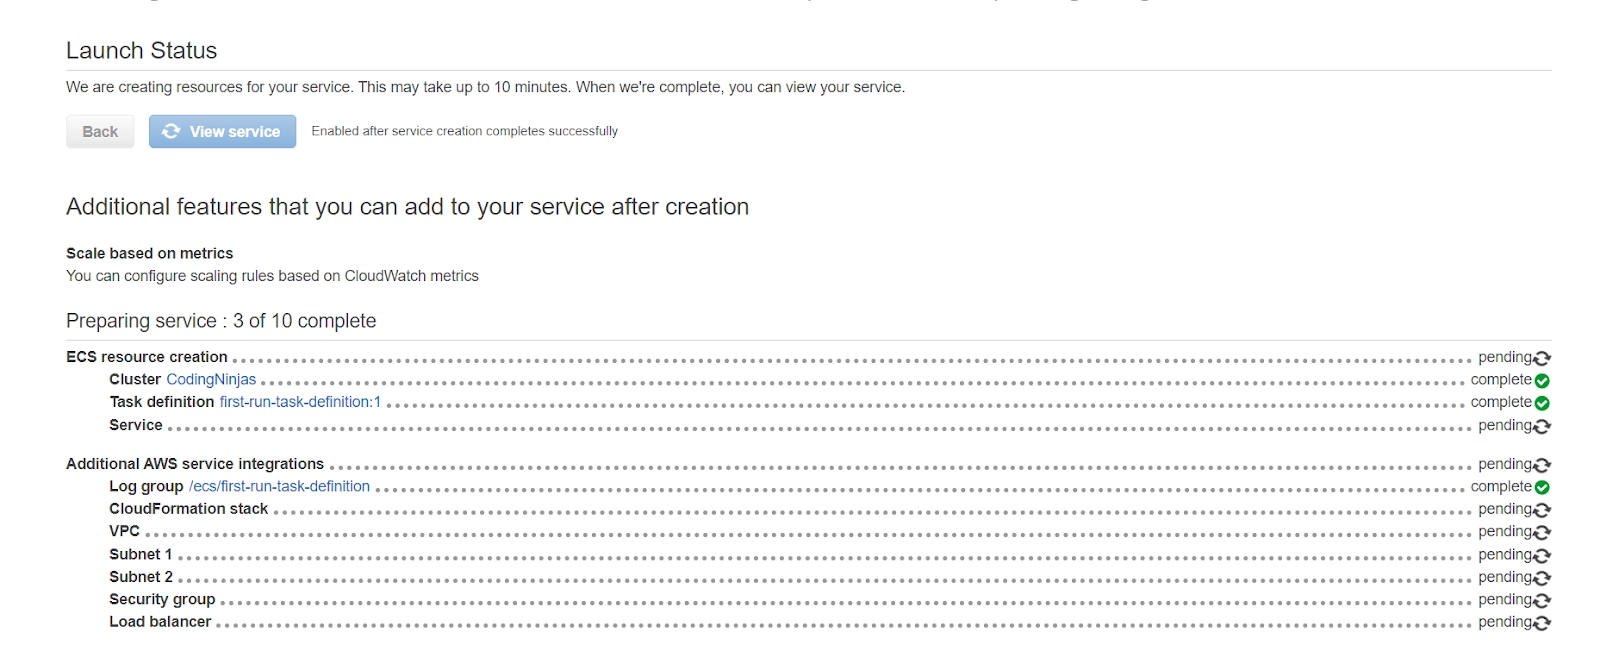
Now just click on create and wait for a few minutes while preparing the service.
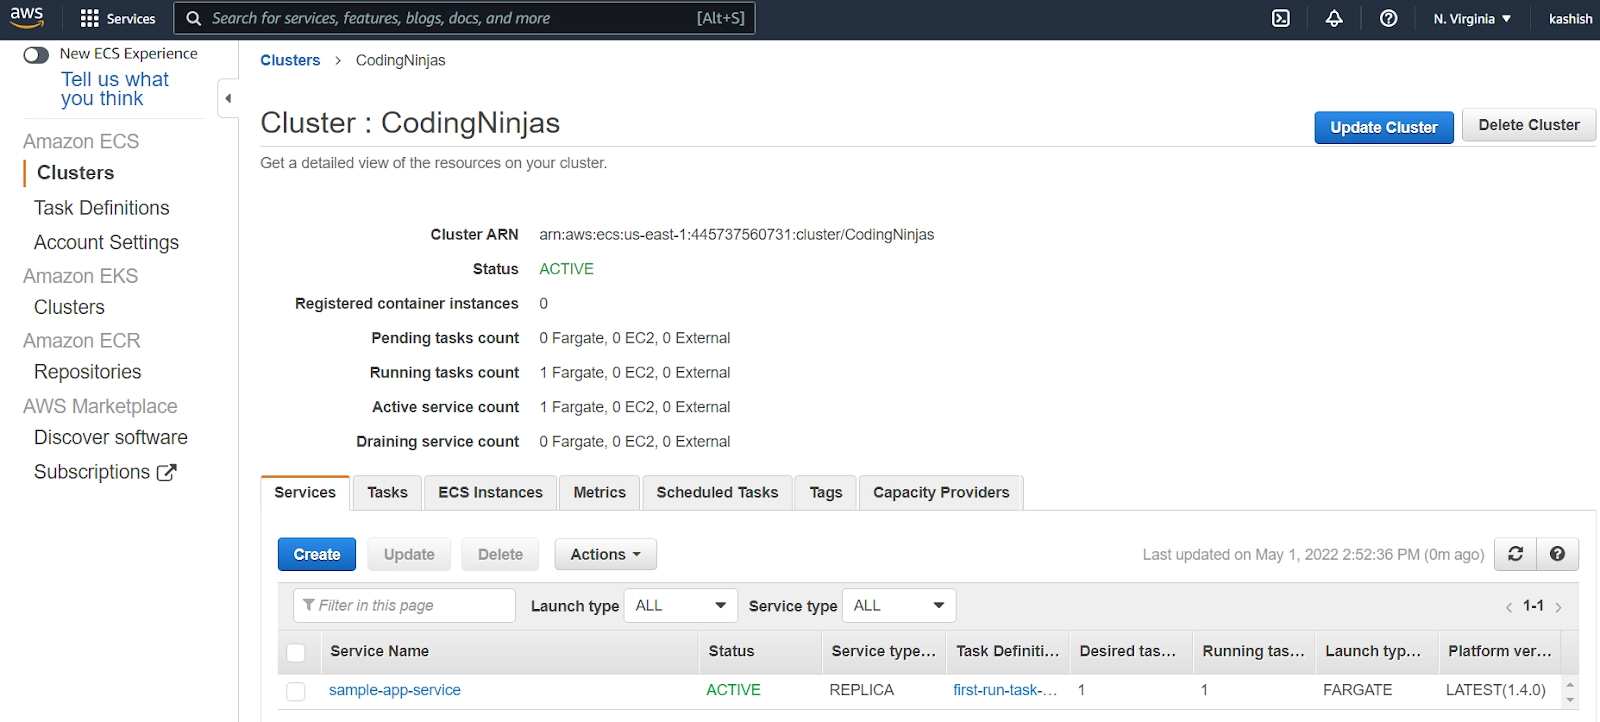
Here is our cluster.
Frequently Asked Questions
Write the benefits of Amazon ECS
Here are some benefits of Amazon ECS:
Cost Efficiency: Multiple containers can be scheduled on the same EC2 instance using Amazon ECS, resulting in greater density.
Compatibility Improvements: Debugging can be greatly accelerated by pulling instance images running in production and sharing them.
Security Enhancements: Users can limit Amazon AWS resources and S3 bucket access. The use of "IAM roles" with ECS provides an additional layer of security not available in traditional environments.
Mention some features of Amazon ECS
Here are some important Amazon ECS features:
AWS Fargate: With Amazon Fargate, teams can focus on development instead of worrying about EC2 instance types.
Native Docker Support: Docker runs and can be managed in Amazon ECS out-of-the-box. Programmatic Control: Developers can extend their services by integrating Amazon ECS with API calls.
Container Auto-Recovery: Amazon ECS ensures 99.99% uptime and availability for your application.
Scheduling: Teams can choose from a variety of scheduling strategies.
Why do we need Docker Containers?
→ It is open Source, lightweight, and secure.
→ Compared to VM, it is portable and efficient.
→ Create a creative environment for developers.
→ Inconsistencies in the environment are eliminated.
→ Rapid scaling capability.
→ Your application will be ready to market in less time.
Conclusion
In this blog, we have seen what Amazon Elastic Container Service is and a step-by-step installation along with different types of components of ECS.
We hope that this blog has helped you enhance your knowledge of ECS and if you would like to learn more, check out our articles on the link. Do upvote our blog to help other ninjas grow.
Check out the Amazon Interview Experience to learn about Amazon’s hiring process.
Refer to our Guided Path on Coding Ninjas Studio to upskill yourself in Data Structures and Algorithms, Competitive Programming, JavaScript, System Design, and many more! If you want to test your competency in coding, you may check out the mock test series and participate in the contests hosted on Coding Ninjas Studio! But if you have just started your learning process and are looking for questions asked by tech giants like Amazon, Microsoft, Uber, etc; you must look at the problems, interview experiences, and interview bundle for placement preparations.
Nevertheless, you may consider our paid courses to give your career an edge over others!
Do upvote our blogs if you find them helpful and engaging!
Happy Learning!


 9+ registered

