Using Broadcast Receivers in Android
Two main steps for using Broadcast Receivers in an android application are creating and registering the Broadcast Receiver. Let's discuss the syntax of both functions:
Creating the Broadcast Receiver
To create a new Broadcast Receiver, we need to create a new class that extends the Broadcast Receiver class. Then you can override the onReceive function of the class.
Syntax
class AirplaneModeReceiver : BroadcastReceiver() {
    override fun onReceive(context: Context, intent: Intent) {
        // body of the function
    }
}
Registering the Broadcast Receiver
To Register a Broadcast Receiver, a new Intent Filter is created with the specified intent.
Syntax
IntentFilter(Intent.ACTION_AIRPLANE_MODE_CHANGED).also {
    /*
    registering the receiver
    Here the parameter it that we are passing along with our AirplaneModeReceiver()
    is the intent filter that we just created.
    */
    registerReceiver(AirplaneModeReceiver(), it)
}
In the next section, we will discuss an example of how we can use Broadcast Receivers in our application.
Also see, android operating system
Example of Broadcast Receiver in Android
In this example, we will register a Broadcast Receiver for the intent Airplane Mode. The receiver will get notified when the Airplane Mode is enabled or disabled.
First, we need to create a new project in Android Studio by selecting the empty activity option. One of the most important files of any android project is its activity_main.xml file, which would look something like this:
activity_main.xml
<?xml version="1.0" encoding="utf-8"?>
<androidx.constraintlayout.widget.ConstraintLayout xmlns:android="http://schemas.android.com/apk/res/android"
    xmlns:app="http://schemas.android.com/apk/res-auto"
    xmlns:tools="http://schemas.android.com/tools"
    android:layout_width="match_parent"
    android:layout_height="match_parent"
    tools:context=".MainActivity">

    <TextView
        android:layout_width="wrap_content"
        android:layout_height="wrap_content"
        android:text="Hello World!"
        app:layout_constraintBottom_toBottomOf="parent"
        app:layout_constraintLeft_toLeftOf="parent"
        app:layout_constraintRight_toRightOf="parent"
        app:layout_constraintTop_toTopOf="parent" />

</androidx.constraintlayout.widget.ConstraintLayout>
In this example, we are working with Dynamic Broadcast Receivers; therefore, you don't need to change the activity_main.xml file.
Now we will create a new Kotlin file with the name "AirplaneModeReceiver" inside the same directory as your MainActivity.kt file. In this file, we will create the Broadcast Receiver.
AirplaneModeReceiver.kt
import android.content.Context
import android.content.BroadcastReceiver
import android.widget.Toast
import android.content.Intent

//  AirplaneModeReceiver class extending BroadcastReceiver class
class AirplaneModeReceiver : BroadcastReceiver() {

    // upon turning on/off the airplane mode, this function will be executed
    override fun onReceive(context: Context, intent: Intent) {

        val name_value = "state" // parameter value of name that we will pass to getBooleanExtra
        val default_value = false // default value for isEnabled
        // getting the state value
        val is_enabled = intent.getBooleanExtra(name_value, default_value) ?: return

        // value of the text that will be shown on the screen
        var show_text = "Airplane Mode is Off"

        // check if airplane mode is on or not
        if (is_enabled) {
            // change the value of show_text if the mode is enabled.
            show_text = "Airplane Mode is On"
        }

        // duration specifies the amount of time that the text will remain on the screen for
        val duration = Toast.LENGTH_LONG
        Toast.makeText(context, show_text, duration).show()
    }
}
Now we will go to the MainActivity.kt file, where we would write the code for registering our Broadcast Receivers.
MainActivity.kt
import android.content.Intent
import androidx.appcompat.app.AppCompatActivity
import android.content.IntentFilter
import android.os.Bundle

// Main Activity class extending AppCompatActivity
class MainActivity : AppCompatActivity() {

    // registering the receiver in mainActivity
    override fun onCreate(savedInstanceState: Bundle?) {
        super.onCreate(savedInstanceState)
        setContentView(R.layout.activity_main)

        // Creating an Intent Filter for Airplane Mode.
        IntentFilter(Intent.ACTION_AIRPLANE_MODE_CHANGED).also {
            /*
            registering the receiver
            Here the parameter it that we are passing along with our AirplaneModeReceiver()
            is the intent filter that we just created.
            */
            registerReceiver(AirplaneModeReceiver(), it)
        }
    }
}
Output
When the airplane mode is enabled, a text saying "Airplane Mode is On" is shown on the screen, which looks like this:

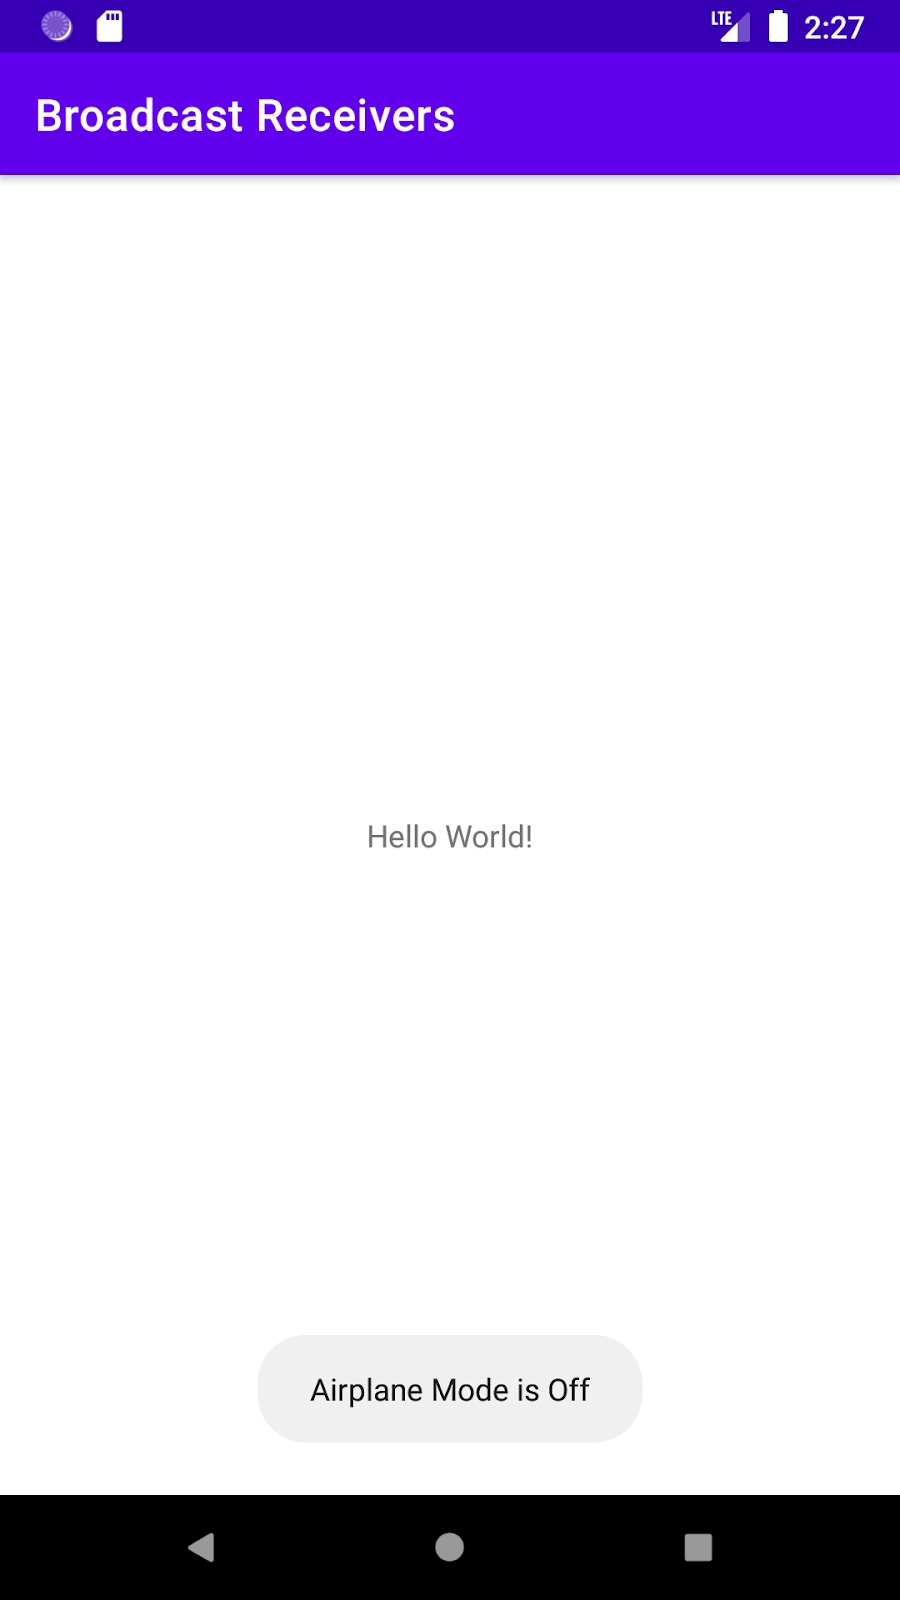
Upon turning off the airplane mode, a text saying "Airplane Mode is Off" is shown on the screen, which looks like this:
Frequently Asked Questions
What is the use of an Intent?
An Intent is a messaging object that we can use to request a specific action from another app component. We can transfer data from one activity to another using Intent.
What kind of information does the AndroidManifest.xml file store?
The AndroidManifest.xml file contains critical information about the Android app such as - package name, activity names, main activity(the app's entry point), Android version support, permissions, etc.
Can we restrict broadcast to only the current app?
Yes, broadcasts can be restricted to the current application by defining them as local broadcasts.
Check this out : usb debugging
Key Takeaways
Cheers if you reached here!!!
In this blog, we learned about Broadcast Receivers in Android. We discussed how Broadcast Receivers could be created and registered in an android application. After reading this blog, I believe you will be able to work with Android Broadcast Receivers smoothly.
In this article, we have used Intent and Intent filters. To learn more about them, you can check out our other article on the topic of Android Intents. And to learn in-depth about android development, check out our Android Development course on the Coding Ninjas website.


 8+ registered

