Working of Build Process
The build procedure is depicted in the diagram below:
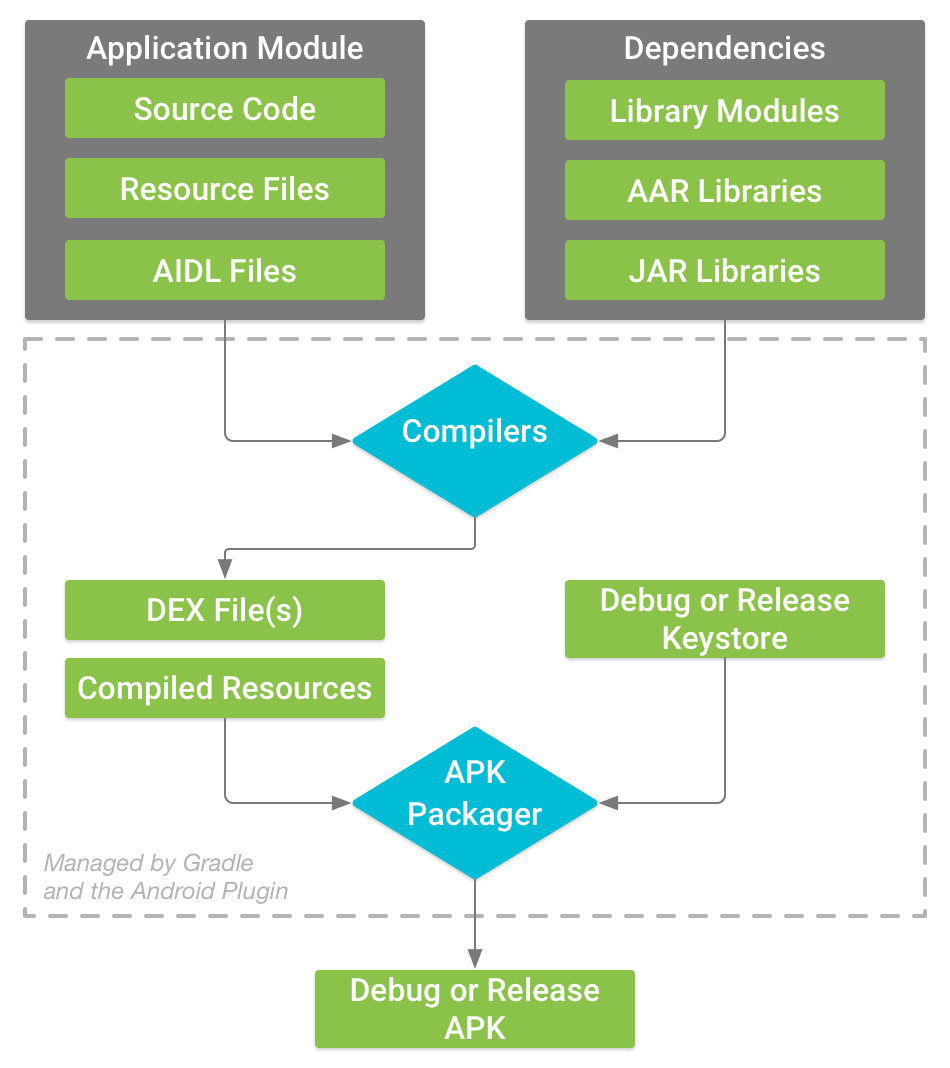
Source: Developer Android
First, The compiler converts the source code, resources, external libraries, JAR files, and AndroidManifest.xml (which provides meta-data about the app) into .dex (Dalvik Executable files) files, which include bytecode, during the build process.
To execute your app, you'll need to use that bytecode, which is supported by all Android devices. The .dex files and all other resources are then combined into a single apk file by APK Manager. APK Packager uses a debug or release Keystore to sign, debug or release apks. Debug apk is mainly used for testing purposes. To put it another way, it is only utilized during the development stage. When your app has all of the features you want, and you're ready to share it with the world, you'll need a Release apk signed with a release Keystore.
Let's look at the Gradle files, with an example, where we create a build gradle check app in our android studio.
Example
Open Android Studio, write your app name and hit the Finish button.

After this, a pop-up of gradle build syncing must have come. Let us see which grade files this syncing added to our project.
setting.gradle
setting.gradle(build gradle check) includes the following set of codes.
Code:
pluginManagement {
    repositories {
        gradlePluginPortal()
        google()
        mavenCentral()
    }
}
dependencyResolutionManagement {
    repositoriesMode.set(RepositoriesMode.FAIL_ON_PROJECT_REPOS)
    repositories {
        google()
        mavenCentral()
    }
}
rootProject.name = "build gradle check"
include ':app'
All of the modules used in your project are specified in the setting.gradle file (Gradle setting).
build.gradle (project level)
build.gradle(build gradle check) includes the following set of codes.
Code:
// Top-level build file where you can add configuration options common to all sub-projects/modules.
plugins {
    id 'com.android.application' version '7.1.0' apply false
    id 'com.android.library' version '7.1.0' apply false
}
task clean(type: Delete) {
    delete rootProject.buildDir
}
The build configurations at the project level are defined by the Top-level (module) build.gradle file. The configurations in this project-level build file are applied to all of the modules in the android application project.
build.gradle (application level)
build.gradle(:app) includes the following set of codes.
Code:
plugins {
    id 'com.android.application'
}

android {
    compileSdk 31

    defaultConfig {
        applicationId "com.akshitpant.buildgradlecheck"
        minSdk 23
        targetSdk 31
        versionCode 1
        versionName "1.0"
        testInstrumentationRunner "androidx.test.runner.AndroidJUnitRunner"
    }

    buildTypes {
        release {
            minifyEnabled false
            proguardFiles getDefaultProguardFile('proguard-android-optimize.txt'), 'proguard-rules.pro'
        }
    }
    compileOptions {
        sourceCompatibility JavaVersion.VERSION_1_8
        targetCompatibility JavaVersion.VERSION_1_8
    }
}

dependencies {
    implementation 'androidx.appcompat:appcompat:1.4.1'
    implementation 'com.google.android.material:material:1.5.0'
    implementation 'androidx.constraintlayout:constraintlayout:2.1.3'
    testImplementation 'junit:junit:4.13.2'
    androidTestImplementation 'androidx.test.ext:junit:1.1.3'
    androidTestImplementation 'androidx.test.espresso:espresso-core:3.4.0'
}
Each module of the android project contains a build.gradle file at the application level. This file contains the applicationID of your package, the version name (apk version), the version code, as well as the minimum and target SDK for a specific application module. External libraries (not jar files) must be mentioned in the app level Gradle file for them to be included in your project as application dependencies.
Gradle System And Command Line
We can also use a command-line tool to start your Gradle system. It's done with the following commands:
- To build project: Use ./gradlew build
- To build project complete from scratch: Use ./gradlew clean build
- To run the test: Use ./gradlew clean build
- To see all available tasks: Use ./gradlew wrapper
FAQs
-
Is is mandatory foe user to use Gradle settings?
The existence of the settings is required by the framework. In a multi-project build, Gradle is needed, whereas, in a single-project build, it is not(optional).
-
Is the Maven repository used by Gradle?
No, For a new dependency, Gradle does not use the Maven Local Repository.
-
What is the difference between applicationId, minSdkVersion, and targetSdkVersion?
applicationId is a must to identify unique id at the time of the app's release, minSdkVersion specifies the minimal API level necessary to run the application, and targetSdkVersion determines the API level used for testing the app.
Key Takeaways
In this article, we learned about the Gradle system, its syncing, and it's working. We also infer from this article how Gradle is important for running and making apks.
However, learning never stops, and there is more to learn. So head over to our Android Development Course on the Coding Ninjas Website to dive deep into Android Development and build future applications.
We hope this article has helped you enhance your knowledge of the Android Gradle system. If you want to learn more, check out our Android UI and Competitive Programming articles. Do upvote this article to help other ninjas grow.


 8+ registered

