Coding the Hello World App
We successfully set up our project configuration in the last section and added the boilerplate code to our app. This section will go over the essential components of our Hello World application.
The Default Main Activity
The first screen that appears when you run your app is the main activity. Each activity represents a user interface panel in our Android app. There is an XML layout file and Java/Kotlin implementation file corresponding to each activity in our application.
Refer to the blog Android Activity and Types on our Coding Ninjas Website to learn more about Android activities.
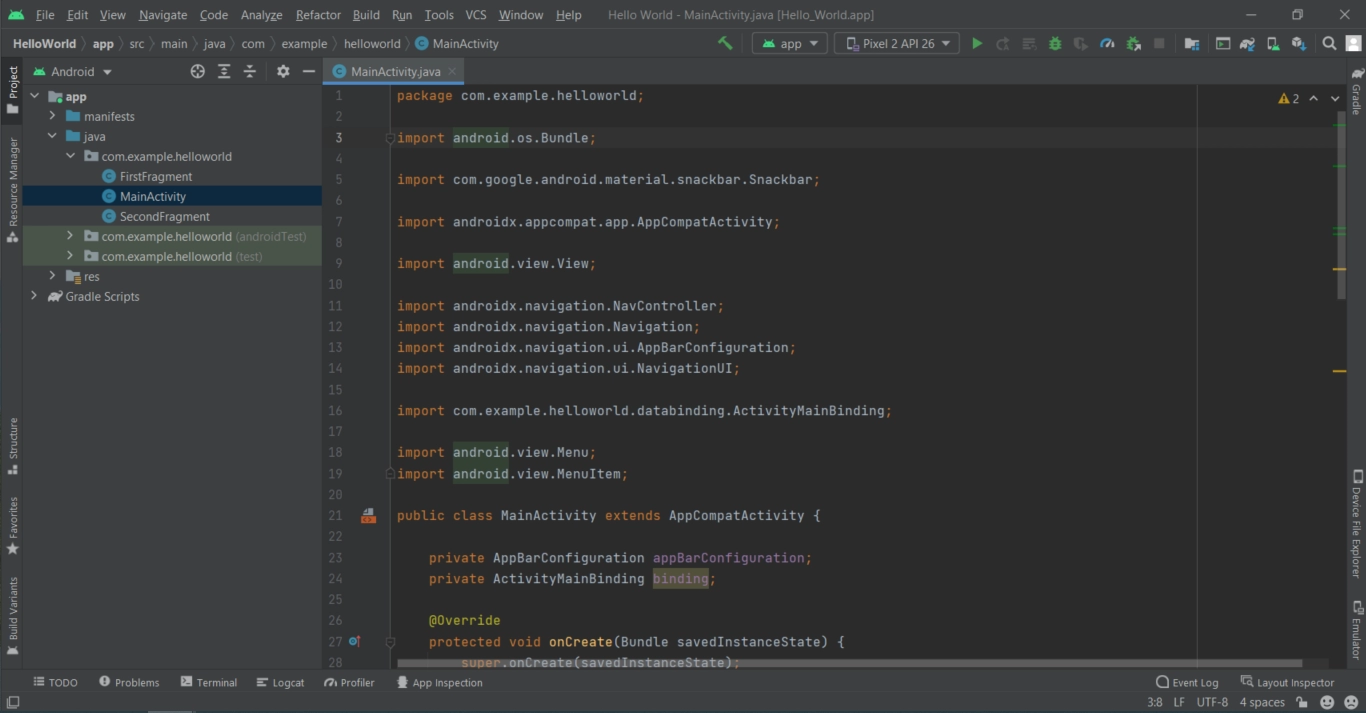
The Default Main Activity Java Code (MainActivity.java)
A lot of boilerplate code will be generated by Android Studio. Do not get scared by seeing that code. The MainActivity.java file can be found under the directory app/java/com.example.helloworld. If you are following this blog and selected the same configurations as specified in the previous section, you will also see two more files other than the MainActivity.java file. They are namely FirstFragment.java and SecondFragment.java. We don’t need to do much in any of these files to create our Hello World application.
The following is the code of the MainActivity.java file.
Code:
package com.example.helloworld;

import android.os.Bundle;

import com.google.android.material.snackbar.Snackbar;

import androidx.appcompat.app.AppCompatActivity;

import android.view.View;

import androidx.navigation.NavController;
import androidx.navigation.Navigation;
import androidx.navigation.ui.AppBarConfiguration;
import androidx.navigation.ui.NavigationUI;

import com.example.helloworld.databinding.ActivityMainBinding;

import android.view.Menu;
import android.view.MenuItem;

public class MainActivity extends AppCompatActivity {

    private AppBarConfiguration appBarConfiguration;
    private ActivityMainBinding binding;

    @Override
    protected void onCreate(Bundle savedInstanceState) {
        super.onCreate(savedInstanceState);

        binding = ActivityMainBinding.inflate(getLayoutInflater());
        setContentView(binding.getRoot());

        setSupportActionBar(binding.toolbar);

        NavController navController = Navigation.findNavController(this, R.id.nav_host_fragment_content_main);
        appBarConfiguration = new AppBarConfiguration.Builder(navController.getGraph()).build();
        NavigationUI.setupActionBarWithNavController(this, navController, appBarConfiguration);

        binding.fab.setOnClickListener(new View.OnClickListener() {
            @Override
            public void onClick(View view) {
                Snackbar.make(view, "Replace with your own action", Snackbar.LENGTH_LONG)
                        .setAction("Action", null).show();
            }
        });
    }

    @Override
    public boolean onCreateOptionsMenu(Menu menu) {
        // Inflate the menu; this adds items to the action bar if it is present.
        getMenuInflater().inflate(R.menu.menu_main, menu);
        return true;
    }

    @Override
    public boolean onOptionsItemSelected(MenuItem item) {
        // Handle action bar item clicks here. The action bar will
        // automatically handle clicks on the Home/Up button, so long
        // as you specify a parent activity in AndroidManifest.xml.
        int id = item.getItemId();

        //noinspection SimplifiableIfStatement
        if (id == R.id.action_settings) {
            return true;
        }

        return super.onOptionsItemSelected(item);
    }

    @Override
    public boolean onSupportNavigateUp() {
        NavController navController = Navigation.findNavController(this, R.id.nav_host_fragment_content_main);
        return NavigationUI.navigateUp(navController, appBarConfiguration)
                || super.onSupportNavigateUp();
    }
}
The most crucial method in this file is the onCreate method which is called when an activity is created. One can also notice that we are overriding this method as we extend this method from the AppCompatActivity class.
The Default Layout XML File (activity_main.xml)
The layouts of our application are defined in the XML files. These files are present in the directory app/res/layout. The name of the layout XML file represents the task that the file in question is performing. If you selected basic activity as the activity type in the previous section, you will also see three more files other than the activity_main.xml file. They are namely content_main.xml, fragment_first.xml and fragment_second.xml. The following is the code of the activity_main.xml file.
Code:
<?xml version="1.0" encoding="utf-8"?>
<androidx.coordinatorlayout.widget.CoordinatorLayout xmlns:android="http://schemas.android.com/apk/res/android"
    xmlns:app="http://schemas.android.com/apk/res-auto"
    xmlns:tools="http://schemas.android.com/tools"
    android:layout_width="match_parent"
    android:layout_height="match_parent"
    tools:context=".MainActivity">

    <com.google.android.material.appbar.AppBarLayout
        android:layout_width="match_parent"
        android:layout_height="wrap_content"
        android:theme="@style/Theme.HelloWorld.AppBarOverlay">

        <androidx.appcompat.widget.Toolbar
            android:id="@+id/toolbar"
            android:layout_width="match_parent"
            android:layout_height="?attr/actionBarSize"
            android:background="?attr/colorPrimary"
            app:popupTheme="@style/Theme.HelloWorld.PopupOverlay" />

    </com.google.android.material.appbar.AppBarLayout>

    <include layout="@layout/content_main" />

    <com.google.android.material.floatingactionbutton.FloatingActionButton
        android:id="@+id/fab"
        android:layout_width="wrap_content"
        android:layout_height="wrap_content"
        android:layout_gravity="bottom|end"
        android:layout_marginEnd="@dimen/fab_margin"
        android:layout_marginBottom="16dp"
        app:srcCompat="@android:drawable/ic_dialog_email" />

</androidx.coordinatorlayout.widget.CoordinatorLayout>
Note: The @string in the XML files refer to the strings.xml file in the directory app/res/values. We will study more about the strings.xml in the later sections of this blog.
Android Manifest File (AndroidManifest.xml)
In most cases, our application will have numerous activities, which must be described in the AndroidManifest.xml file. The MAIN action and LAUNCHER category elements in intent filters (<intent-filter>) must be used in our manifest file to specify the main activity of our app. Our app icon will not appear on the home screen's list of apps if we do not provide the MAIN action or LAUNCHER category for the main activity.
The default code for the AndroidManifest.xml file generated by our Hello World app is shown below.
Code:
<?xml version="1.0" encoding="utf-8"?>
<manifest xmlns:android="http://schemas.android.com/apk/res/android"
    package="com.example.helloworld">

    <application
        android:allowBackup="true"
        android:icon="@mipmap/ic_launcher"
        android:label="@string/app_name"
        android:roundIcon="@mipmap/ic_launcher_round"
        android:supportsRtl="true"
        android:theme="@style/Theme.HelloWorld">
        <activity
            android:name=".MainActivity"
            android:exported="true"
            android:label="@string/app_name"
            android:theme="@style/Theme.HelloWorld.NoActionBar">
            <intent-filter>
                <action android:name="android.intent.action.MAIN" />

                <category android:name="android.intent.category.LAUNCHER" />
            </intent-filter>
        </activity>
    </application>

</manifest>
The Strings File
The strings.xml file, which is present in the directory app/res/values, includes all of the text that your app utilises. All important strings like default text and names of buttons are stored in this file. The following code is present in the strings.xml file created using the project configurations specified in the previous section.
Code:
<resources>
    <string name="app_name">Hello World</string>
    <string name="action_settings">Settings</string>
    <!-- Strings used for fragments for navigation -->
    <string name="first_fragment_label">First Fragment</string>
    <string name="second_fragment_label">Second Fragment</string>
    <string name="next">Next</string>
    <string name="previous">Previous</string>

    <string name="hello_first_fragment">Hello first fragment</string>
    <string name="hello_second_fragment">Hello second fragment. Arg: %1$s</string>
</resources>
To create your application into Hello World Application, just change the following line in this file.
<string name="hello_first_fragment">Hello first fragment</string>

// change the above line to the following line

<string name="hello_first_fragment">Hello World !!!</string>
If you have successfully reached here following all the instructions, you have created your Hello World application. In the next step, we will see how to run this application.
Running the Application
To run your android application, you need to first create an AVD (Android Virtual Device). In this blog, I have selected Pixel 2 as the AVD. You may choose the AVD of your choice. After that, simply press the run app button at the top right corner of your Android Studio window, as shown in the image below.

The following is the output that you will see after running your application.

FAQs
-
Are XML files sensitive to indentation?
No, XML files are not sensitive to indentation.
-
Which is the latest android version?
The latest Android version is Android 12 and was released in Oct 2021.
-
What is the hardware profile of AVD?
The hardware profile describes a device's attributes as it leaves the factory. Certain hardware profiles, such as Pixel devices, are preloaded in the Device Manager, and you can define or edit them as needed.
Key Takeaways
Cheers if you reached here!! This blog aimed to introduce you to the Android framework and create your first Hello World Application. To read more about Android resources and building blocks, refer to this blog on the Coding Ninjas website.
Yet there is never an end to the learning process, so check out our Android Development Course on the Coding Ninjas Website to learn everything you need to know about Android development and how to design the applications of future. Until then, good luck!!


 8+ registered

