Intent Use Case
An Intent is a message object that can be used to request a specific action from another app component. Although intents help members communicate in a variety of ways, there are three primary use cases:
-
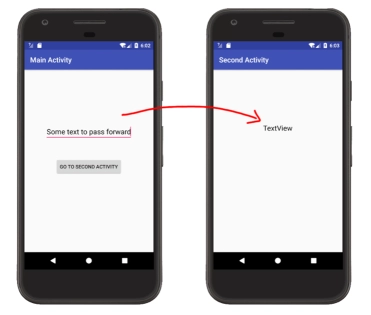
Starting an activity: An Activity in an app represents a single screen. By supplying an Intent to startActivity, you can create a new instance of an Activity(). The Intent explains the activity that is about to begin and contains any essential data.
If you want to be notified when the activity is finished, use the startActivityForResult() method. In your activity's onActivityResult() function, the result is received as a distinct Intent object. See the Activities article for additional details.
-
Starting a service: It is a component that runs in the background and does not have a user interface. You can use JobScheduler to create a service on Android 5.0 (API level 21) and later.
You can launch a service in versions before Android 5.0 (API level 21) by utilizing methods from the Service class. By supplying an Intent to startService, you can start a service to execute a one-time operation (such as downloading a file). The Intent explains the service to be launched and contains any required data.
If the service has a client-server interface, you can bind to it from another component by sending an Intent to bindService(). See the Services article for additional details.
-
Delivering a broadcast: It is a message that any app can receive. The system sends out numerous broadcasts in response to system events, such as when the system boots up or charges the device. By supplying an Intent to sendBroadcast() or sendOrderedBroadcast(), you can send a broadcast to other apps. For more information, check out this article.
Also see, android operating system
Intent Filters
In the app's manifest file, there is an expression called Intent Filter that specifies the type of intents that the component should receive. If we establish an Intent Filter for an activity, other apps may start our activity by sending a specific sort of Intent; otherwise, the activity may only be started by an explicit intent.
In general, everything we provide in the manifest file for Intent Filters <intent-filter> can be nested within the corresponding app components. We can use these three to describe the type of Intent to accept.
- <action> It specifies the name of an intended action to be accepted, which must be a literal string value of an action rather than a class constant.
- <category> It specifies the name of an approved intent category, which must be the literal string value of an action rather than the class constant.
- <data> It specifies the sort of data that will be accepted, and we can describe various features of the data URI (scheme, host, port, path) and MIME type by using one or more attributes.
Intent Filter in Manifest File
The code snippet below defines an activity with <intent-filter> in the AndroidManifest.xml.
Code:
<activity
            android:name=".MainActivity"
            android:exported="true">
            <intent-filter>
                <action android:name="android.intent.action.MAIN" />
                <category android:name="android.intent.category.LAUNCHER" />
                <data android:mimeType="text/plain"/>
            </intent-filter>
        </activity>
We can build a filter with several instances of <action>, <category>, or <data> components, and we must ensure that the element can handle all possible filter element combinations.
Multiple Intent Filters in Manifest File
If we want to handle numerous Intents with different actions, categories, and data combinations, we must design several intent filters.
The code snippet below defines multiple Intent filters in the android manifest file to handle various Intents.
Code:
<activity
            android:name=".ResultActivity"
            android:exported="false">
            <intent-filter>
                <action android:name="android.intent.action.SEND" />
                <category android:name="android.intent.category.DEFAULT" />
                <data android:mimeType="text/plain" />
            </intent-filter>
        </activity>

        <activity
            android:name=".MainActivity"
            android:exported="true">
            <intent-filter>
                <action android:name="android.intent.action.MAIN" />

                <category android:name="android.intent.category.LAUNCHER" />

                <data android:mimeType="text/plain" />
            </intent-filter>
        </activity>
Because we defined an activity utilizing MAIN action and LAUNCHER category characteristics in intent filters <intent-filter>, as shown in the above code snippet, the activity MainActivity will serve as the app's entrance point.
- MAIN - It denotes the app's main entry point, which means it initiates the activity defined by the MAIN action when the user runs the app with a launcher icon for the first time.
- LAUNCHER - This signifies that this activity icon should be included in the list of apps on the home screen. If the <activity> element does not have an icon, the system will utilize the icon from the <application> element.
To have the activity appear in the app launcher, these two elements: MAIN and LAUNCHER, must be coupled together.
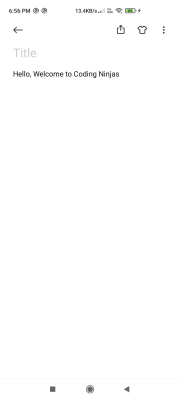
The second activity, ResultActivity, is designed to assist us in sharing the material. The user can navigate to this activity from MainActivity or enter immediately from another app using Implicit Intent that matches one of the two activity filters.
Put this code into your activity_main.xml file.
Code:
<?xml version="1.0" encoding="utf-8"?>
<LinearLayout xmlns:android="http://schemas.android.com/apk/res/android"
    android:layout_width="match_parent"
    android:layout_height="match_parent"
    android:orientation="vertical">

    <Button
        android:id="@+id/sendMessage"
        android:layout_width="wrap_content"
        android:layout_height="wrap_content"
        android:layout_marginStart="150dp"
        android:layout_marginTop="230dp"
        android:text="Send Message" />
</LinearLayout>
Now, we will implement code on MainActivity.kt file.
Code:
package com.codingninjas.contentprovider

import androidx.appcompat.app.AppCompatActivity
import android.os.Bundle
import com.codingninjas.contentprovider.R
import android.content.Intent
import android.view.View
import android.widget.Button

class MainActivity : AppCompatActivity() {
    override fun onCreate(savedInstanceState: Bundle?) {
        super.onCreate(savedInstanceState)
        setContentView(R.layout.activity_main)
        val btnSend = findViewById<View>(R.id.sendMessage) as Button
        btnSend.setOnClickListener {
            val intent = Intent(Intent.ACTION_SEND)
            intent.type = "text/plain"
            startActivity(Intent.createChooser(intent, "Choose Message App"))
        }
    }
}
And add this code into your AndroidManifest.xml.
Code:
<activity
            android:name=".MainActivity"
            android:exported="true">
            <intent-filter>
                <action android:name="android.intent.action.MAIN" />
                <category android:name="android.intent.category.LAUNCHER" />
                <action android:name="android.intent.action.SEND" />
                <category android:name="android.intent.category.DEFAULT" />
                <data android:mimeType="text/plain" />
            </intent-filter>
        </activity>
- action - We utilize this parameter to specify that the activity can perform SEND actions.
- category - For this activity, we provided the DEFAULT category to obtain implicit intents.
- data - It requires the type of data that the activity can send.
Output:
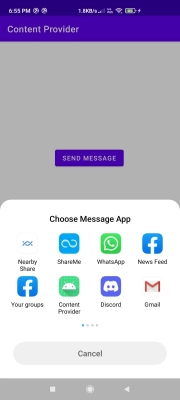
If you look at the above result, you'll notice that when we click the Send Message button, that displays a dialog with the apps that can send a message. You'll notice that our app is also on the list if you look closely.
This is how we may utilize intent filters in Android applications to allow other apps to invoke our application components.
FAQs
-
What are pending intents in Android?
A PendingIntent is a token that an app offer to a foreign app (for example, NotificationManager, AlarmManager, Home Screen AppWidgetManager, or other 3rd party applications), allowing the foreign application to use your application's rights to execute a preset piece of code.
-
What is the difference between intent filters and Intent in Android?
An intent is an object that can store the operating system or another app activity and its data in URI form. It is started using startActivity(intent). In contrast, IntentFilter can retrieve activity information from the operating system or other app activities.
-
What is merged manifest?
The manifest merger tool combines all XML elements from each file by following merge heuristics and obeying merge preferences that you have defined with unique XML attributes.
Key Takeaways
In this article, we have extensively discussed Intent in Android and the usage of filters.
You can head over to our Android Development Course on the Coding Ninjas Website to dive deep into Android Development and build future applications.
We hope that this blog has helped you enhance your knowledge regarding intents, intent filters and if you would like to learn more, check out our articles on Types of Intent in Android. Do upvote our blog to help other ninjas grow. Happy Coding!


 9+ registered

