Do you think IIT Guwahati certified course can help you in your career?
Introduction
Menus in Android serve as a fundamental component of user interface design, enabling users to navigate and interact with an app effectively. They provide a convenient way to present actions and other options in a compact format. Understanding how to implement and utilize these menus is crucial for any Android developer aiming to enhance user experience.
This article delves into the intricacies of Android menus, covering their definition, types, and implementation with clear examples and code explanations.
What are Menus in Android?
Menus in Android are a collection of options that provide users with different choices and functionalities within an application. They are typically used for actions that don't fit directly on the main user interface (UI). Menus help in making the application more user-friendly and organized, as they group similar actions together, thereby decluttering the UI and improving the overall user experience.
Android provides several types of menus, each suited for specific use cases:
Options Menu: Displayed in the app bar, it's used for global actions that pertain to the entire app.
Context Menu: Shows actions related to a specific UI component and appears upon user interaction, like a long press.
Popup Menu: Similar to context menus but more flexible in terms of positioning, often used for actions related to specific content or UI elements.
These menus can be defined in XML or programmatically in Java/Kotlin. The choice depends on the complexity of the menu and the specific requirements of the application.
How to Define Menu in XML File?
Defining a menu in an XML file is a straightforward and organized approach in Android. This method allows developers to visually structure their menus, making it easier to manage and modify. Here's how you can define a menu in an XML file:
Creating the Menu Directory: Initially, you need to create a 'menu' directory inside the 'res' (resources) folder of your Android project.
Creating a Menu Resource File: Within the 'menu' directory, you create an XML file, such as menu_main.xml. This file will contain the structure of your menu.
Defining the Menu Structure: In the XML file, you use a series of tags to define the menu items and their attributes. The root element is <menu>, and each menu item is represented by a <item> tag.
android:title: Text to be displayed for the menu item.
android:icon: Icon for the menu item (optional).
android:orderInCategory: Defines the order of this item among other items.
android:showAsAction: Determines how this item will be displayed in the ActionBar (if space is available).
By defining menus in XML, you achieve a cleaner codebase and separate the UI design from the logic. It also simplifies the process of updating the UI without needing to modify the Java/Kotlin code.
Creating a Menu Directory and Menu Resource File: Example and Explanation
To effectively use menus in your Android app, the first step is to create a menu directory and then a menu resource file within it. Here's how you can do it:
Step 1: Create a Menu Directory
Open your Android project in Android Studio.
In the Project pane, navigate to the res folder.
Right-click on the res folder, go to New > Android Resource Directory.
In the Resource Type dropdown, select menu, then click OK.
This action creates a new directory named menu under the res folder.
Step 2: Create a Menu Resource File
Right-click on the newly created menu directory.
Select New > Menu Resource File.
Name the file (for example, activity_main_menu.xml), and click OK.
You now have a menu resource file where you can define your menu items.
Example Menu Resource File
Here's an example of how you might define a simple menu in the activity_main_menu.xml file:
<menu> tag: This is the root element of your XML file and contains all menu items.
<item> tag: Each item represents a single menu item.
android:id: Unique identifier for the menu item.
android:title: The text displayed for the menu item. This refers to a string resource for better localization.
android:icon: (Optional) Icon to be displayed alongside the text. Here, ic_search is a drawable resource.
android:showAsAction: Determines how the item is displayed in the app bar. ifRoom|withText shows the item with text if there's enough space. never means it will always appear in the overflow menu.
This XML-based approach allows you to define the visual structure of your app's menus in a clean and manageable way.
Implementing Menus in activity_main.xml:
Example and Explanation
After setting up the menu directory and resource file, the next step is integrating the menu with your activity. This involves updating the activity_main.xml file and then handling the menu in your activity's Java/Kotlin code. Let's start with an example of how activity_main.xml might look and then explain the code.
Example: activity_main.xml
<RelativeLayout xmlns:android="http://schemas.android.com/apk/res/android"
    xmlns:tools="http://schemas.android.com/tools"
    android:layout_width="match_parent"
    android:layout_height="match_parent"
    tools:context=".MainActivity">

    <!-- Other UI elements here -->

    <TextView
        android:id="@+id/textView"
        android:layout_width="wrap_content"
        android:layout_height="wrap_content"
        android:text="Welcome to the Android App!"
        android:layout_centerInParent="true" />

</RelativeLayout>
Explanation of Code
RelativeLayout: This is the root layout container for your activity's UI. It allows positioning child elements relative to each other or the parent.
TextView: This is an example UI element displaying some text. It's centered within the RelativeLayout.
Integrating Menu with Activity
To integrate the menu you've defined in the XML file (activity_main_menu.xml) with your main activity, you need to override the onCreateOptionsMenu() method in your MainActivity class. Here's how you do it:
onCreateOptionsMenu(Menu menu): This method is called by Android to set up the activity's options menu.
getMenuInflater().inflate(): This line inflates the menu resource (R.menu.activity_main_menu) into the provided Menu object. Inflating means parsing the XML file and creating menu items from it.
By doing this, the options menu defined in activity_main_menu.xml is displayed in the app bar of your MainActivity.
Android Different Types of Menus
Android provides various types of menus, each designed for specific use cases. Let's explore each type with examples.
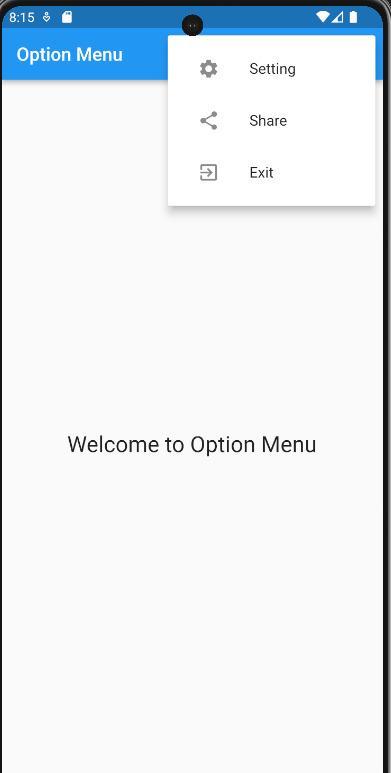
1. Options Menu
Purpose: The Options Menu is used for actions that have a global impact on the app. It's typically displayed in the app bar.
Visibility: Appears either as icons on the app bar or under the overflow menu (three dots), depending on the space available and the showAsAction property of the menu items.
Usage Scenario: Ideal for settings, search, or user profile options.
Example
In your MainActivity.java or MainActivity.kt, override the onCreateOptionsMenu() method to inflate the options menu from an XML resource.
@Override
public boolean onCreateOptionsMenu(Menu menu) {
    getMenuInflater().inflate(R.menu.activity_main_menu, menu);
    return true;
}
@Override
public boolean onOptionsItemSelected(MenuItem item) {
switch (item.getItemId()) {
case R.id.menu_search:
// Handle search action
return true;
case R.id.menu_settings:
// Handle settings action
return true;
default:
return super.onOptionsItemSelected(item);
}
}
onCreateOptionsMenu(): Inflates the menu resource.
onOptionsItemSelected(MenuItem item): Handles click events on the menu items.
Output
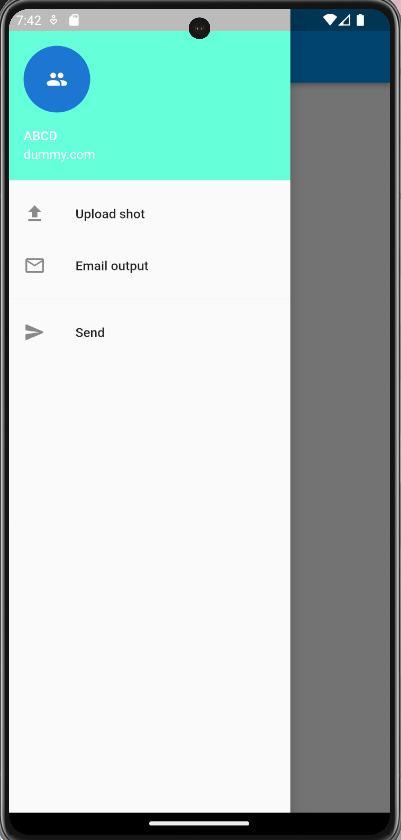
2. Context Menu
Purpose: Context Menus are used for actions that relate to a specific part of the UI, such as a list item.
Visibility: They are displayed upon a user action, typically a long press.
Usage Scenario: Useful for actions like editing or deleting an item in a list.
Example
To create a context menu, you need to register a view for the context menu and then override onCreateContextMenu().
@Override
protected void onCreate(Bundle savedInstanceState) {
    super.onCreate(savedInstanceState);
    setContentView(R.layout.activity_main);

    TextView textView = findViewById(R.id.textView);
    registerForContextMenu(textView);
}

@Override
public void onCreateContextMenu(ContextMenu menu, View v, ContextMenu.ContextMenuInfo menuInfo) {
    super.onCreateContextMenu(menu, v, menuInfo);
    getMenuInflater().inflate(R.menu.context_menu, menu);
}
registerForContextMenu(View view): Registers a view to show a context menu.
onCreateContextMenu(): Inflates the context menu when the registered view is long-pressed.
Output
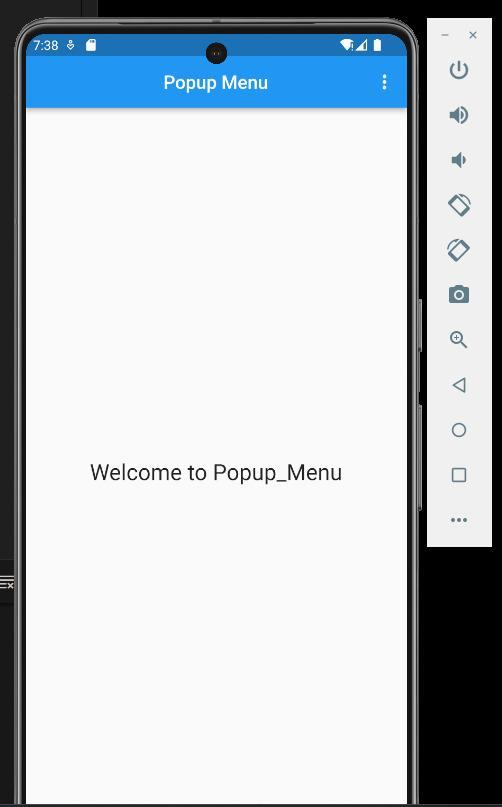
3. Popup Menu
Purpose: Popup Menus are similar to Context Menus but are more flexible regarding their placement. They are used to provide actions that are relevant to specific content.
Visibility: Displayed in a modal popup window anchored to a view.
Usage Scenario: Good for actions like sorting or filtering content.
Example
Popup menus are usually triggered by a user action, like a button click. Here's how to implement it:
Button button = findViewById(R.id.button_show_popup);
button.setOnClickListener(new View.OnClickListener() {
    @Override
    public void onClick(View v) {
        PopupMenu popup = new PopupMenu(MainActivity.this, v);
        popup.getMenuInflater().inflate(R.menu.popup_menu, popup.getMenu());
        popup.setOnMenuItemClickListener(new PopupMenu.OnMenuItemClickListener() {
            public boolean onMenuItemClick(MenuItem item) {
                // Handle item selection
                return true;
            }
        });
        popup.show();
    }
});
PopupMenu: Creates a new popup menu with specified anchor view.
popup.getMenuInflater().inflate(): Inflates the popup menu from an XML resource.
setOnMenuItemClickListener(): Handles menu item clicks.
Output
Frequently Asked Questions
How do I dynamically add items to an Android menu?
You can dynamically add items to a menu in the onCreateOptionsMenu() method by using Menu.add() method. This is useful when you need to modify the menu based on the current state of the application.
Can I use icons in Android menus?
Yes, you can use icons in menus. For options menus, icons are displayed on devices with a menu button. For toolbar menus, you can set android:showAsAction to always or ifRoom to display icons.
How do I handle menu item clicks in fragments?
In fragments, you can handle menu item clicks by overriding onOptionsItemSelected() method. Make sure to call setHasOptionsMenu(true) in the onCreate() method of the fragment to indicate that it should participate in populating the options menu.
Conclusion
Android menus are integral to app development, offering a structured way to present various options and actions to the user. Implementing and utilizing options, context, and popup menus effectively can significantly enhance the user experience. Developers can create intuitive and responsive applications by defining menus through XML and handling their interactions programmatically. Remember, the choice of menu type depends on the specific needs and context within your application, and Android provides the flexibility to cater to a wide range of scenarios.


 9+ registered

