Approaches of Implementation
We can write the android code as per the schema laid out by the model view controller. There are multiple approaches to implement this while writing the program.
Two of these approaches are as follows:
- The controller segment has activities and fragments. It is in charge of updating the View.
- We can use activities and fragments as both controllers and views. We make the Model a separate class that does not extend any other android class.
An efficient way of implementing this architecture in android is to club together activities, fragments, and views in the view layer. We can make Controller and models separate classes that do not extend to any model class.
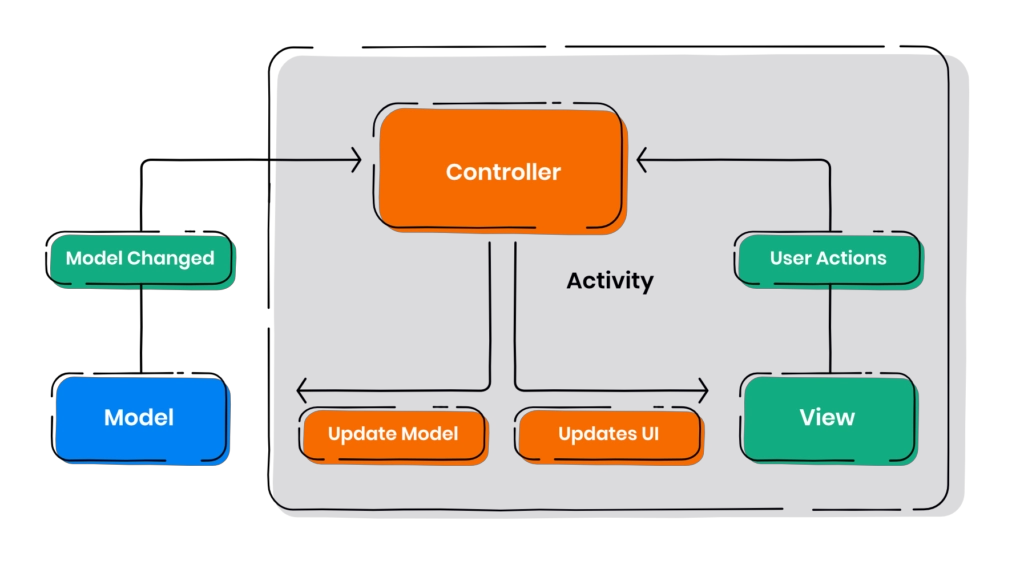
In this architecture, the Controller updates the data. The View then accesses this updated data and displays it to the user. Let's make the view layer follow the single responsibility principle. Its function is to inform the Controller regarding every request made by the user, access the logic from the Model, and display it. If this happens, the UI Test covers all the functionalities of the View.
MVC Architecture’s Example
To better understand the MVC implementation, we will make an example application.
We will handle the Controller and View by the Activity. Whenever you click the button, Activity will guide the Model to control the further operations.
The Model here is a separate class that will contain data to be displayed.
Let’s move on to the step by step implementation of the following in a project:
Check this out, android operating system
Creating a new Project
- Click on File->New->New Project.
- Click on Empty Activity.
- Select the language as Kotlin.
- Select the minimum SDK as per requirement.
Modifying the activity_main.xml file
In the activity_main.xml file, add two buttons whose function will be to display the number of times they have been pressed. Below given is the code of the activity_main.xml file.
activity_main.xml
<LinearLayout xmlns:android="http://schemas.android.com/apk/res/android"
    xmlns:app="http://schemas.android.com/apk/res-auto"
    android:layout_width="match_parent"
    android:layout_height="match_parent"
    android:background="#FDFDFA"
    android:orientation="vertical">

    <TextView
        android:layout_width="match_parent"
        android:layout_height="wrap_content"
        android:gravity="center"
        android:text="Model View Controller Architecture"
        android:textColor="#595757"
        android:textSize="40dp"
        android:textStyle="bold" />

    <TextView
        android:id="@+id/tv_res"
        android:layout_width="match_parent"
        android:layout_height="wrap_content"
        android:gravity="center"
        android:text="Click on button"
        android:textColor="#515151"
        android:textSize="20dp"
        android:textStyle="bold"
        android:layout_marginTop="30dp"/>

    <LinearLayout
        android:layout_width="match_parent"
        android:layout_height="wrap_content"
        android:layout_marginTop="50dp"
        android:gravity="center"
        android:orientation="vertical">

        <Button
            android:id="@+id/button1"
            android:layout_width="160dp"
            android:layout_height="71dp"
            android:onClick="add"
            android:text="Count : 0"
            app:backgroundTint="#EC7140" />

        <Button
            android:id="@+id/button2"
            android:layout_width="160dp"
            android:layout_height="71dp"
            android:onClick="sub"
            android:text="Count : 0"
            app:backgroundTint="#EC7140" />


    </LinearLayout>

    <ImageView
        android:id="@+id/ImageCn"
        android:layout_width="match_parent"
        android:layout_height="wrap_content"
        android:layout_marginTop="220dp"
        android:src="@drawable/cnlogo" />

</LinearLayout>
Making the Model Class
Make a new class named Model to put all the data and its functionalities separately.
Model.kt
package com.codingninjas.modelviewcontroller

import kotlin.collections.ArrayList
import java.util.*


class Model : Observable() {
    // declaring the list of integers
    private val list: MutableList<Int>

    // constructor for initializing the list
    init {
        // reserving some  space for list elements beforehand
        list = ArrayList(2)

        // adding the elements into the list
        list.add(0)
        list.add(0)

    }

    // Getter - Setter functions to get the values from Model
    fun getValueAtIndex(index: Int): Int {
        return list[index]
    }

    // function to make modifications in the  buttons
    // count number of times user has touched  it
    fun setValueAtIndex(index: Int) {
        list[index] = list[index] + 1
        setChanged()
        notifyObservers()
    }
}
Handling functionalities of View and Controller in MainActivity File
We will use the data provided by the Model Class by View and Controller inside the MainActivity.kt file.
MainActivity.kt
package com.codingninjas.modelviewcontroller

import androidx.appcompat.app.AppCompatActivity
import android.os.Bundle
import android.view.View
import android.widget.Button
import java.util.*

class MainActivity : AppCompatActivity(), Observer, View.OnClickListener {

    // creating a Model Class Object
    var myModel: Model? = null

    // creating a Button Class Object
    var Button1: Button? = null
    var Button2: Button? = null

    override fun onCreate(savedInstanceState: Bundle?) {
        super.onCreate(savedInstanceState)
        setContentView(R.layout.activity_main)


        // defining relationship between the observable Model class and the observer Activity
        myModel = Model()
        myModel!!.addObserver(this)

        // providing button IDs to the objects
        Button1 = findViewById(R.id.button1)
        Button2 = findViewById(R.id.button2)


        Button1?.setOnClickListener(this)
        Button2?.setOnClickListener(this)
    }
    override fun onClick(v: View) {
        when (v.id) {
            R.id.button1 ->  myModel?.setValueAtIndex(0)
            R.id.button2 -> myModel?.setValueAtIndex(1)
        }
}

    override fun update(arg0: Observable, arg1: Any?) {

        Button1!!.text = "Count: " + myModel!!.getValueAtIndex(0)
        Button2!!.text = "Count: " + myModel!!.getValueAtIndex(1)
    }
}
Output
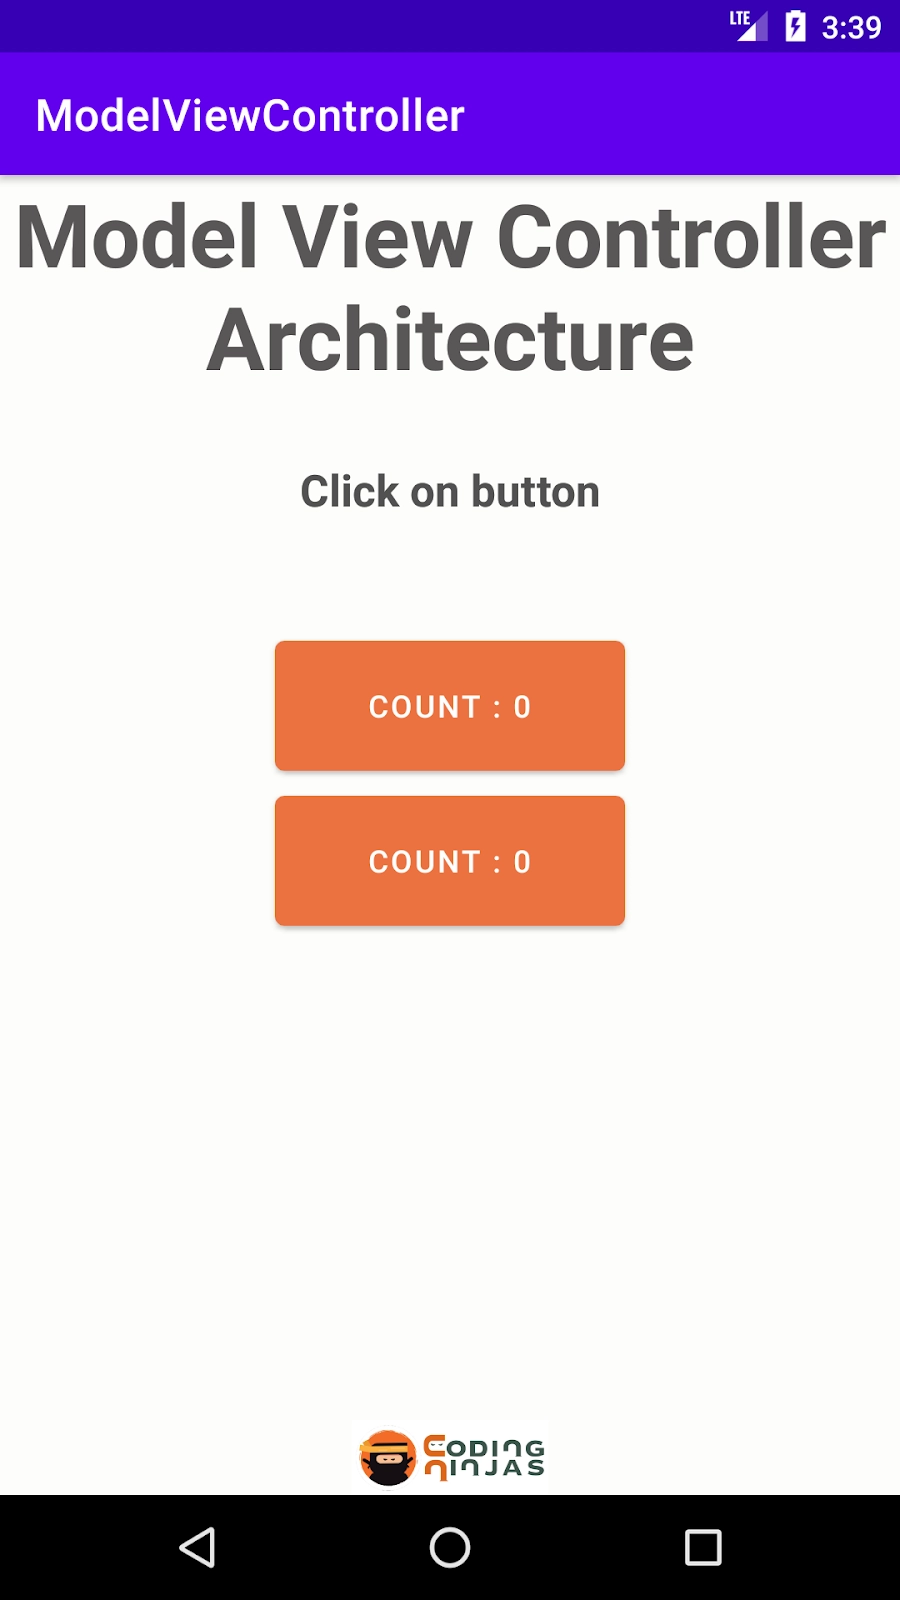


Initially, our app displayed the first screen with two buttons on it, and the count of each button was increased. Then we tapped the first button five times and its count increased by five similarly we pressed the second button ten times, and its counter increased by ten.
Advantage of Model View Controller
The Model View Controller Architecture finds its widespread uses due to its various advantages to the developers. Some of the benefits it offers are as follows:
- It allows the separation of the code into three layers. The structuring of code increases the testability of the code.
- The code categorization makes the code easier to extend, hence making the new implementation of new functionalities in the application easier.
Drawbacks of the Model View Controller
Let us now discuss several drawbacks of using this Model.
- View Dependence on Model and Controller: The View depends on the Model and the Controller. Furthermore, if we want to change the View, i.e., the UI Logic of the application, it would require us to change several classes altogether. This dependency decreases the flexibility in the architecture.
- Handling UI Logic: The controller updates the Model, and the Model in charge of data provides it to view, which then displays it. However, one question that arises here is who decides how to show the data. If the View's responsibility is to handle the UI logic, the UI Logic becomes non-unit testable. If it becomes the Model's function, it will depend on the View.
FAQs
-
How does using MVC Architecture make an application lightweight?
MVC Architecture doesn’t use View State, which reduces the bandwidth of the requests made in an application up to an extent.
-
What do you understand by multiple view support?
MVC Architecture, as it separates View from the Model, can simultaneously show multiple views of the given data.
-
How does using MVC Architecture increase testability?
MVC pattern increases code testability by using several components, supporting the separation of concerns.
Key Takeaways
In this article, we have extensively discussed Android Model View Controller and its implementation in Android Development.
We started this blog with a discussion of software architecture patterns. Then we discussed one of the most used patterns, the Model View Controller. We went through the various technicalities of this topic in detail. Furthermore, the stepwise procedure of implementing this architecture to develop a software pattern was discussed.
We hope that this blog has helped you enhance your knowledge regarding Android Model View Architecture and if you would like to learn more, check out our articles on Android Architecture.
If you want to be a proficient Android developer, then don’t forget to check out our fully-fledged course on Android development.
Do upvote our blog to help other ninjas grow.
Happy Coding!


 9+ registered

