Ways to Implement MVVM
There are two ways to implement MVVM in Android projects:
- Using the DataBinding library
- Utilizing any tool like RxJava
This blog will use the DataBinding library method to implement MVVM in an android project.
Refer this to know about , android operating system
Data Binding
Google released the Data Binding Library for Android. Data Binding allows developers to combine UI components in XML layouts with the data repository of an application. This allows the minimization of code logic that essentially binds to the View. Furthermore, Two-Way Binding is used to attach objects with XML layouts to make data transfer between an object and layout possible.
The syntax used for a two way data binding is @={variable}
Example for MVVM Architecture
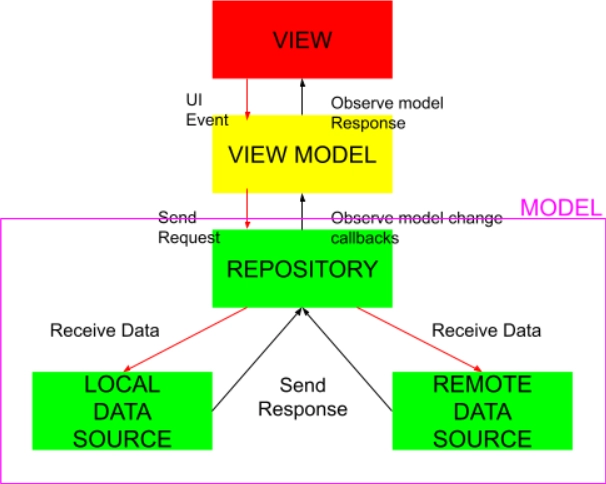
To understand the MVVM Architecture, let us learn with an example of a User Login application that is built by implementing the MVVM architecture. The application will prompt the user to enter their Email ID and password based on the received user inputs. The ViewModel will notify the View what to show to the user as a toast message. As discussed before, the ViewModel will not possess a reference to the View.
To enable DataBinding in an android application, the following code is needed to be added in the application’s build.gradle(build.gradle (:app)) file:
Enable DataBinding:
android {
   dataBinding {
       enabled = true
      }
}
Add lifecycle dependency:
implementation ‘android.arch.lifecycle:extensions:1.1.1’
Now let us start building the project
Step-by-Step Implementation
Following are the implementation steps:
Step 1: Create a new project
Let us start by clicking on the File Tab, and then hover over New => New Project.
Choose an Empty activity
Select language as Java/Kotlin
Select the minimum SDK.
Step 2: Modify String.xml file
All the required strings used in the activity are given below.
<resources>
    <string name="app_name">MVVM</string>
    <string name="heading">MVVM Architecture</string>
    <string name="email_hint">Email ID</string>
    <string name="password_hint">Password</string>
    <string name="button_text">Log-In</string>
</resources>
Step 3: Creating the Model class
Create a model class that will register the Email ID and password inputted by the user. Consider the code below to implement a proper Model class.
import androidx.annotation.Nullable;

public class Model {
    @Nullable
    String email, password;

    // Creating a constructor to initialise the variables email and
    //password
    public Model(String email, String password){
        this.email = email;
        this.password = password;
    }

    // Creating getter and setter methods
    // for email variable
    @Nullable
    public String getEmail() {
        return email;
    }

    public void setEmail(@Nullable String email) {
        this.email = email;
    }

    // Creating getter and setter methods
    // for password variable
    @Nullable
    public String getPassword() {
        return password;
    }

    public void setPassword(@Nullable String password) {
        this.password = password;
    }
}
Step 4: Working on activity_main.xml file
Open the activity_main.xml file and append EditText to receive inputs for Email-ID and Password. A Login Button is also required to validate the user’s input and display an appropriate Toast message.
Consider the code below.
<?xml version="1.0" encoding="utf-8"?>
<layout xmlns:android="http://schemas.android.com/apk/res/android"
    xmlns:app="http://schemas.android.com/apk/res-auto"
    xmlns:bind="http://schemas.android.com/tools">

    <!-- binding object of ViewModel to the XML layout -->
    <data>
        <variable
            name="viewModel"
            type="com.example.mvvmarchitecture.AppViewModel" />
    </data>

    <!-- Provided Linear layout-->
    <LinearLayout
        android:layout_width="match_parent"
        android:layout_height="match_parent"
        android:layout_gravity="center"
        android:layout_margin="18dp"
        android:background="#E5EFC1"
        android:orientation="vertical">

        <!-- This is a TextView for the heading -->
        <TextView
            android:id="@+id/textView"
            android:layout_width="match_parent"
            android:layout_height="wrap_content"
            android:text="@string/heading"
            android:textAlignment="center"
            android:textColor="@android:color/holo_green_dark"
            android:textSize="30sp"
            android:textStyle="bold" />

        <!-- This is EditText field for Email-ID -->
        <EditText
            android:id="@+id/inEmail"
            android:layout_width="match_parent"
            android:layout_height="wrap_content"
            android:layout_marginStart="12dp"
            android:layout_marginTop="68dp"
            android:layout_marginEnd="8dp"
            android:layout_marginBottom="22dp"
            android:hint="@string/email_hint"
            android:inputType="textEmailAddress"
            android:padding="12dp"
            android:text="@={viewModel.userEmail}" />

        <!-- This is EditText field for password -->
        <EditText
            android:id="@+id/inPassword"
            android:layout_width="match_parent"
            android:layout_height="wrap_content"
            android:layout_marginStart="8dp"
            android:layout_marginEnd="12dp"
            android:hint="@string/password_hint"
            android:inputType="textPassword"
            android:padding="12dp"
            android:text="@={viewModel.userPassword}" />

        <!-- This is Login Button -->
        <Button
            android:layout_width="match_parent"
            android:layout_height="wrap_content"
            android:layout_marginStart="25dp"
            android:layout_marginTop="64dp"
            android:layout_marginEnd="22dp"
            android:background="#A2D5AB"
            android:fontFamily="@font/roboto"
            android:onClick="@{()-> viewModel.onButtonClicked()}"
            android:text="@string/button_text"
            android:textColor="@android:color/background_light"
            android:textSize="30sp"
            android:textStyle="bold"
            bind:toastMessage="@{viewModel.toastMessage}" />

        <ImageView
            android:id="@+id/imageView"
            android:layout_width="match_parent"
            android:layout_height="wrap_content"
            android:layout_marginTop="125dp"
            app:srcCompat="@drawable/banner" />

    </LinearLayout>
</layout>
Step 5: Creating the ViewModel class
This class will contain all methods that are needed by the application layout. The ViewModel class will extend BaseObservable as it converts the data into streams and prompts the View as soon as the toast message property will change.
import android.text.TextUtils;
import android.util.Patterns;
import androidx.databinding.BaseObservable;
import androidx.databinding.Bindable;

public class AppViewModel extends BaseObservable {

    // This creates an object of Model class
    private Model model;

    // Creates string variables for
    // toast messages
    private String successMessage = "Login success";
    private String errorMessage = "Entered Email-ID or Password is not valid";

    @Bindable
    // Creates string variable for
    // toast message
    private String toastMessage = null;

    // Creates getter and setter methods
    // for toast message
    public String getToastMessage() {
        return toastMessage;
    }

    private void setToastMessage(String toastMessage) {
        this.toastMessage = toastMessage;
        notifyPropertyChanged(BR.toastMessage);
    }

    // Creates getter and setter methods
    // for email variable
    @Bindable
    public String getUserEmail() {
        return model.getEmail();
    }

    public void setUserEmail(String email) {
        model.setEmail(email);
        notifyPropertyChanged(BR.userEmail);
    }

    // Creates getter and setter methods
    // for password variable
    @Bindable
    public String getUserPassword() {
        return model.getPassword();
    }

    public void setUserPassword(String password) {
        model.setPassword(password);
        notifyPropertyChanged(BR.userPassword);
    }

    // Creates a constructor of ViewModel class
    public AppViewModel() {

        model = new Model("","");
    }

    // Login Button Logic
    public void onButtonClicked() {
        if (isValid())
            setToastMessage(successMessage);
        else
            setToastMessage(errorMessage);
    }

    //checks if the input fields are left null
    public boolean isValid() {
        return !TextUtils.isEmpty(getUserEmail()) && Patterns.EMAIL_ADDRESS.matcher(getUserEmail()).matches()
                && getUserPassword().length() > 5;
    }
}
Step 6: Defining functionalities of the View in the MainActivity file
View class is responsible for updating the User Interface of the application. As per the changes in the toast message given by ViewModel, the Binding Adapter will trigger the View layer. Then the setter of the Toast message will notify the observer about the changes in data. After that, View will take appropriate actions.
import android.os.Bundle;
import android.view.View;
import android.widget.Toast;
import androidx.appcompat.app.AppCompatActivity;
import androidx.databinding.BindingAdapter;
import androidx.databinding.DataBindingUtil;
import com.example.mvvmarchitecture.databinding.ActivityMainBinding;

public class MainActivity extends AppCompatActivity {

    @Override
    protected void onCreate(Bundle savedInstanceState) {
        super.onCreate(savedInstanceState);

        // The ViewModel  will update the Model
        // after observing the changes in the View

        ActivityMainBinding activityMainBinding = DataBindingUtil.setContentView(this, R.layout.activity_main);
        activityMainBinding.setViewModel(new AppViewModel());
        activityMainBinding.executePendingBindings();

    }
    @BindingAdapter({"toastMessage"})
    public static void runMe( View view, String message) {
        if (message != null)
            Toast.makeText(view.getContext(), message, Toast.LENGTH_SHORT).show();
    }
}
Advantages of MVVM Architecture
- Working collaboratively
- reuse of code
- Code testing becomes very easy
Disadvantages of MVVM Architecture
- Some believe that MVVM may be excessive for simple user interfaces.
- Designing the ViewModel might be challenging in larger circumstances as well.
- When we have complicated data bindings, debugging becomes a little more challenging.
Frequently Asked Questions
What is MVVM architecture Android?
MVVM means a way to structure code. With MVVM, it is possible to keep the UI components of an application away from the business logic. Furthermore, the business logic itself is kept away from the database operations.
What is the difference between MVC and MVVM in Android?
MVC (Model-View-Controller) and MVVM (Model-View-ViewModel) are architectural patterns. In Android, MVC directly connects Model and View, which can lead to complex code. Conversely, MVVM employs a ViewModel as an intermediary to separate concerns, simplifying maintenance and testing.
Is MVVM better than MVC?
MVVM has made the MVP pattern's flaws obsolete. It proposes isolating the application's main business logic from the views or user interface (UI) that control how data is presented. Because of its unidirectional data and dependency flow, MVVM is superior to MVC/MVP.
Check this out : usb debugging
Conclusion
In this article, we have extensively discussed the Android Model View ViewModel architecture in Android. If you are Preparing for interview and don't know where to start, we have got you covered, check out our expert curated courses on our website, You can also check out Coding Ninjas Studio to practice frequently asked interview problems. We hope that this blog has helped you enhance your knowledge regarding Android and if you would like to learn more, check out our articles. Do upvote our blog to help other ninjas grow. Happy Coding!"


