Important Attributes for Positioning
Let's look at the many properties of the Relative Layout that we will use while developing the UI for an Android app.
- layout_above: Position the view's bottom border above the specified anchor view ID and include a reference to another resource in the form of id.
- layout_below: Position the view's top border below the specified anchor view ID and include a reference to another resource in the form of id.
- layout_toStartOf: Position the view's right border before the specified anchor view ID and include a reference to another resource in the form of id.
- layout_toEndOf: Position the view's left border after the specified anchor view ID and include a reference to another resource in the form of id.
- layout_alignBottom: It is used to make the view's bottom edge match the bottom edge of the specified anchor view ID, which must reference another resource in the form of id.
- layout_alignEnd: This attribute is used to make this view's right edge match the right edge of the specified anchor view ID, which must reference another resource.
- layout_alignStart: This property is used to make this view's start edge match the start edge of the specified anchor view ID, which must reference another resource.
- layout_alignTop: This property is used to make this view's top edge match the top edge of the specified anchor view ID, which must reference another resource.
- layout_alignParentBottom: If this attribute is set to true, the bottom edge of this view is aligned with the bottom edge of the parent. The value of alignParentBottom is one of two possibilities: true or false.
- layout_alignParentEnd: If this property is set to true, the end edge of this view is aligned with the end edge of the parent. The value of alignParentEnd is one of two possibilities: true or false.
- layout_alignParentStart: If this attribute is set to true, the start edge of this view is aligned with the start edge of the parent. The value of alignParentStart is one of two possibilities: true or false.
- layout_alignParentTop: If this attribute is set to true, the top edge of this view is aligned with the parent's top edge. The value of alignParentTop is one of two possibilities: true or false.
- layout_centerInParent: If the center in the parent is set to true, the view will be placed in the middle of the screen, both vertically and horizontally. In parent, the value of center is either true or false.
- layout_centerHorizontal: The view is centered horizontally if the centerHorizontal attribute is set to true. True or false is the value of this attribute.
- layout_centerVertical: The view will be centered vertically if the centerVertical attribute is set to true. The value of this attribute is one of two possibilities: true or false.
Example Using Positioning Attributes
Let us now understand these attributes with the help of an example.
main_activity.xml
Code:
<?xml version="1.0" encoding="utf-8"?>
<RelativeLayout
xmlns:tools="http://schemas.android.com/tools" xmlns:android="http://schemas.android.com/apk/res/android
"
    android:layout_width="match_parent"
    android:layout_height="match_parent"
    android:background="#CED0D1"
    tools:context=".MainActivity">

    <TextView
        android:id="@+id/tv1"
        android:layout_width="wrap_content"
        android:layout_height="wrap_content"
        android:layout_alignParentTop="true"
        android:layout_centerHorizontal="true"
        android:text="Two Button will use me as a reference"
        android:textAllCaps="true"
        android:textSize="17sp"
        android:textStyle="bold" />

    <Button
        android:id="@+id/btn1"
        android:layout_width="170dp"
        android:layout_height="wrap_content"
        android:layout_below="@+id/tv1"
        android:layout_alignStart="@+id/tv1"
        android:layout_margin="5dp"
        android:text="Located next to the second button" />

    <Button
        android:id="@+id/btn2"
        android:layout_width="170dp"
        android:layout_height="wrap_content"
        android:layout_below="@+id/tv1"
        android:layout_alignTop="@id/btn1"
        android:layout_marginEnd="21dp"
        android:layout_toEndOf="@id/btn1"
        android:text="Located next \nto the first button" />

    <TextView
        android:id="@+id/tv2"
        android:layout_width="170dp"
        android:layout_height="wrap_content"
        android:layout_below="@+id/btn1"
        android:layout_alignStart="@+id/btn1"
        android:layout_marginTop="70dp"
        android:text="I'd like to align my base line with yours."
        android:textColor="#2255CA"
        android:textSize="20sp"
        android:textStyle="bold|italic" />

    <TextView
        android:id="@+id/tv3"
        android:layout_width="170dp"
        android:layout_height="wrap_content"
        android:layout_alignBaseline="@id/tv2"
        android:layout_alignTop="@+id/tv2"
        android:layout_margin="10dp"
        android:layout_marginTop="70dp"
        android:layout_toEndOf="@id/tv2"
        android:text="Okay,let me use the attribute"
        android:textColor="#2359D5"
        android:textSize="20sp"
        android:textStyle="bold|italic" />

    <TextView
        android:id="@+id/tv4"
        android:layout_width="wrap_content"
        android:layout_height="wrap_content"
        android:layout_alignParentStart="true"
        android:layout_alignParentEnd="true"
        android:layout_alignParentBottom="true"
        android:padding="10dp"
        android:text="I utilized three sticky qualities and am now at the bottom."
        android:textAllCaps="true"
        android:textColor="#D50000"
        android:textSize="20sp"
        android:textStyle="bold" />

</RelativeLayout>
Output:
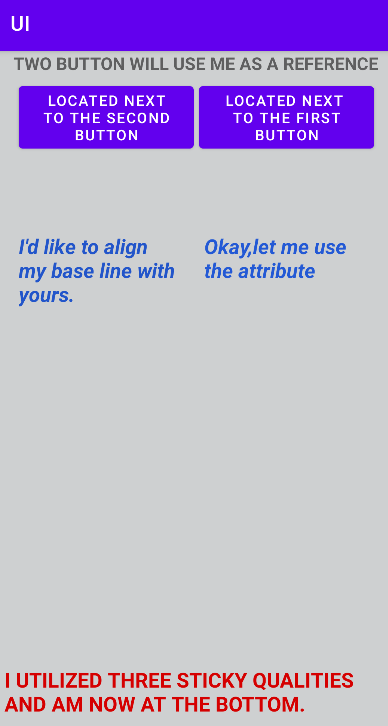
We used the android:layout_alignParentTop="true" attribute to position one view with the id textView at the top of the screen.
The two buttons are placed beneath the TextView with the id tv1. The android:layoutbelow="@id/tv1" attribute is used in both Button tags to do this.
We used the android:layout_alignTop="@id/btn1" attribute to align both buttons from the top margin (of each other).
We also attempted to align the two TextViews depending on their text, that is, to align the texts of both views.
Finally, we utilized the sticky attributes android:layout_alignParentBottom="true," android:layout_alignParentEnd="true," and android:layout_alignParentStart="true" to keep the tv4 at the bottom of the screen. The TextView in this example, like the sticky attribute, stretches so that its boundary is stretched and sticks to the left, right, and bottom of the screen.
FAQs
-
Is ConstraintLayout better than RelativeLayout?
Ans: ConstraintLayout, unlike other layouts, provides a flat view hierarchy and performs better than relative layout. Yes, this is the most significant advantage of Constraint Layout; it is the only layout that can handle your UI.
-
Which layout is considered to be the best for large complex hierarchies?
Ans: To increase efficiency, consider employing flatter layouts such as RelativeLayout or GridLayout. The maximum depth is set at ten by default.
-
What is the Android hierarchy?
Ans: Hierarchy Viewer is an Android Device Monitor tool that allows you to measure the layout performance of each view in your layout hierarchy.
Key Takeaways
In this article, we have extensively discussed various types of relative layouts in android and their positioning.
Read more: Attributes in DBMS
You can head over to our Android Development Course on the Coding Ninjas Website to dive deep into Android Development and build future applications.
We hope that this blog has helped you enhance your knowledge regarding relative layout positioning and if you would like to learn more, check out our articles on Frame Layout. Do upvote our blog to help other ninjas grow. Happy Coding!


 8+ registered

