


Introduction
The structure of a user interface in your app, such as an activity, is defined by a layout. The layout's elements are built utilizing a hierarchy of View and ViewGroup objects. A View is often something that the user can see and interact with. A ViewGroup, on the other hand, is an invisible container that determines the layout structure for View and other ViewGroup objects.
In this article, we will learn about UI Layouts in Android and the types of layouts. But before jumping into this, we would strongly recommend learning about Android Activities.
The upcoming section will discuss various UI elements provided by Android Inbuilt Library.
UI Elements
A View is the user interface responsible for event processing and drawing and is used to generate responsive UI components such as TextView, Button, ImageView, EditText, RadioButton, and so on. They are commonly referred to as Widgets.
A ViewGroup serves as the primary class for layouts and layout parameters, which store other Views or ViewGroups and define layout characteristics. They are commonly referred to as layouts.
Let's understand the difference between View and ViewGroup with the help of a screenshot
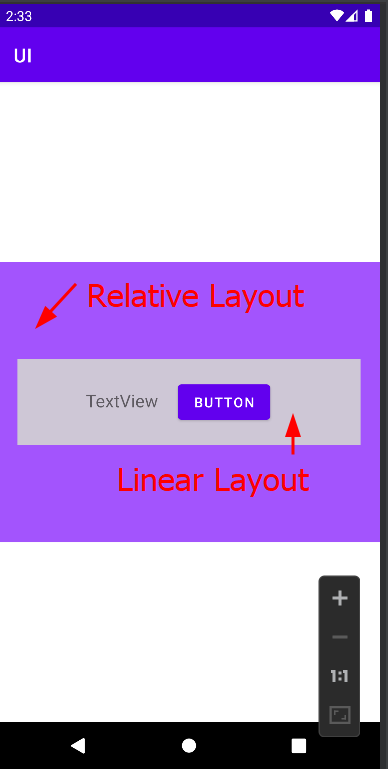
In the above image, we can see that the boxes with purple and grey colors are Relative and Linear Layout respectively. These layouts are examples of View Group. On the other hand, TextView and Button, situated in Grey Linear Layout, are examples of Views.
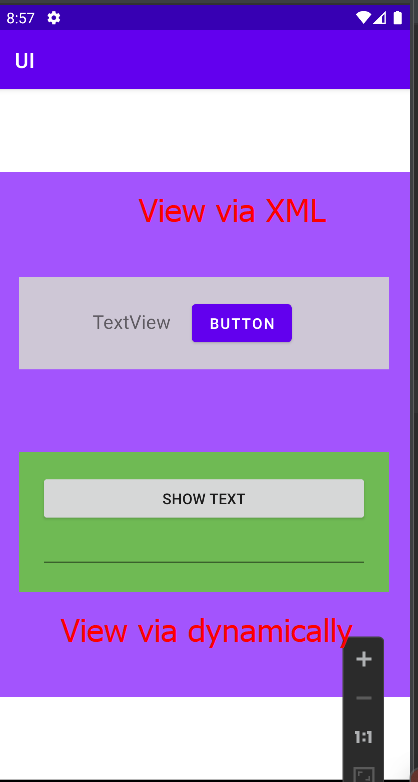
We can declare Views in these Layouts or ViewGroup. Also, we can use these UI elements by declaring them in the XML file or the KOTLIN or JAVA file programmatically(or dynamically).
Load UI using XML
Let's learn more about loading various Views and ViewGroups with the code provided below of activity_main.xml.
Code:
<?xml version="1.0" encoding="utf-8"?>
<androidx.constraintlayout.widget.ConstraintLayout xmlns:android="http://schemas.android.com/apk/res/android"
    xmlns:app="http://schemas.android.com/apk/res-auto"
    xmlns:tools="http://schemas.android.com/tools"
    android:layout_width="match_parent"
    android:layout_height="match_parent"
    tools:context=".MainActivity">

    <RelativeLayout
        android:layout_width="match_parent"
        android:layout_height="500dp"
        android:background="#A354FD"
        android:paddingStart="20dp"
        android:paddingTop="100dp"
        android:paddingEnd="20dp"
        android:paddingBottom="100dp"
        app:layout_constraintBottom_toBottomOf="parent"
        app:layout_constraintLeft_toLeftOf="parent"
        app:layout_constraintRight_toRightOf="parent"
        app:layout_constraintTop_toTopOf="parent">

        <LinearLayout
            android:id="@+id/ll_grey"
            android:layout_width="match_parent"
            android:layout_height="wrap_content"
            android:background="#CEC7D6"
            android:padding="20dp"
            android:layout_alignParentTop="true">

            <TextView
                android:id="@+id/tv"
                android:layout_width="wrap_content"
                android:layout_height="wrap_content"
                android:layout_marginStart="50dp"
                android:text="TextView"
                android:textSize="18sp" />

            <Button
                android:id="@+id/btn"
                android:layout_width="wrap_content"
                android:layout_height="wrap_content"
                android:layout_marginStart="20dp"
                android:text="Button" />

        </LinearLayout>

        <LinearLayout
            android:id="@+id/ll_green"
            android:layout_width="match_parent"
            android:layout_height="wrap_content"
            android:background="#6FBA54"
            android:padding="20dp"
            android:orientation="vertical"
            android:layout_alignParentBottom="true">

        </LinearLayout>

    </RelativeLayout>

</androidx.constraintlayout.widget.ConstraintLayout>
Here, we are using three ViewGroups, namely ConstraintLayout (white background), then its child RelativeLayout (purple background), and then LinearLayout (grey background). In our LinearLayout ViewGroup, we use two Views, i.e., TextView (for text) and Button (for handling on click functionality).
We have defined another LinearLayout (green background) for our upcoming section to define these same elements dynamically.
We will study in detail these Layouts and Widgets in the upcoming article.
Load UI Programmatically
We can now see how we can build some views like Button or EditText with the help of a ViewGroup (LinearLayout) in this case. Let’s head over to MainActivity.kt and copy the code given below.
Code:
package com.codingninjas.ui

import android.os.Bundle
import android.widget.*
import android.widget.Toast.LENGTH_SHORT
import androidx.appcompat.app.AppCompatActivity

class MainActivity : AppCompatActivity() {

    private lateinit var textView: TextView
    private lateinit var button: Button

    override fun onCreate(savedInstanceState: Bundle?) {
        super.onCreate(savedInstanceState)
        setContentView(R.layout.activity_main)

        initViews()

        // creates the button
        val showButton = Button(this)
        showButton.text = "Show Text"

        // creates the editText
        val editText = EditText(this)

        val linearLayout = findViewById<LinearLayout>(R.id.ll_green)
        linearLayout.addView(showButton)
        linearLayout.addView(editText)

        showButton.setOnClickListener{
            // gets the text in EditText
            val text = editText.text

            // Shows the text to the user
            Toast.makeText(this, text, Toast.LENGTH_SHORT).show()
        }
    }

    private fun initViews() {
        textView = findViewById<TextView>(R.id.tv)
        button = findViewById<Button>(R.id.btn)
    }

    override fun onStart() {
        super.onStart()
        button.setOnClickListener {
            Toast.makeText(this, "Button Clicked", LENGTH_SHORT).show()
        }
    }
}
Normally, we bind views in the OnCreate() and use them in onStart(), but it is not mandatory. Here initViews() bind the views using findViewById() and we are setting up these views onClickListerner in onStart().
Output:


 9+ registered

