Just imagine, you have to create a presentation on a topic and the deadline is on your head. While you search for information on the internet, suddenly a big sign showing “LOADING” appears. It's irritating right?. Let's take an example like you are really hungry and when you order the food then suddenly the site hangs.

It will surely make you really angry. It creates a negative first impression on the user and leads to changing of the site or abandoning the site. To solve this problem, we can use lazy loading. In this article, we are going to discuss what is Angular lazy loading, what are some important features of lazy loading and in what scenarios we can use lazy loading and many more.
Lazy Loading
Lazy loading is a technique in which loading resources like videos or images, or photos is involved. It does not involve all the resources at once. They are displayed when they are required. It reduces the starting loading time when the user opens the website or an app. It is highly beneficial when there is a low network available. We can view the entire website using the scroll-down option. However, we can use lazy loading to improve the speed of the website. It may require some techniques and specifications while implementing it.
Steps to Implement Angular Lazy Loading
These are the steps that one should follow in order to implement Angular Lazy Loading.
Create a New Angular Project for Implementing Lazy Loading
ng new angular-lazy-loading
Using the command ‘ng new angular-lazy-loading’ is used to create a fresh new project.
Create a New Module Using CLI Command
ng new coding_ninja-app --routing
It will create a new module to hold all the components of lazy-loading and add it to the app module as a child module.
Create Components in a New Module Using the CLI Command
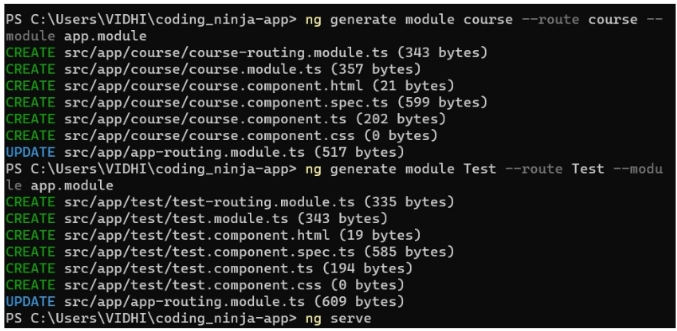
ng generate module course --route course --module app.module
ng generate module Test --route Test --module app.module
It will create new components in a new module. Here we have created two components named as course and test.
const routes: Routes = [{ path: 'coding_ninja', loadChildren: () => import('./coding-ninja/coding-ninja.module').then(m => m.CodingNinjaModule) },
{ path: 'course', loadChildren: () => import('./course/course.module').then(m => m.CourseModule) },
 { path: 'Test', loadChildren: () => import('./test/test.module').then(m => m.TestModule) }];
The lazy loading syntax uses loadChildren() function that uses ‘import’ function in the syntax for dynamically importing the modules. The path indicates the reference path to the module.
There are two ways in which it can be implemented:
Using Promise
{path: 'lazy-loading',
     loadChildren: () => import('./lazy-loading/lazy-loading.module')
       .then(m => m.LazyLoadingModule)
            .catch(err => {
                  console.log('Error loading lazy module:', err);
            return null;
          }
      )
}
You can use promises to handle the Loading of the components or resources. A promise constructor is used to create a promise and resolve it when it is done with loading the resources.
Using Async
{path: 'lazy-loading',
   async () => (await import('./lazy-loading/lazy-loading.module’)).LazyLoadingModule
       .then(m => m.LazyLoadingModule)
                      .catch(err => {
                               console.log('Error loading lazy module:', err);
                      return null;
                   }
          )
 }
Using async will help you to create readable and presentable code. This 'await' keyword is used, pausing the function execution until the Promise returned by ''import'' is resolved.
Set User Interface
To display the information of the application we have created a simple UI. We have included the title and two options like course and test for access to the information regarding the course and test offered by the application.
<h1>
  CODING NINJA APPLICATION
</h1>

<button type="button" routerLink="/course">course</button>
<button type="button" routerLink="/Test">Test</button>
<router-outlet></router-outlet>
Import and Route the Configure
Added a default path to match those who do not belong to the other two paths.
const routes: Routes = [{ path: 'coding_ninja', loadChildren: () => import('./coding-ninja/coding-ninja.module').then(m => m.CodingNinjaModule) },
{ path: 'course', loadChildren: () => import('./course/course.module').then(m => m.CourseModule) },
 { path: 'Test', loadChildren: () => import('./test/test.module').then(m => m.TestModule)},
 { path: '', redirectTo: '', pathMatch: 'full } ];
Test and verify that Lazy Loading Worked
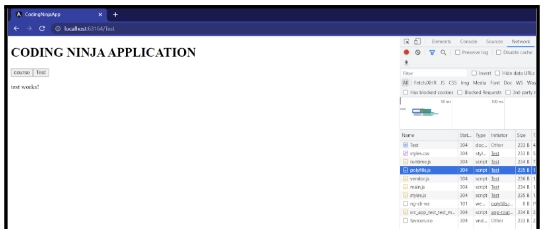
To see that lazy loading has worked, we have used a developer tool by using shift+control+j. We can see that there is an additional row added. This means that our application can reach out to the required module after we click it.

Points to Remember While Using Angular Lazy Loading
Lazy Loading improves the performance of angular applications. There are many things to keep in mind while using Lazy Loading. They are as follows:
-
You should use the load children () function. It indicates a path where the module can be loaded and used when necessary.
-
You should pre-load all the essential resources that an application will require. This can be done using predefined services.
-
Try to keep modules and components small. If you are using a large module, it will require more memory and will be slow to work.
- Test the performance of lazy Loading on all devices and all network devices. It would be beneficial for optimal results for user needs and specific applications.


