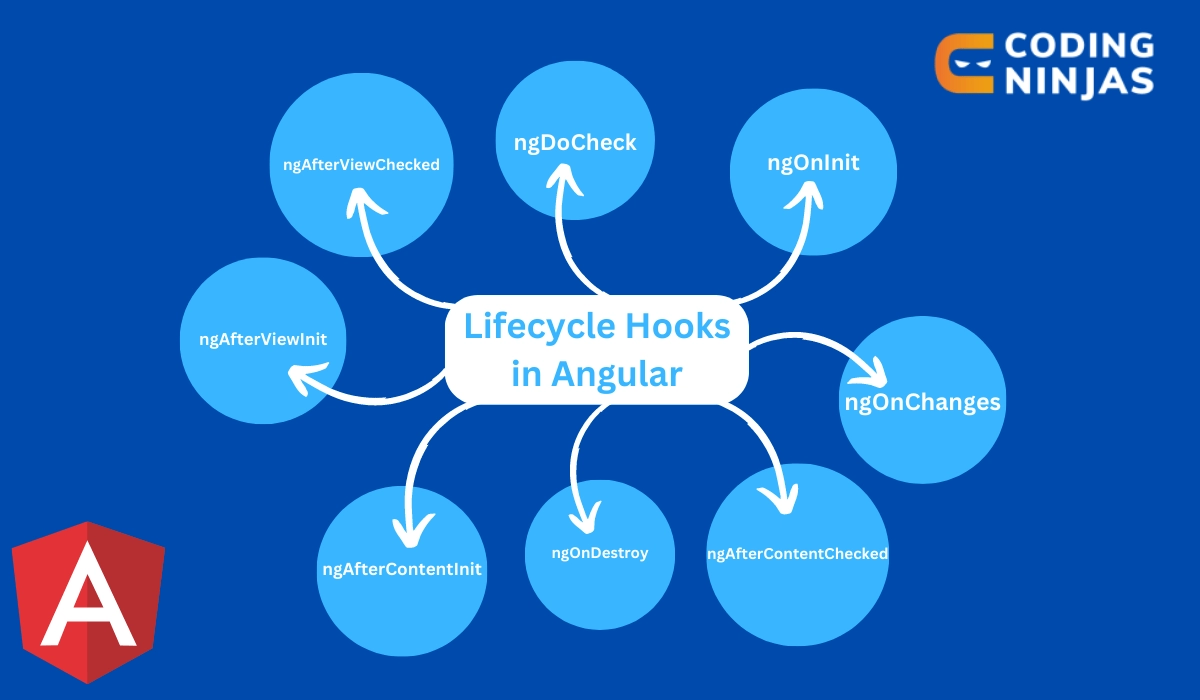
ngOnChanges
ngOnChanges is a lifecycle hook that is invoked a component's input property changes anytime. This hook is helpful when we want to respond to changes in a component's input properties.
When ngOnChanges is called, an object is passed containing the input properties' previous and current values. These values can then be used to perform any necessary action based on the changes made in these values.
ngOnInit
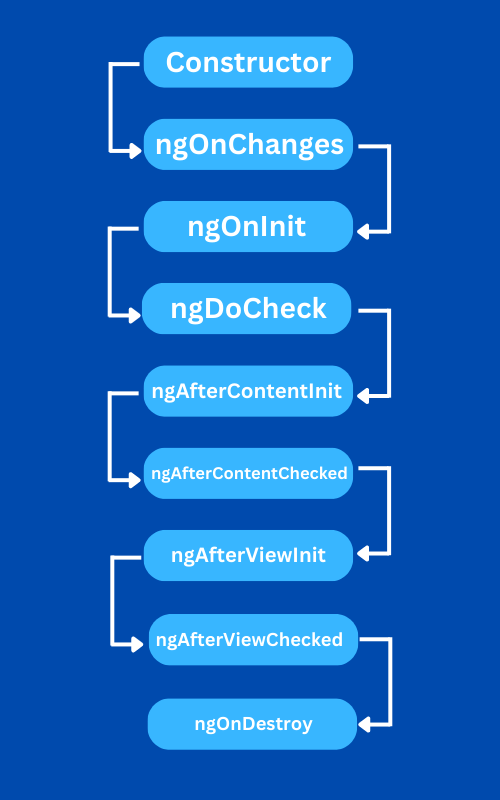
ngOnInit is a lifecycle hook that is called after the completion of the ngOnChanges hook. It is executed only once during the lifecycle of a component. This hook mainly performs initialization tasks in the component's input properties. It ensures that the component's input parameters are fully initialized before being displayed in the view.
ngDoCheck
ngDoCheck hook is called whenever the change detector of the target component is invoked. This hook detects and responds to the changes undetectable by the Angular, such as changes in objects. This happens because, in Angular, the change detection mechanism relies on the change in the object. But since the reference remains the same in objects even after modifying it, Angular cannot detect the difference.
Hence, we need to respond to these changes manually by the ngDoCheck lifecycle hook.
ngAfterContentInit
ngAfterContentInit is called whenever the component's projected component is initialized. This hook is used to perform initialization for the content's projected contents.
This particular lifecycle hook can be called to retrieve data from the projected content of the component. This hook is called once after the projected content of the component is initialized. Similar to ngOnInit, this hook ensures that the component's project content is initialized.
ngAfterContentChecked
ngAfterContentChecked is a lifecycle hook that is called after the changes in the component's projected content are checked. This hook updates the component's view based on the changes made to its projected content.
One Thing to note about this hook is that, unlike others, it is called once per change detection cycle. Hence, we must use it judiciously to ensure its overuse doesn't make the applications slower.
ngAfterViewInit
ngAfterViewInit hook is called after the component's view has been initialized. This hook performs initialization tasks that require the component's view. It mainly performs tasks like setting up event listeners, loading and initializing libraries, etc.
Similar to ngAfterContentInit, it is also called once during the initialization of the component's view. If the view is updated, the ngAfterViewChecked is called, which we will discuss next.
ngAfterViewChecked
ngAfterViewChecked is called after Angular has checked for the changes in the component's view. This hook is used whenever we need to perform anything after the component's initialized view.
Like ngAfterContentChecked, this hook is called once per each change detection cycle. This means that if the view of a component has been initialized and we need to make changes to it, it will be called instead of the ngAfterViewInit hook.
ngOnDestroy
ngOnDestroy is the last hook in the lifecycle of a component which is called just before a component is destroyed. Its main function is to perform any remaining tasks that need to be done before the component is removed from the DOM tree.
This hook is also only called only once during the life cycle. If the component is not destroyed and the resources are not released, it can lead to low performance and memory leaks in the application. Thus the ngOnDestroy is an essential hook to ensure the proper functioning of the application.
Generating Hook Methods
In Angular, generating hook methods refers to the automatic creation of lifecycle hooks within a component. Lifecycle hooks are predefined methods that Angular calls at specific points during the lifecycle of a component. These hooks enable developers to execute custom code at key stages, such as initialization, change detection, and destruction.
Angular generates these hook methods based on the lifecycle of the component, providing developers with entry points to intervene and perform actions tailored to different phases. Examples of generated hook methods include ngOnInit, ngOnChanges, ngAfterViewInit, and ngOnDestroy. These hooks play a crucial role in allowing developers to manage component behavior and state throughout its lifecycle.
Example of Lifecycle Example
In Angular, the lifecycle of a component involves several phases, and developers can leverage lifecycle hooks to execute custom code at specific points during this process. Below is an example illustrating the use of some commonly used lifecycle hooks in Angular:
import { Component, OnInit, OnChanges, OnDestroy } from '@angular/core';

@Component({
  selector: 'app-lifecycle-example',
  template: '<p>{{ message }}</p>',
})
export class LifecycleExampleComponent implements OnInit, OnChanges, OnDestroy {
  message: string = 'Hello, Angular!';

  constructor() {
    console.log('Constructor called');
  }

  ngOnInit() {
    console.log('ngOnInit called');
  }

  ngOnChanges() {
    console.log('ngOnChanges called');
  }

  ngOnDestroy() {
    console.log('ngOnDestroy called');
  }
}
In this example, the constructor is called when an instance of the component is created. The ngOnInit hook is called after the component has been initialized. The ngOnChanges hook is called when there are changes to input properties. The ngOnDestroy hook is called just before the component is destroyed. Developers can use these hooks to perform tasks like initializing data, responding to changes, or cleaning up resources, providing control over the component's behavior throughout its lifecycle.
Initializing a Component
Use the ngOnInit() method for initial setup tasks. This is where you handle complex initialization outside the constructor. Components should be quick and safe to create. You don't want a new component contacting a remote server before showing it or during testing. ngOnInit() is a good place for a component to get its initial data. Set the component after Angular has set the input properties. Constructors should only set initialized local variables to simple values. Remember, data-bound input properties are set after construction.
If you need to initialize the directive based on those properties, do it in ngOnInit(). The ngOnChanges() method is your first time accessing those properties. Angular calls ngOnChanges() before ngOnInit(), but several times after that. It only calls ngOnInit() once. In simpler terms, ngOnInit() is like the setup phase where you get things ready, and ngOnChanges() is called when there are changes to properties, but ngOnInit() is called only once.
Cleanup on the Destruction of the Instance
This refers to the process of performing tasks or freeing up resources when an Angular component is being destroyed or removed from the view. In Angular, you can implement the ngOnDestroy() lifecycle hook to handle cleanup operations before a component is removed.
This could include tasks like unsubscribing from observables, clearing intervals, or releasing resources to avoid memory leaks. It ensures that your component cleans up after itself before it's no longer needed.
Using Change Detection Hooks
Change detection in Angular is the mechanism that ensures the view is synchronized with the application state. Angular provides hooks that allow developers to tap into this change detection process.
- ngDoCheck(): This hook is called during every change detection run, providing an opportunity to implement custom change detection logic. It's invoked after ngOnChanges() and ngOnInit().
- ngAfterViewInit(): Called after the component's view, and its child views, are initialized. It's a good place to perform additional initialization tasks related to the view.
- ngAfterViewChecked(): Called after the component's view, and its child views, have been checked by the change detection mechanism. It's useful for responding to changes that occur in the view.
Using AfterContent Hooks
These hooks are specifically related to content projection in Angular components, where content is inserted into a component via <ng-content>.
- ngAfterContentInit(): Called after the content (projected content from the parent component) has been initialized. It's a good place to perform initialization tasks related to the content.
- ngAfterContentChecked(): Called after the content has been checked by the change detection mechanism. It's useful for responding to changes that occur in the projected content.
These hooks provide developers with flexibility to execute code at specific points in the component lifecycle, allowing for customization and optimization based on the application's requirements.
Defining Custom Change Detection
Developers can define custom change detection strategies using the ngDoCheck hook. This customization helps optimize performance and address specific scenarios unique to the application.
Why do we need lifecycle hooks?
Angular lifecycle hooks are essential for managing the lifecycle of components. They provide developers with opportunities to execute custom logic at specific points during the component's lifecycle. Understanding and utilizing these hooks is crucial for building efficient and responsive Angular applications. Here's why they are necessary:
- Initialization and Setup
- View and Content Initialization
- Change Detection
- Resource Cleanup
- Performance Optimization
Frequently Asked Questions
What are the lifecycle hooks in Angular?
Angular lifecycle hooks are methods that allow you to tap into the lifecycle of a component, from initialization to destruction. They include ngOnInit, ngOnChanges, ngOnDestroy, and others.
What is the difference between constructor and lifecycle hooks?
The constructor is part of TypeScript, used for basic initialization. Lifecycle hooks like ngOnInit are specific to Angular, providing more advanced control over the component lifecycle.
Which lifecycle hook is called before render?
The ngOnInit lifecycle hook is called just after the constructor and before the first ngOnChanges in Angular, making it suitable for initialization tasks before rendering.
How can we call Angular Lifecycle Hooks manually?
We can call Angular lifecycle hooks manually by invoking the method name of the hook. However, it is not considered a good practice because these lifecycle hooks are designed to be invoked automatically on appropriate points in the component's lifecycle.
Conclusion
Angular lifecycle hooks are a powerful feature that empowers developers to manage the lifecycle of components. From initialization to destruction, these hooks provide fine-grained control, enabling efficient resource management and enhanced user experiences. Understanding and leveraging these hooks is crucial for building robust and responsive Angular applications. Now that you have learned about lifecycle hooks in Angular, you can refer to other similar articles.
You may refer to our Guided Path on Code Studios for enhancing your skill set on DSA, Competitive Programming, System Design, etc.


 33+ registered