Setting Up View
This module is for you if you don't have an Animator panel open. If that's the case, move on to the following section.
Go to the Window menu bar and select Animator from the drop-down list to access the Animator panel.
Select the Animation option from the same Window menu to open the Animation panel.
Both of these will be used to make our sliding door animation.
Creating Animations for the Door
In this section, we will create animations for the Door using the Animator State Machine.
Now that you have your movable doors, we must figure out how to get them to move according to our commands. We must first understand the Animator and what it does to accomplish so.
The Animator, as previously stated, is in charge of transitioning from one Animation state to another. Consider playing a first-person shooter game like PUBG or CS:GO. If you merely press W, the player character walks or jogs, but if you hit shift together with W, the player fluidly bursts into a run. The Animator handles the Transition from "Walk State" to "Sprint State."
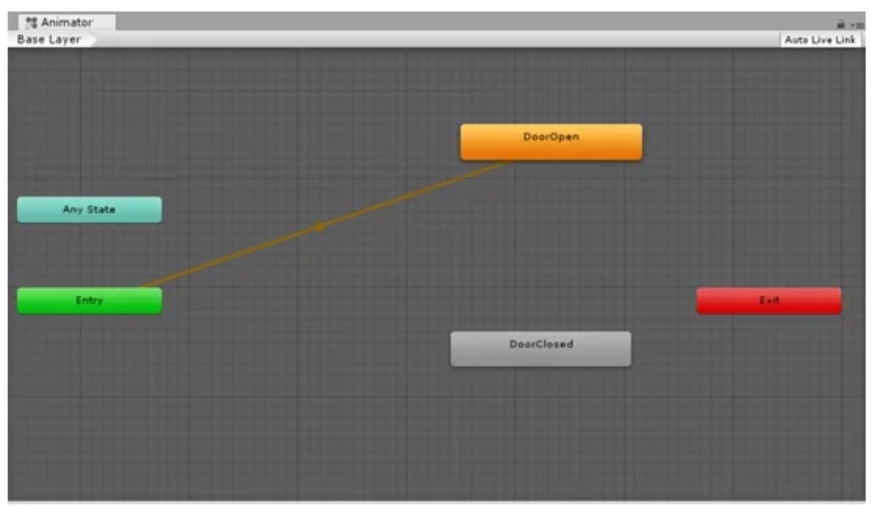
You'll notice an orange arrow pointing from the Entry state to the DoorOpen State. This arrow (or any other arrow) represents a transition between animation states. Let's look at what each status means.
To make animations, we first make the animation movements and then order them in the form of a state machine (google it!) so that we may transition from one State to the next. The animated figure below should not terrify you. You'll be able to make these in your sleep after watching this guide.
- Entry: The State of animation when the scene first appears is called Entry.
- Exit: This State stops the animation and restarts it from the beginning. Let's pretend your Transition ends in the state "foo." Make a transition between "blablabla" and "Entry." You simply cannot. If you genuinely need to do that, you should utilize "Exit."
- Any State: Any State is a unique state that always exists. It allows you to travel to a specified state regardless of where you are currently located. This is a shortcut for applying the same outward Transition to all of your machine's states. It's worth noting that the specific meaning of Any State means that it can't be the end of a transition (i.e., leaping to "any state" can't be used to pick a random state to enter next).
You'll also notice an arrow leading from the Entry to the DoorOpen State. This isn't what we're looking for. As soon as the scenario begins, the Door opens. We want the Door to remain stationary until we tell it to move. As a result, we'll require an "Idle" state or one with no Motion linked to it.
source: www.studytonight.com
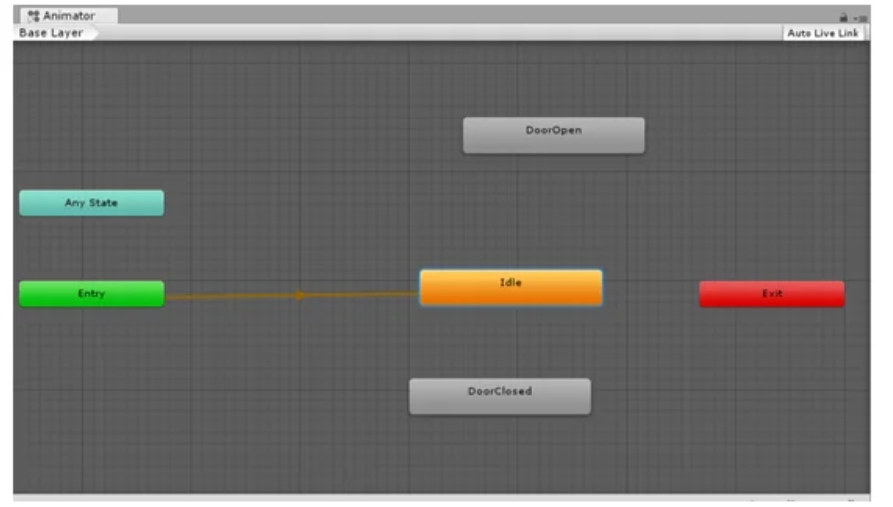
- To do so, right-click on the Animator panel space and choose to Create State -> Empty from the drop-down menu.
- Rename the state "New State" to "Idle" (do it yourself).
- Idle must now be the default state (State transitioned to after Entry). To do so, right-click Idle and choose Set as Layer Default State from the context menu.
source: www.studytonight.com
The transitions are next. Control is transferred from one State to the next during transitions. The orange arrow can identify a transition.
To make a transition, right-click on the first State, pick Make Transition from the drop-down menu, and then click on the following State.
So try to make your own working state diagram and compare it to the image below to see whether it's correct.
It is not yet over. When you press play, the Door automatically opens and closes. Because our transitions are condition less, this is the case. Condition-less transitions take place once the starting state has completed its animation. We require command in this situation. As a result, we apply transition conditions.
We need to set a parameter that toggles the Door open or closed in order to apply conditions. Go to the top left corner of the Animator panel and click the Parameter tab.
Select the Boolean option from the drop-down box by clicking the Plus icon below.
Change the name to "isDoorOpen" (do it yourself).
We use a boolean since it will be simple to represent the open and closed states of the Door.
To apply the conditions to the transitions, do the following:
- By clicking on the arrow, you can choose a transition.
- Click + in the Conditions option in the Inspector panel.
- Set the condition's value appropriately.
For "isDoorOpen," the values of transitions 1, 2, and 3 are true, false, and true, respectively.
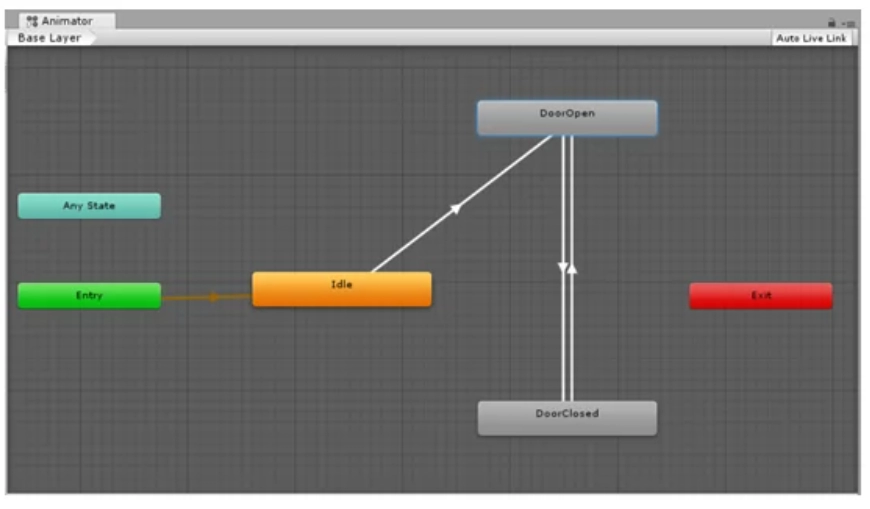
source: www.studytonight.com
As a result, we've finished setting up our conditions. These transitions will be triggered by programming.
Code
Let us have a look at the code.
-
Add a new C# script called "DoorManagerScript" to an empty object called "Door Manager."
- Select Add Component > New Script > to add the script. "DoorManagerScript" is the name of the script. Press the Create and Add buttons.
- Type and save the following code in the script.
using System.Collections;
using System.Collections.Generic;
using UnityEngine;


public class DoorManagerScript : MonoBehaviour
{
    public Animator anim;


    private bool trigger;


    void Start()
    {
        anim.SetBool ("isDoorOpen", false);
        trigger = false;
    }


    void Update()
    {
        trigger = anim.GetBool ("isDoorOpen");

        if(Input.GetKeyDown (KeyCode.Space))
        {
            if(!trigger)
            {
                anim.SetBool ("isDoorOpen", true);
            }
            else
            {
                anim.SetBool ("isDoorOpen", false);
            }
        }
    }
}
Well, I'd want to congratulate you on making your first Unity moving object. Furthermore, it follows your instructions! Excellent work. This is only a small sample of what the Mechanism system can accomplish in your skilled hands.
So play the video and observe what happens when you push the space bar.
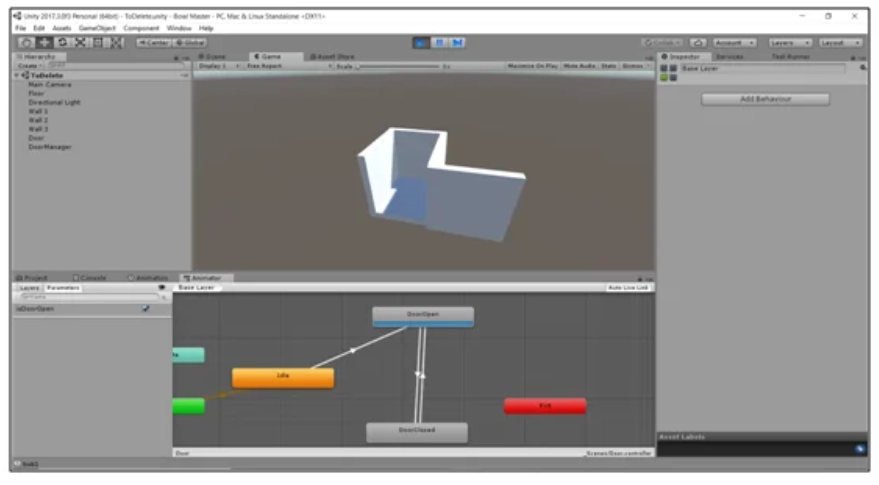
source: www.studytonight.com
Let’s move on to Frequently asked questions.
Frequently Asked Questions
What is Animation in Unity?
One component of a game that brings it to life is animation. Unity's animation system is called Mecanim, and its strength lies in bringing humanoid models to life.
What is the distinction between an Animator and an Animation?
Animators were replaced by Animations. Animators were introduced in 3.0 to help overcome some of the shortcomings of Animations. Animations only alter an object's visual representation. This is fine if you're just changing the opacity of an object, but it causes problems when you translate, rotate, or scale it. Animators, on the other hand, alter the physical characteristics of objects. That means that if you move a View, the touch coordinates will be mapped at the new location without any additional intervention.
What is the distinction between the Animation and Animator components?
The Animation component is an old animation component that was used in our legacy animation system. It is still included in Unity for backward compatibility, but it should not be used for new projects. Instead, use the most recent Animator component.
What's the distinction between the Animation window and the Animator window?
The Animation Window in Unity allows you to create and edit animation clips. You can use it to animate almost any property that can be edited in the inspector, such as a Game Object's position, material color, light brightness, sound volume, and even arbitrary values in your own scripts, whereas The Animator Window allows you to organize your existing animation clip assets into a flowchart-like system known as a state machine.
How do animations that have curves blend with those that don’t?
When you have an animation with a curve and another animation without a curve, Unity will blend them together using the default value of the parameter connected to the curve. You can specify default values for your parameters so that when blending occurs between a State with a Curve Parameter and one without, it will blend between the curve value and the default parameter value. To set a Parameter's default value, simply enter it in the Animator Tool window while not in LiveLink.
Conclusion
In this article, we have extensively discussed Animation and Animator in Unity 3D. We learned how to set up the environment, use the Animator State Machine, and write code.
After reading about Moving RigidBody, are you not feeling excited to read/explore more articles on the topic of Unity? Don't worry; Coding Ninjas has you covered. To learn, see Introduction to game development, Introduction to Unity, and Creating animations in Unity.
To learn more about DSA, Competitive Programming, System Design, JavaScript, etc., refer to our Guided Path on Coding Ninjas Studio. If you wish to put your coding skills to the test, check out the mock test series and enter the contests hosted by Coding Ninjas Studio! However, if you have just begun your learning process and are looking for questions asked by tech giants such as Amazon, Facebook, and Microsoft, among others, you should look at the interview experiences and interview bundle for placement preparations.
Nonetheless, you may want to consider our paid courses to give your career a competitive advantage!
Please vote for the blogs if you find them useful and exciting!
Happy Learning!

