Introduction
In this article, we will learn what Apigee hybrid is, and how we can install apigee hybrid on our system. Let’s first briefly understand what exactly is Apigee hybrid.

Apigee hybrid is a platform for creating and managing API proxies that uses a hybrid deployment methodology. The hybrid solution consists of a management plane hosted by Apigee in the cloud and a runtime plane that you install and control on one of the supported Kubernetes platforms.
There are different versions available for apigee hybrid. We will be using version 1.7 of the Apigee hybrid in this blog.
Installation of Apigee Hybrid
Before installing Apigee hybrid we need to configure a few things. So, let’s discuss them first before proceeding.
Configuring Google Cloud and UI
The very first thing that you need to do is to create the google cloud account and log in to the google cloud console. After that, you need to create a google cloud project which will be used for creating the apigee hybrid.
Creating a google cloud project
1. Go to Google Cloud Console and log in with your account.
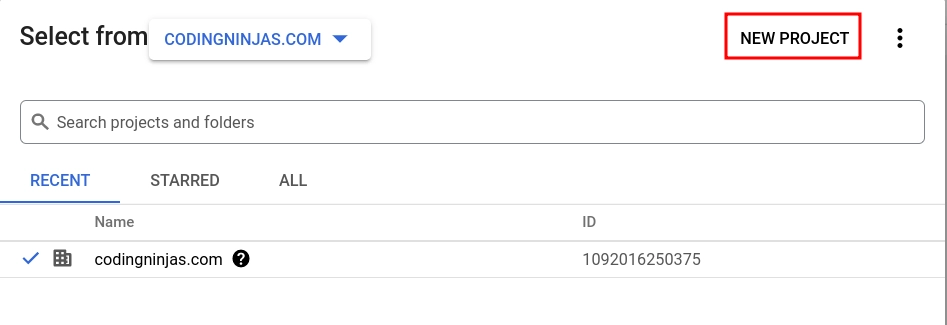
2. Click on Select Project.

3. A window will appear. Click on New Project and enter the details required.
4. After entering the required information click on Create. Also, make sure to note down the project ID somewhere as it will be needed later.
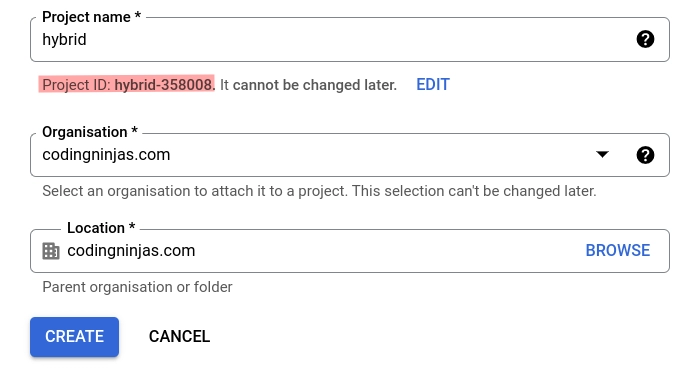
Your new project has been created. The next step is to enable the required APIs.
Enabling the required APIs
Below mentioned APIs need to be enabled in order to use Apigee Hybrid.
-
Apigee API
-
Apigee Connect API
-
Cloud Pub/Sub API
-
Cloud Resource Manager API
-
Compute Engine API
-
Kubernetes Engine API
To enable the above APIs follow the mentioned steps:
1. Open up the gCloud terminal and enter the following command replacing the $PROJECT_ID with your project ID.
gcloud services enable apigee.googleapis.com apigeeconnect.googleapis.com cloudresourcemanager.googleapis.com compute.googleapis.com container.googleapis.com pubsub.googleapis.com --project $PROJECT_ID
2. To verify whether all of the required APIs are enabled or not enter the below command.
gcloud services list --project $PROJECT_ID
The above command returns the list of the active APIs in your project make sure that all the APIs listed below are enabled in your project.
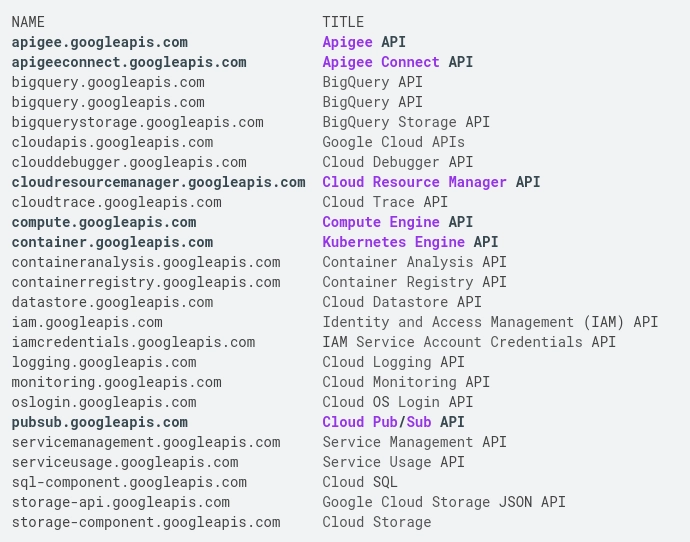
After enabling the required APIs for apigee hybrid. The next step would be to create an organization
Creating an Organization
Follow the below steps to create an organization.
1. Get the access token for your gcloud and save it inside an environment variable namely TOKEN.
TOKEN=$(gcloud auth print-access-token)
2. Execute the below command and make sure all of the environment variables have the correct value assigned to them.
echo ${PROJECT_ID}
echo ${ORG_NAME}
echo ${ORG_DISPLAY_NAME}
echo ${ORGANIZATION_DESCRIPTION}
echo ${ANALYTICS_REGION}
echo ${RUNTIMETYPE}
3. Use the below command to send an authenticated POST request to the Create organizations API.
curl -H "Authorization: Bearer $TOKEN" -X POST -H "content-type:application/json" -d '{ "name":"'"$ORG_NAME"'", "displayName":"'"$ORG_DISPLAY_NAME"'", "description":"'"$ORGANIZATION_DESCRIPTION"'", "runtimeType":"'"$RUNTIMETYPE"'", "analyticsRegion":"'"$ANALYTICS_REGION"'" }' "https://apigee.googleapis.com/v1/organizations?parent=projects/$PROJECT_ID"
When the above command successfully runs it returns the following output.
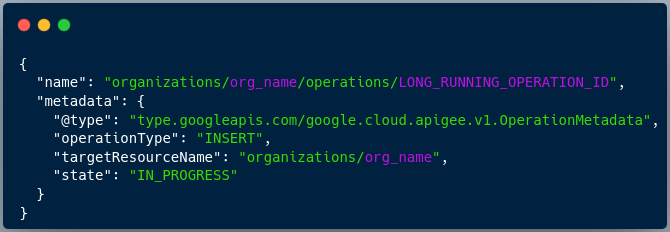
The highlighted part will be replaced by the values generated at that time. You can save the value of LONG_RUNNING_OPERATION_ID as it will be used later.
Execute the following command to save the long-running operation ID.
export LONG_RUNNING_OPERATION_ID=long_running_operation_ID
The new organization has been created successfully and it is ready to use. The next step is to create an environment group.
Creating an Environment Group
In Apigee, API proxies are deployed to an environment and these environments are organized into environment groups. It is important to have at least one environment and one environment group. Let’s first create an environment and then we’ll assign this environment to an environment group.
Execute the below command to create the environment. As mentioned in the above section check whether all of the environment variables are defined or not before executing the below command.
curl -H "Authorization: Bearer $TOKEN" -X POST -H "content-type:application/json"   -d '{
    "name": "'"$TOKEN"'",
    "displayName": "'"$ENV_DISPLAY_NAME"'",
    "description": "'"$ENV_DESCRIPTION"'"
  }'   "https://apigee.googleapis.com/v1/organizations/$ORG_NAME/environments"
The required environment is created. Now, let’s create an environment group
1. Get the access token for your gcloud and save it inside an environment variable namely TOKEN.
TOKEN=$(gcloud auth print-access-token)
2. Make sure the environment variables DOMAIN and ENV_NAME are defined.
echo $DOMAIN
echo $ENV_NAME
3. Create the environment group using the following command.
curl -H "Authorization: Bearer $TOKEN" -X POST -H "content-type:application/json" -d '{
"name": "'"$ENV_GROUP"'",
"hostnames":["'"$DOMAIN"'"] }'
"https://apigee.googleapis.com/v1/organizations/$ORG_NAME/envgroups"
4. Assign the environment to the new group using the following command.
curl -H "Authorization: Bearer $TOKEN" -X POST -H
"content-type:application/json"
-d '{
    "environment": "'"$ENV_NAME"'",
}'
"https://apigee.googleapis.com/v1/organizations/$ORG_NAME/envgroups/$ENV_GROUP/attachments"
All the configurations required for the apigee hybrid installation are done. Now let’s see how we can install the apigee hybrid.
Hybrid runtime setup
Before actually installing the hybrid runtime. We need to install a few other things like cert-manager, ASM, and apigeectl. Let’s discuss all of them one by one.
Installing cert-manager
The cert-manager can be installed from GitHub using the following command.
kubectl apply --validate=false -f https://github.com/jetstack/cert-manager/releases/download/v1.7.2/cert-manager.yaml
After successful execution of the above command, the cert-manager should have been installed. To verify you can execute the below command.
kubectl get pods -n cert-manager
The following output will be generated if the cert-manager is installed successfully.

Installing ASM
Istio distribution provided with Anthos Service Mesh (ASM) is used by Apigee hybrid. Follow the below steps to install ASM.
1. Execute the below command and check whether the required environment variables are defined or not.
echo $PROJECT_ID
echo $CLUSTER_NAME
echo $CLUSTER_LOCATION
2. A new overlay file with the name “overlay.yaml” need to be created. You can visit the official documentation of apigee hybrid to see the content of this file.
3. Enable all the permission required to install the Anthos Service Mesh.
4. Install all the required tools like asmcli, git, kubectl, and jq.
5. Grant cluster-admin permissions and stop. There's no need to perform the “Validate project and cluster” step.
Installing apigeectl
apigeectl is the command-line interface (CLI) for installing and managing Apigee hybrid in a Kubernetes cluster. Follow the steps below to install apigeectl.
1. Fetch the latest version number and store it inside a variable named VERSION.
export VERSION=$(curl -s https://storage.googleapis.com/apigee-release/hybrid/apigee-hybrid-setup/current-version.txt?ignoreCache=1)
2. Download the latest version by executing the below command.
curl -LO https://storage.googleapis.com/apigee-release/hybrid/apigee-hybrid-setup/$VERSION/apigeectl_linux_64.tar.gz
3. Create a new directory and extract the downloaded file into this directory this directory will be used as the base directory for apigee hybrid installation.
4. Change the directory to the newly created directory using the cd command and create a new environment variable to store the path of this directory.
5. Inside this directory, create a new directory with any name you like (we’ll be using hybrid-files as the name for our directory). Make sure you remember the name as this folder will be used to store configuration files, service account keys, and TLS certificates.
6. Change the directory to the newly created directory using the cd command.
7. Create two new subdirectories to organize files that will be created later.
Creating Service account and credentials
To allow hybrid components to make authorized API calls the Apigee hybrid uses google cloud service accounts. To create a service account change directory to the directory we made inside our base directory created in the above section then execute the following command.
./tools/create-service-account --env non-prod --dir ./service-accounts
You’ll see a prompt. Press and hit enter to create the service account.
Creating TLS certificates
TLS certificates need to be provided for the runtime ingress gateway in the Apigee hybrid configuration. To create the TLS certificate change the directory to the cert folder we created inside the hybrid-files folder that we created earlier and execute the following command.
openssl req -nodes -new -x509 -keyout ./certs/keystore.key -out ./certs/keystore.pem -subj '/CN='$DOMAIN'' -days 3650
Configuring the hybrid runtime
Apigee hybrid uses default values for many settings, but there are some settings that don’t have any default values assigned to them. You explicitly need to assign some value to those settings.
To assign a value to these settings a new file needs to be created namely overrides.yaml inside the overrides directory we created earlier. In this file, you can write the name of the setting and the value you want to assign.
Enabling Synchronizer access
You need to enable Synchronizer access to allow the apigee hybrid to communicate with runtime and management planes.
Installing the Hybrid runtime
All the configurations have been done. Now let’s install the hybrid runtime.
Make sure you are in the hybrid-files directory which we created earlier before executing any of the below commands.
1. Before the actual initialization let’s do a dry run by executing the following command.
${APIGEECTL_HOME}/apigeectl init -f overrides/overrides.yaml --dry-run=client
2. If no errors are found, then you can execute the below command for initialization.
${APIGEECTL_HOME}/apigeectl init -f overrides/overrides.yaml
3. Apply the Apigee-specific runtime components to the cluster using the following command.
${APIGEECTL_HOME}/apigeectl apply -f overrides/overrides.yaml
4. Check the status of your deployment by running the following command.
${APIGEECTL_HOME}/apigeectl check-ready -f overrides/overrides.yamlCongratulations, You have successfully installed the Apigee hybrid.


