Do you think IIT Guwahati certified course can help you in your career?
Introduction
MVC architecture is a design pattern that splits an application into three interconnected components: the Model, the View, and the Controller. This approach, central to many MVC frameworks, helps developers organize their code more efficiently, which makes it easier to manage and update. Each component handles specific aspects of the application, which allows for a clear separation of concerns and simpler maintenance. With the help of MVC frameworks, developers can create more scalable, robust, and maintainable applications. In this article, we are going to learn how to talk about how to use MVC architecture and take advantage of this tool.
What is MVC Architecture?
MVC stands for model-view-controller architecture. It was initially designed for desktop graphical user interfaces. Now,MVC has become very popular for developing web applications and mobile desktops, and other clients. It divides a given application into three parts that are all connected. When the software applications were first designed, everything was on the same machine. That is, frontend, backend, and processing code were all processed on the same machine. But later, a tiered approach was introduced, in which a specific part of code is separated and written separately.
The Model View Controller design pattern includes a data model, presentation information, and control information are all included in the Model View Controller (MVC) design pattern. Each of these must be separated into separate objects according to the pattern.
MVC is more of an architectural pattern than a full-fledged application. MVC is primarily concerned with an application's user interface (UI). MVC is widely used in popular programming languages such as Java, C#, Ruby, PHP, and others.
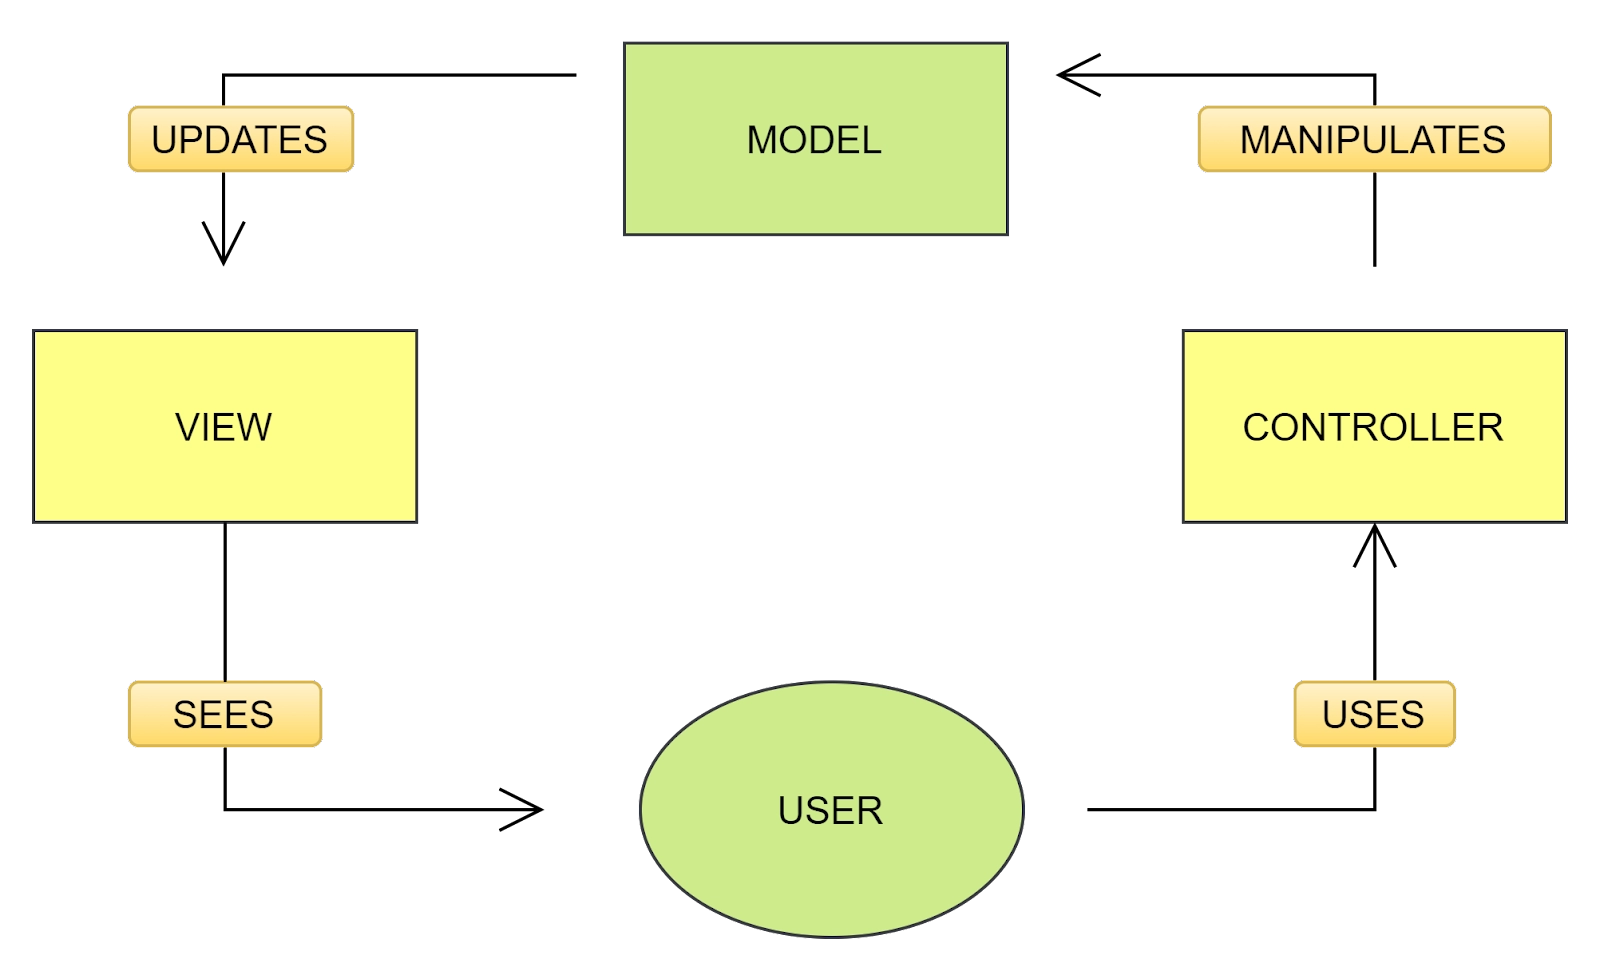
The original MVC
Importance of MVC in System Design
Separation of Concerns
Enhanced Clarity and Maintainability: MVC separates the application into three interconnected components—Model, View, and Controller—allowing developers to focus on specific aspects of the application logic. Models handle data and business logic, Views manage the presentation layer, and Controllers coordinate interactions between the Model and View. This division improves code clarity and makes maintenance easier by isolating changes within specific components without affecting others.
Reusability
Component Reusability: MVC promotes component-based development where Models, Views, and even Controllers can be reused across different parts of the application or in entirely separate projects. For instance, a well-defined Model representing user data can be reused in various views or even in other applications, enhancing development efficiency and consistency.
Scalability
Supports Incremental Growth: MVC architecture facilitates scalability by enabling developers to add new features or modify existing ones without extensively rewriting the entire application. This modular approach allows for easier integration of new components or functionalities, minimizing disruption to the existing system and supporting long-term project growth.
Testability
Modular and Independent Testing: MVC's separation of concerns makes testing more manageable. Each component—Model, View, and Controller—can be tested independently, utilizing frameworks and tools specific to their functionalities. This modular testing approach enhances the overall reliability of the application by ensuring that changes in one component do not adversely affect others.
Key Components of MVC
Model:
The model contains the application's business logic and is responsible for data maintenance. Only the pure application data is stored in the model. There is no logic describing how the data should be presented to a user.
View:
The view denotes the user interface through which end-users interact. The view knows how to get to the data in the model. But it has no idea what it means or what the user can do with it.
Controller:
Between the view and the model is the controller. The controller is the one who responds to the user's actions. The respective controller responds within the model based on the user actions and chooses a view to render that displays the user interface. The controller is where the user input logic is kept.
Implementation Strategies for MVC Architecture
Code Separation
Maintain Clear Component Boundaries: Ensure that Models handle data and business logic, Views manage UI rendering, and Controllers deal with input and user interaction. Avoid mixing responsibilities to enhance code clarity and reduce maintenance complexity.
Framework Utilization
Leverage MVC Frameworks: Use established frameworks like Spring MVC, Django, or Angular to streamline implementation. These frameworks provide built-in patterns and tools that enforce MVC principles, reduce boilerplate code, and speed up development.
Consistent Data Flow
Define Clear Communication Paths: Establish a predictable flow of data between Model, View, and Controller. For example, the Controller updates the Model, and the View reflects those changes. Avoid bidirectional dependencies that could lead to tight coupling and bugs.
Modular Design
Encapsulate Functionality in Modules: Break down the application into smaller, reusable modules aligned with MVC components. This promotes scalability and enables teams to work on different modules independently, speeding up development and improving collaboration.
By following these strategies, teams can effectively implement MVC architecture in a way that enhances maintainability, flexibility, and long-term project success.
Features of MVC:
1. Separation of Concerns: MVC promotes a clear separation of concerns by dividing an application into three main components: Model, View, and Controller. Each component has a specific responsibility and operates independently, allowing for modular and maintainable code.
2. Modularity: MVC encourages modularity by encapsulating related functionality into separate components. The Model handles data and business logic, the View is responsible for presenting the data to the user, and the Controller manages the interaction between the Model and the View. This modular approach makes the application more organized and easier to develop, test, and maintain.
3. Reusability: MVC promotes code reusability by separating the application logic into distinct components. The Model, View, and Controller can be developed and tested independently, and they can be reused across different parts of the application or even in other projects. This reusability saves development time and effort.
4. Flexibility: MVC provides flexibility in terms of development and modification. Each component can be modified or replaced without significantly affecting the others. For example, you can change the View component to modify the user interface without altering the underlying Model or Controller. This flexibility allows for easier updates and enhancements to the application.
5. Testability: MVC enhances the testability of an application by allowing each component to be tested independently. The Model, View, and Controller can have separate unit tests to ensure their functionality. This independent testability makes it easier to identify and fix bugs, leading to more robust and reliable software.
6. Parallel Development: MVC supports parallel development by allowing different team members to work on different components simultaneously. The separation of concerns enables developers to focus on their specific tasks, such as developing the Model, designing the View, or implementing the Controller logic, without interfering with each other's work. This parallel development approach can lead to faster development cycles and improved team collaboration.
Working of the MVC framework with Example:
Now, let's understand how the MVC framework works. We will take an example of an online bookstore application to understand how the MVC framework works:
1. Model:
- The Model represents the data and business logic of the application. - In the bookstore example, the Model would include classes like `Book`, `Author`, and `Order`. - The `Book` class may have properties such as `title`, `author`, `price`, and methods like `getDetails()` or `updateStock()`. - The Model interacts with the database to retrieve, update, and store data related to books, authors, and orders.
2. View:
- The View is responsible for presenting the data to the user in a user-friendly format. - In the book store example, the View would include HTML templates or UI components for displaying book listings, book details, shopping cart, and order confirmation pages. - The View receives data from the Model through the Controller and renders it in a structured and visually appealing way.
3. Controller:
- The Controller acts as an intermediary between the Model and the View. It receives user requests, interacts with the Model to retrieve or update data, and prepares the data for the View to display. - In the bookstore example, the Controller would handle actions like: - Fetching the list of books from the Model when the user visits the book listing page. - Retrieving book details from the Model when the user selects a specific book. - Processing user input, such as adding a book to the shopping cart or placing an order. - Updating the Model with new data or changes based on user actions.
4. User Interaction:
- The user interacts with the application through the View, typically by clicking on links, submitting forms, or performing other actions. - When a user action occurs, the Controller receives the request and determines the appropriate action to take based on the user's input.
5. Controller Action:
- The Controller communicates with the Model to retrieve or update data based on the user's request. - In the book store example, if the user clicks on a book's details page, the Controller would fetch the details of that specific book from the Model.
6. Model Data Retrieval/Update:
- The Model interacts with the database or other data sources to retrieve or update the requested data. - In the book store example, the Model would query the database to fetch the book details based on the book ID provided by the Controller.
7. View Rendering:
- Once the Controller receives the data from the Model, it prepares the data and passes it to the appropriate View for rendering. - In the book store example, the Controller would pass the retrieved book details to the book details View template. - The View then renders the data in a user-friendly format, such as displaying the book title, author, price, and description on the page.
8. Response:
- The rendered View is sent back to the user's browser as a response to their request. - In the bookstore example, the user would see the book details page with the relevant information displayed.
Popular MVC Frameworks (Real-World Examples)
Django (Python): Django follows the Model-View-Template (MVT) pattern, which is a variation of MVC tailored to Python web development. The framework handles much of the backend logic and emphasizes rapid development and clean design.
Ruby on Rails (Ruby): Rails uses the classic MVC pattern and provides a convention-over-configuration approach. It streamlines development by handling routine tasks and encouraging best practices, ideal for database-driven web applications.
Angular (TypeScript/JavaScript): Angular is a front-end framework that implements a component-based architecture resembling MVC. Components manage both the view and part of the controller logic, promoting modular and maintainable single-page applications.
Challenges of MVC Architecture
Complexity in Small Projects: For small or simple applications, implementing MVC can introduce unnecessary complexity. The overhead of separating concerns may outweigh its benefits in these cases.
Steep Learning Curve: New developers may find it difficult to understand the separation of responsibilities and how the components interact. This learning barrier can slow down initial development.
Management Overhead: Maintaining clear separation and managing multiple files for a single feature (Model, View, Controller) can become cumbersome, especially as the application grows or across teams unfamiliar with MVC principles.
Advantages of MVC Architecture
The advantages of MVC architecture are :
Multiple developers can work on the model, controller, and views at the same time.
Multiple views are possible for models.
Convenient to maintain and manage.
MVC allows related actions on a controller to be logically grouped. A specific model's views are also grouped.
The MVC framework separates the user interface, business logic, and data.
MVC framework improves the testability of web applications and provides excellent support for test-driven development.
Disadvantages of MVC Architecture
The disadvantages of MVC architecture are :
It becomes a necessity to get familiar with a variety of technologies for MVC developers.
It requires users to adapt to MVC's decomposition criteria. The framework navigation can be complicated.


 9+ registered

