


Introduction
Methods that return a string are known as HTML Helpers. HTML controls can be created programmatically using the Helper class. View uses HTML Helpers to render the HTML content. When creating an ASP.NET MVC(Model-View-Controller) application, HTML Helper classes are not required. Although an ASP.NET MVC application can be built without them, HTML Helpers help in the speedy building of views. Because HTML Helpers do not require ViewState and do not have event models, they are more lightweight than ASP.NET Web Form controls.

HTML Helper and its Types
MVC 2 introduces a new class called HtmlHelper. It's used to programmatically construct HTML controls. On the view page, it has built-in techniques for generating controls. The constructors, attributes, and methods of this class have been tabled in this topic. Finally, we will go over an example of how to use extension methods to create a form.

Inline HTML Helper
Using the Razor @helper tag, Inline HTML Helper is utilised to create a reusable Helper method. Only the same view can reuse inline helpers. We are unable to use the inline assistance on the various view pages. Based on our needs, we can design our own Inline helper method.
Advantages
- It can be reused in the same view.
- It cuts down on code repetition.
- It's simple to make and simple to utilise.
- Customizing the approach to meet a specific need is simple.
Syntax
@helper HelperNameHere(Parameters list..)
{
//write your code.....
}
Example:
Controller
 public ActionResult InlineHTMLHelper()
        {
            return View();
        }
View
    <ul>
    @helper mylist(string[] arr)
    {
        foreach (string data in arr)
        {
           <li>@data</li>
        }
    }
</ul>
@mylist(new string[]{"Yogeshdotnet","xyz","abc"})
@mylist(new string[]{"Yogeshdotnet1","xyz1","abc1"})
Output

Built-in HTML Helper
Because there are many overrides available for them, ASP.NET provides a wide selection of built-in HTML helpers that can be utilised according to the user's preferences. ASP.NET provides three different types of built-in HTML helpers.
The built-in HTML Helpers are separated into three groups:
- Standard HTML Helper
- Strongly typed HTML Helper
- Templated HTML Helper
Standard HTML Helper
Standard HTML helpers are HTML helpers that are primarily used to render HTML elements such as text boxes, checkboxes, radio buttons, and dropdown lists, among others.
Here is a list of standard HTML Helpers:
- @Html.ActionLink() - Creates a link on an HTML page.
- @Html.TextBox() - Creates a text box.
- @Html.CheckBox() - Creates a check box.
- @Html.RadioButton() - Creates a Radio Button.
- @Html.BeginFrom() - This is used for starting a form.
- @Html.EndFrom() - This is used for closing a form.
- @Html.DropDownList() - Creates a drop-down list.
- @Html.Hidden() - It is used to create hidden fields.
- @Html.label() - It is used to create HTML labels.
- @Html.TextArea() - The TextArea method renders a text area element in a browser.
- @Html.Password() - This method is in charge of producing a password input field in the browser.
- @Html tag. ListBox() - The ListBox helper method builds a browser-based html ListBox with a scrollbar.
Example:
In this example, we'll create a form, submit it, and then display the results.
Action
public ActionResult BuiltInTypehelpers()
        {
            return View();
        }
View
@{
    ViewBag.Title = "BuiltInTypehelpers";
}
<style>
    .myclass {
        width: 400px;
        border: 1px solid brown;
        height: 35px;
        border-radius: 5px;
        margin-left: 50px;
    }

    .myclass1 {
        margin-left: 100px;
    }
</style>
<h2>BuiltInTypehelpers</h2>
@using (Html.BeginForm("SubmitData", "HtmlHelpersEx", FormMethod.Post))
{
    <table>
        <tr>
            <td> @Html.Label("Enter Name") </td>
            <!-- Add CSS class , required html attribute and Placeholder using htmlattributes -->
            <td>@Html.TextBox("txt1", "", new { @class = "myclass", @placeholder = "Enter name", @required = "required" })</td>
        </tr>
        <tr>
            <td> @Html.Label("Email") </td>
           <!-- Add TextBox Type -->
            <td>@Html.TextBox("txt2", "", new { @class = "myclass", @placeholder = "Enter name", @type = "email", @required = "required" })</td>
        </tr>
        <tr>
            <td> @Html.Label("State") </td>

            <td>

                @Html.DropDownList("StateList", new List<SelectListItem> { new SelectListItem { Text = "Raj", Value = "1" }, new SelectListItem { Text = "UP", Value = "2" } }, "--Select State--", new { @class = "myclass", @required = "required" })
                <!-- To Get Selected Text instead of value create hidden field-->
                <input type="hidden" name="hidden1" id="hidden1" value="" />
            </td>
        </tr>
        <tr>
            <td> @Html.Label("State") </td>

            <td>
                @Html.RadioButton("gender", "male", new { @class = "myclass1" })@Html.Label("Male")
                @Html.RadioButton("gender", "female")@Html.Label("Female")
            </td>
        </tr>
        <tr>
            <td> @Html.Label("hobbies") </td>

            <td>
                <label><input type="checkbox" name="name1" value="Dancing" /> Dancing </label><label> <input type="checkbox" name="name1" value="Reading" /> Reading </label><label> <input type="checkbox" name="name1" value="Internet" /> Internet </label>
            </td>
        </tr>
        <tr>
            <td> @Html.Label("Comments") </td>

            <td>
                @Html.TextArea("comments", new { @class = "myclass", @rows = "5", @col = "5" })
            </td>
        </tr>
        <tr>


            <td colspan="2"><input type="submit" name="sub1" value="Save" class="btn btn-primary btn-lg" />

          @*@Html.ActionLink("Go To Inline Helper", "InlineHTMLHelper" , "HtmlHelpersEx", new { id1 = "sdsdsds" }, null)*@
            </td>

        </tr>
    </table>

}

<script src='@Url.Content("~/Scripts/jquery-1.10.2.min.js")'></script>
@*<script src="~/Scripts/jquery.validate.min.js"></script>
<script src="~/Scripts/jquery.validate.unobtrusive.min.js"></script>*@
<script>
    // Code to take text from selected item from dropdown
    $(document).ready(function () {
        $("#StateList").change(function () {
            var ddtext = $("#StateList option:selected").text();
            $("#hidden1").val(ddtext);

        })


    })


</script>
Custom Class(Employee2)
using System;
using System.Collections.Generic;
using System.Linq;
using System.Web;

namespace testCode.CustomClasses
{
    public class Employee2
    {
        public string Name;
        public string Email;
        public string StateList;
        public string gender;
        public string[] hobbies;
        public string comments;
    }
}


Action
public ActionResult SubmitData(FormCollection form , string[] name1)
        {
            var Name1 = form["txt1"].ToString();
            var Email1 = form["txt2"].ToString();
            // To get Value of State
            // var State = form["StateList"].ToString();
            //To Get Selected Text of DropDown
            var State = form["hidden1"].ToString();
            var gender = form["gender"].ToString();
            // Create new  array to get checkboxes data and initilze with checked values
            string[] arraydata = new string[name1.Length];
            for(var i=0; i<name1.Length; i++)
            {
                if(name1[i]!= null)
                {
                    arraydata[i] = name1[i].ToString();
                }
            }

            var Comments = form["comments"].ToString();
            //TempData["Name"] = Name;
            //TempData["Email"] = Email;
            // Initile Custom Class
            Employee2 obj = new Employee2 { Name = Name1, Email = Email1 , hobbies =  arraydata, gender = gender, StateList= State, comments = Comments};
            //Store Employee Object Into TempData and Pass it
            TempData["Data"] = obj;
            return RedirectToAction("ShowData");
        }

    public ActionResult ShowData()
        {
            if (TempData["Data"] != null)
            {
                return View();
            }
            else
            {
                return RedirectToAction("BuiltInTypehelpers");
            }
        }


View(Show Data)

@using testCode.CustomClasses
@{
ViewBag.Title="ShowData";

Employee2 obj2 = ((Employee2)TempData["Data"]);
}

<h2>ShowData</h2>
@*<h4>Name:@TempData["Name"]</h4
><h4>Email:@TempData["Email"]</h4>*@

<h4>Name:@obj2.Name</h4>
<h4>Email:@obj2.Email</h4>
<h4>Hobbies</h4><ul>
@foreach(var data in obj2.hobbies){
<li>@data</li>
}</ul>
<h4>Gender:@obj2.gender</h4>
<h4>State:@obj2.StateList</h4>
<h4>Comments:@obj2.comments</h4>
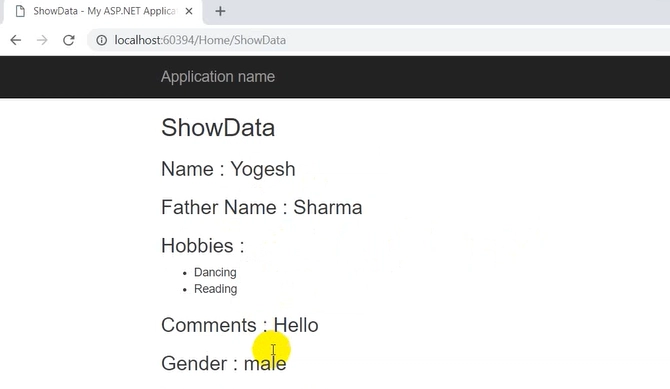
Outputs

After clicking on save button it will redirect to show data page.
Strongly Typed HTML Helper
The Strongly-Typed HTML helper accepts a lambda as a parameter, which tells it the model element to use in the typed view. Instead of using the general View-Data structure, strongly typed views are utilised to render specific types of model objects.
Here is a list of strongly typed HTML Helper:
- @Html.HiddenFor()
- @Html.LabelFor()
- @Html.TextBoxFor()
- @Html.RadioButtonFor()
- @Html.DropDownListFor()
- @Html.CheckBoxFor()
- @Html.TextAreaFor()
- @Html.PasswordFor()
- @Html.ListBoxFor()
All of them have the same functionality as the previous ones, but they're utilised with modal classes. To use strongly typed HTML, we require a model class, as we know. So, first, we'll create a model class, as seen below.
Example
using System;
using System.Collections.Generic;
using System.Linq;
using System.Web;

namespace HTML_Helper_Demo.Models
{
    public class Student
    {
        public int EmpId { get; set; }
        public string Name { get; set; }
        public string Gender { get; set; }
        public city city { get; set; }
        public skills skills { get; set; }
        public string Address { get; set; }
        public string Password { get; set; }
        public bool AgreeTerm { get; set; }
    }
}

    public enum city {
        Dehli, Mumbai, Kolkata, Channai, Bangalore
    }

public enum skills
{
    HTML5,
    CSS3,
    Bootstrap,
    JavaScript,
    JQuery,
    Angular,
    MVC,
    WebAPI
}


Now, in the controller, we will write the following code. Then, with the default attributes, we will add a view.
using System;
using System.Collections.Generic;
using System.Linq;
using System.Web;
using System.Web.Mvc;
using HTML_Helper_Demo.Models;

namespace HTML_Helper_Demo.Controllers
{
    public class HomeController : Controller
    {
        public ActionResult Index()
        {
            return View();
        }
        [HttpPost]
        public ActionResult Index(Student stu)
        {
            return View();
        }
    }
}


Now we will write the HTML in the following format:
@using HTML_Helper_Demo.Models
@model Student
@{
ViewBag.Title="Index";
}

<div>
<h3>Example of Lable</h3>
@Html.LabelFor(model=>model.Name,new
{ @class = "label-control" })

<h3>Textbox</h3>@Html.TextBoxFor(model=>model.Name,new
{ @class = "form-control" })

<h3>Another Textbox</h3>@Html.TextAreaFor(model=>model.Address,new
{ @class = "form-control", rows = "5" })

<h3>Password</h3>@Html.PasswordFor(model=>model.Password,new
{ @class = "form-control" })

<h3>Radio buttons Example</h3>@Html.RadioButtonFor(model=>model.Gender,true,new
{ id = "male-true" })@Html.Label("male-true","Male")@Html.RadioButtonFor(model=>model.Gender,false,new
{ id = "female-true" })
@Html.Label("female-true", "Female")

    <h3>Checkbox</h3>
@Html.CheckBoxFor(model => model.AgreeTerm)

    <h3>Example of Listbox</h3>
@Html.ListBoxFor(model=>model.skills,new SelectList(Enum.GetValues(typeof(skills))),new
{ @class = "form-control" })

<h3>
Dropdown List</h3>
@Html.DropDownListFor(model=>model.city,new SelectList(Enum.GetValues(typeof(city))),"Select City",new
{ @class = "form-control" })

</div>
Output


Templated HTML Helper
For data entry and presentation, the templated HTML Helper is used. It creates HTML based on model properties and can generate HTML for an entire model with just one tag. These are separated into two groups.
- Display Template
- Editor Template
Here is a list of templated HTML Helper:
Display
- @Html.Display()
- @Html.DisplayFor()
- @Html.DisplayName()
- @Html.DisplayNameFor()
- @Html.DisplayText()
- @Html.DisplayTextFor()
- @Html.DisplayModelFor()
Editor
- @Html.Editor()
- @Html.EditorFor()
- @Html.EditorForModel()
Now we can use the model class that we previously generated, and then we should write this code in the controller.
Example
using System;
using System.Collections.Generic;
using System.Linq;
using System.Web;
using System.Web.Mvc;
using HTML_Helper_Demo.Models;

namespace HTML_Helper_Demo.Controllers
{
    public class HomeController : Controller
    {
        public ActionResult Details()
        {
            //The student Details are hardcoded here.
            //You can access data from any data source in real time.
            Student student = new Student()
            {
                StdId = 23,
                Name = "XYZ",
                Gender = "Male",
                city = city.Kolkata,
                skills = skills.JavaScript,
                Address = "Abc xyz",
                AgreeTerm = true
            };
            ViewData["StudentData"] = student;
            return View();
        }
    }
}


Now, we will create a new view with all of the default properties and write the code below.
@{
ViewBag.Title="Details";
}
<fieldset>
<legend>Student Details</legend>
@Html.Display("StudentData")
</fieldset>
Output

Custom HTML Helper
A method that returns an HTML string is known as an HTML helper. The string is then shown in the view. Many HTML helper functions are available in MVC. It also gives us the option of writing our own HTML helper methods. We can reuse the helper method after we've created it.
In MVC, there are two ways to generate custom HTML helpers, as seen below.
- Extension method for the HtmlHelper class to be added.
- Making use of the static method.
Add extension method
By writing an extension method for the HTML helper class, we can create our own HTML helper. These helpers are accessible through the class's Helper property, and we can use them in the same way as inbuilt helpers are.
Example
In the MVC application, we will create a new class and give it a relevant name. In this example, we create a new folder in the application called "CustomHelper" and then add the class "CustomHelpers" to it. Because we'll be creating an extension method, we'll make this class static. In class, we will write the following code:
using System;
using System.Collections.Generic;
using System.Linq;
using System.Web;
using System.Web.Mvc;

namespace CustomeHelper.CustomHelper
{
    public static class CustomHelpers
    {
        public static IHtmlString File(this HtmlHelper helper, string id)
      {
            TagBuilder tb = new TagBuilder("input");
            tb.Attributes.Add("type", "file");
            tb.Attributes.Add("id", id);
            return new MvcHtmlString(tb.ToString());
        }
    }
}
We build a static method file for the HtmlHelper class in the previous code. Using the TagBulider class, we generate an html tag in this way. We only utilise two html attributes in this code; however, we can add more html attributes as needed. This html helper technique is now used on views in the same way that inherent helpers are. We should add the "CustomHelper" namespace to the view as shown below because this class is in the "CustomHelper" namespace.
@using CustomeHelper.CustomHelper
@ {
    ViewBag.Title = "Index";
}

< h2 > Index < /h2>
Add namespace to the web.config file if you wish to utilise these helpers on different views. Once you've added that namespace, you may use the "File" helper as seen below.

We will pass the id parameter to this method. When we execute our view, we'll see the following output.

Make use of static method
We don't build any extension methods for the HtmlHelper class in this way. We make a new class called "CustomHelper." In class, write the following code:
using System;
using System.Collections.Generic;
using System.Linq;
using System.Web;
using System.Web.Mvc;

namespace CustomeHelper.CustomHelper
{
    public class CustomHelper
    {
        public static IHtmlString File(string id)
      {
            TagBuilder tb = new TagBuilder("input");
            tb.Attributes.Add("type", "file");
            tb.Attributes.Add("id", id);
            return new MvcHtmlString(tb.ToString());
        }
    }
}
You can use this helper method on view once you've created it. We don't use inbuilt helpers in this method because we don't create extension methods for the HtmlHelper class. We use class name instead of "@Html" (in razor view) to use this helper, as seen below.

Pass the id parameter to this method. When you execute your view, you'll see the following output.


 9+ registered

