Label syntax and properties
Syntax of Label in aspx file:
<asp:LabelID="Label1" runat="server" Text="Label1" ></asp:Label>
Label Control has its own set of properties that we can utilize to customize it:
- AccessKey: It is used to include a keyboard shortcut for the Label.
- TabIndex: It determines the webserver's tab control index.
- BackColor: To improve the Label's look and make it more colorful, we may use this property to change its backdrop color.
- BorderColor: We can utilize this attribute to change the Label border color.
- BorderWidth: We can use this parameter to specify the width of the Label border.
- Forecolor: It sets the color for the text on the Label.
- Text: This property sets the text to be displayed for the Label.
- ToolTip: It gives the text that will appear when the mouse is moved over a Label.
- Visible: It will allow us to control the control's visibility on the web form.
- Height: It enables us to customize the Label control's height.
-
AutoSize: We can resize the Label control automatically using it.
- BorderStyle: The border of the Label control can be customized to meet the application's needs.
- FlatStyle: It is concerned with the Label control's flat style appearance.
- Font: It determines the font for the Label control text. It will assign a value to it.
- TextAlign: This property determines how the text in the Label control is aligned.
Labels using GUI
The following are steps to put Labels in web forms:
- Open the Visual Studio and create a new empty Web application.
- Add New web form from Solution Explorer
-
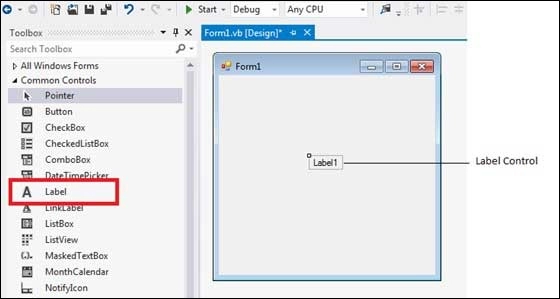
The Toolbox panel contains all server-side controls. Drag the Label control from the toolbox onto an ASP.NET web page.

Source
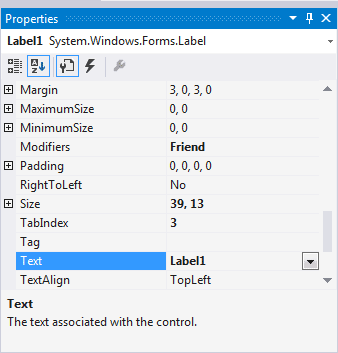
4. We can set the properties of the Label control from the Properties panel. For example, we can use the Text property to assign text to a Label control. Here, text property is set to “Label1”.

Source
Web Forms Label using code
We can make a Label using code also. For instance:
ASPX file:
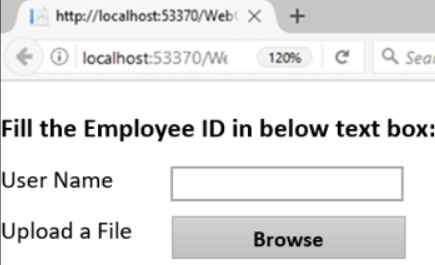
As you can see, there are two Labels in this code. One Label is for TextBox and the other is for FileUpload. These Labels give instructions about there corresponding inputs.
<!DOCTYPE html>
<html>
<head runat="server">
<title></title>
</head>
    <body>
    <form id="form1" runat="server">
        <div>
        <div>
            <asp:Label ID="Label1" runat="server" Text="User Name"></asp:Label>
            <asp:TextBox ID="TextBox1" runat="server"></asp:TextBox>
        </div>
        <div>
            <asp:Label ID="Label2" runat="server" Text="Upload a File"></asp:Label>
            <asp:FileUpload ID="FileUpload1" runat="server" />
        </div>
        </div>
    </form>
</body>
</html>
Output:

You can even set the Label properties from the C# file.
CS file:
In the following code, the Text property of Labels of ID Label1 and Label2 is set to “User Name” and “Upload a File” respectively.
using System;
using System.Collections.Generic;
using System.Linq;
using System.Web;
using System.Web.UI;
using System.Web.UI.WebControls;

public partial class Default : System.Web.UI.Page
{
    protected void Page_Load(object sender, EventArgs e)
    {
        Label1.Text="User Name";
        Label2.Text="Upload a File";
    }
}
FAQs
-
What is the difference between a Label and literal control in ASP.NET?
The Label control allows you to display static text on your website. When dynamically adding material to a page, literal control is most commonly employed.
Label controls can be styled, which means they can have different fonts, colors, and font sizes, but Literal controls can't be styled because they don't utilize any HTML tags.
-
How does the AutoSize property of Label control work?
When this attribute is true, the Label changes its width to fit its entire contents on the screen. When you use a Label control to show varied lengths of text, such as the status of an application process, this value is usually set to true.
-
What is one application of using the AutoSize property of Label control?
You can utilize the AutoSize property when an application displays text in multiple languages because the size of the text may change depending on the language settings in Windows.
-
What is Label.FlatStyle property?
Any values supplied to the ImageList, Image, ImageIndex, and ImageAlign properties are ignored when the FlatStyle property is set to FlatStyle.System. Furthermore, any property values that are not vertical property settings are ignored by the TextAlign property. The TextAlign property's horizontally aligned settings are aligned to the control's top.
-
From where does Label class inherit?
The inheritance of Label class:
Object→Control→WebControl→Label
Key Takeaways
From this article, we learned about Label control for web forms in ASP.NET and how to make it using GUI and code.
But this is not enough; you need something extra to excel in web development truly. If you want to learn more about web development, you can read our articles or take our highly curated Web Development course.
Recommended Reading:


