Do you think IIT Guwahati certified course can help you in your career?
Introduction
Passport.js is a very flexible and powerful middleware used for authenticating requests in node.js applications. Passport.js enables applications to use different types of strategies without using a lot of code. Its sole purpose is to authenticate the the incoming requests, which is it does using a set of plugins known as strategies.
So, in this blog we will be learning about how we can authenticate users using Node JS, Express JS and Passport JS. Let us now have a look at the authentication flow of passport.js.
What is NodeJs?
Node.js is an open-source, cross-platform Javascript runtime environment that executes JavaScript code outside of a web browser. It allows developers to run JavaScript on the server side to create server-side and networking applications. Node.js is built on the V8 JavaScript engine, the same engine that runs in Google Chrome, and it provides an event-driven, non-blocking I/O model that makes it lightweight and efficient. Node.js is commonly used for web scraping, real-time data processing, and building web servers and APIs.
What is ExpressJs?
Express.js is a web application framework for Node.js. It is designed to make the process of creating server-side and networking applications easier by providing a set of features and functions that simplify the process of handling requests, routing, and middleware.
What is PassportJs?
Passport.js is an authentication middleware for Node.js. It is designed to authenticate requests made to a web application or API by providing a simple, flexible, and modular way to authenticate users using a variety of strategies. Passport.js supports many different authentication strategies, such as local authentication using a username and password, OAuth and OAuth2 for authenticating with popular social media and other external services, and JWT for stateless authentication.
OAuth (Open Authorization) is a standard for authorization of access to resources. It is an open protocol to allow secure authorization in a simple and standard method from web, mobile, and desktop applications.
Prerequisites
NodeJS
First and foremost, NodeJS should be installed on your local machine. You can download and install the latest version of Node.js from the official website. For detailed installation guide you can check this link here.
ExpressJS
You can install ExpressJS only after you have installed NodeJS on your local machine. To install express run the following command in project directory.
npm install express
Passport Js
To install Passport JS you need to install NodeJS first. Then after installing NodeJS you can run the following command in your project directory
npm install passport
Authentication flow
The main steps of authentication flow in passport.js are:
Installing required modules
Using passport.initialize() and passport.session() middleware
Specifying a route that uses passport.authenticate() to authenticate a request
Configuring Passport using a Strategy
Setting up serializeUser and deserializeUser
Redirecting user to a route after authentication
In our application, we will authenticate users with passport.js, when a user tries to login with email and password, a POST request will be sent to /login route, from where passport.authenticate() will be executed.
The strategy used here is LocalStrategy and req.body.username,
req.body.password is passed as arguments. LocalStrategy verifies the data entered by the user by comparing it with the data present in the user's database.
In case of successful authentication, the verify callback is invoked with the credentials. If authentication is successful, done() is invoked with (null, user) to supply a Passport that the user is authenticated with. But in case of a failure, done is invoked with (null, false) and an error message.
After the user is successfully authenticated, the user instance is serialized using serializeUser and done() is invoked with null and user.id. Here user.id is saved in the session in req.session.passport.user and is used to retrieve the user object by deserializeUser later on.
The deserializeUser deserializes user instances from the session. Deserialization takes place using the user id, and then the user object is attached to the request as req.user.
The passport.initialize() middleware is executed on every request. It finds the id in the session, and then the deserializeUser is called. During deserialization the user information is loaded to the request through req.user.
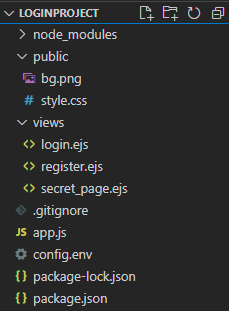
Project Structure
Before starting the project, let us look at our project structure,
Installing the dependencies
Type command
npm init -y
To create an empty npm project:
You will notice the package.json file gets created.
Now we can start installing the dependencies we will need for this project.
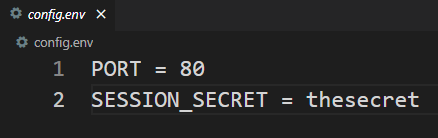
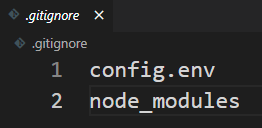
Now we will create config.env and .gitignore files.
Let us now create the main file, app.js and create a basic express app with this code,
var express = require("express");
const app = express();
const dotenv = require("dotenv");
dotenv.config({path:'./config.env'});
const PORT = process.env.PORT;

// Handling the get request
app.get("/", (req, res) => {
	res.send("Hello from server");
});
// Starting the server on PORT
app.listen(PORT, () => {
	console.log(`The application started successfully!`);
});
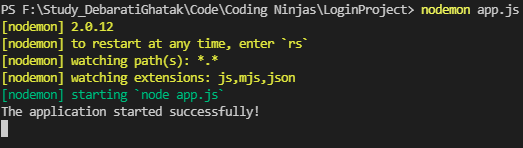
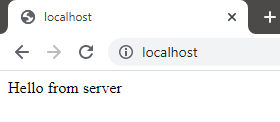
Type nodemon app.js to run the project
Go to http://localhost/ to check whether the application is running or not. If everything is working fine, You should be able to see this message,
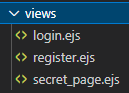
Views
We will now create a folder called ‘views’ to keep our templates.
Inside this folder, we are going to create,
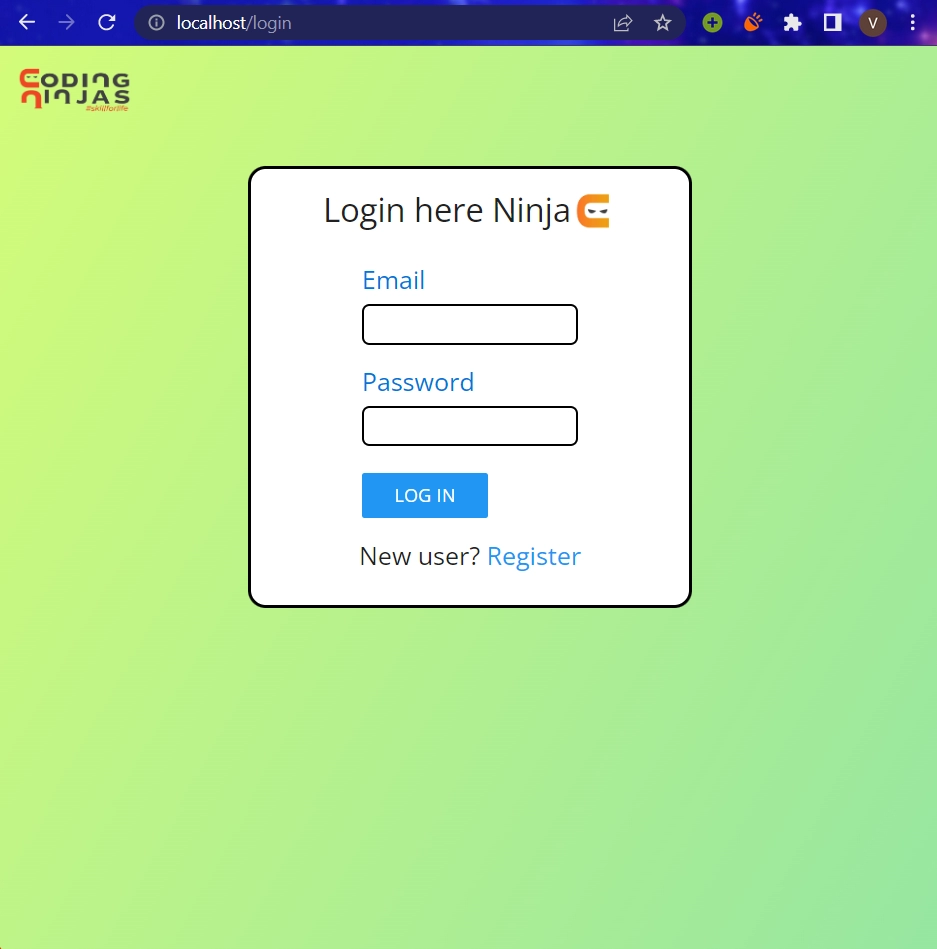
login.ejs: user will be redirected here to login to their account.
register.ejs: user will be redirected here to register their account.
secret-page.ejs: user will be redirected to this page only after he/she is logged in.
After the user registers on the website, we would save the data in the user’s array. But for the password field, we will store a hashed password instead of the original password to maintain security. We will use bcrypt to generate a hash of the original password and create a hashed password.
In our application, we are using LocalStrategy (email and password), and the method auth() will get called for user authentication. We will first get the user by email and if the user is null, done() will be invoked with false to indicate authentication failure has occurred. We will also pass a flash message to the user saying, “Incorrect email entered!”.
We will then also check the user’s password using bcrypt.compare.
If the password is correct, done() is invoked with (null, user). In case it’s incorrect error message will be shown to the user.
For the secret page, we will add a logout route for the logout button in our secret page. User will be redirected to /login after clicking on logout button.
app.post("/logout", function (req, res) {
    req.logout(function (err) {
        if (err) { return next(err); }
        res.redirect('/login');
    });
});
You can also try this code with Online Javascript Compiler
We first register with Name, Email and Password. Then we login using the same credentials, and after successful login we are redirected to the Secret Page, from where we finally logout.
If an incorrect email or password is passed during login, an error message is shown.
Frequently Asked Questions
What are serialization and deserialization?
In serialization, serializeUser function is used, and user.id is saved in the session in req.session.passport.user and is used to retrieve the user object by deserializeUser later on.
Incase of deserialization the reverse of serialization happens; the user id obtains the user object via the deserializeUser function.
What is passport.js?
Passport.js is a very flexible and powerful middleware used for authenticating requests in Express applications.
What is passport.initialize() and passport.session()?
Passport.initialize() middleware is used to initialize passport and the passport.session() middleware is used for having persistent login sessions.
What can you use Node.js for?
Node.js is generally used for building real-time applications, which generate a large no of I/O operations. It includes, gaming applications, social networking applications, real time chat applications, IoT devices and apps, etc.
Can we use Node.js to build AI and Machine learning algorithms?
Node.js has libraries and tools for incorporating AI-based elements into the web apps, but it would not be the best use case for this technology, Python and Ruby would be better choice for Machine learning and AI.
Conclusion
In this blog, we learned about the basic authentication flow of passport.js.After that, we created a simple Node.js login application to authenticate users with passport.js. We were able to break down many vague concepts regarding passport.js while coding the application.
We hope that the blog has helped in you learning more about authentication using passport.js. If, you want to lean more about web development then you can check out more blogs here.


 8+ registered

