Do you think IIT Guwahati certified course can help you in your career?
Introduction🧑🏻🎓
Postman is the most popular API platform in the world. The features of Postman make it easier to complete each phase of creating an API and speed up teamwork, resulting in better APIs more quickly. Today, Postman is used by more than 20 million developers and 500,000 businesses worldwide.
The following article will explore how we can author and publish an API in Postman. Let’s go! 🫡
Authoring Your Docs🧐
For each collection you create, Postman automatically generates documentation. The documentation provides examples, information on authorization, and sample code for each request in your collection.
You should add detailed descriptions of your collection and its objects to make it easier for your teammates (or the world) to comprehend what you are doing. Use the Postman editor to see how your content will appear as you write it. You may also arrange and format your descriptions using the standard markdown editor. The documentation for your collection contains all of your descriptions.
Adding Descriptions to Your Documentation🤔
Use descriptions to educate users of your collection on the functions of your collection. Use headings to organize your descriptions, then fill them with text, tables, photos, and links.
For an existing collection, folder, or request's description, add or change as follows:
Select a collection, folder, or request by clicking collections in the sidebar.
Go to the context bar and select the documentation icon.
The edit icon is located next to the description; select it.
Use the Markdown or the visual Postman editors to write your description. Feel free to flip between the two editors while you work since they are both compatible.
Select Store to save your documents.
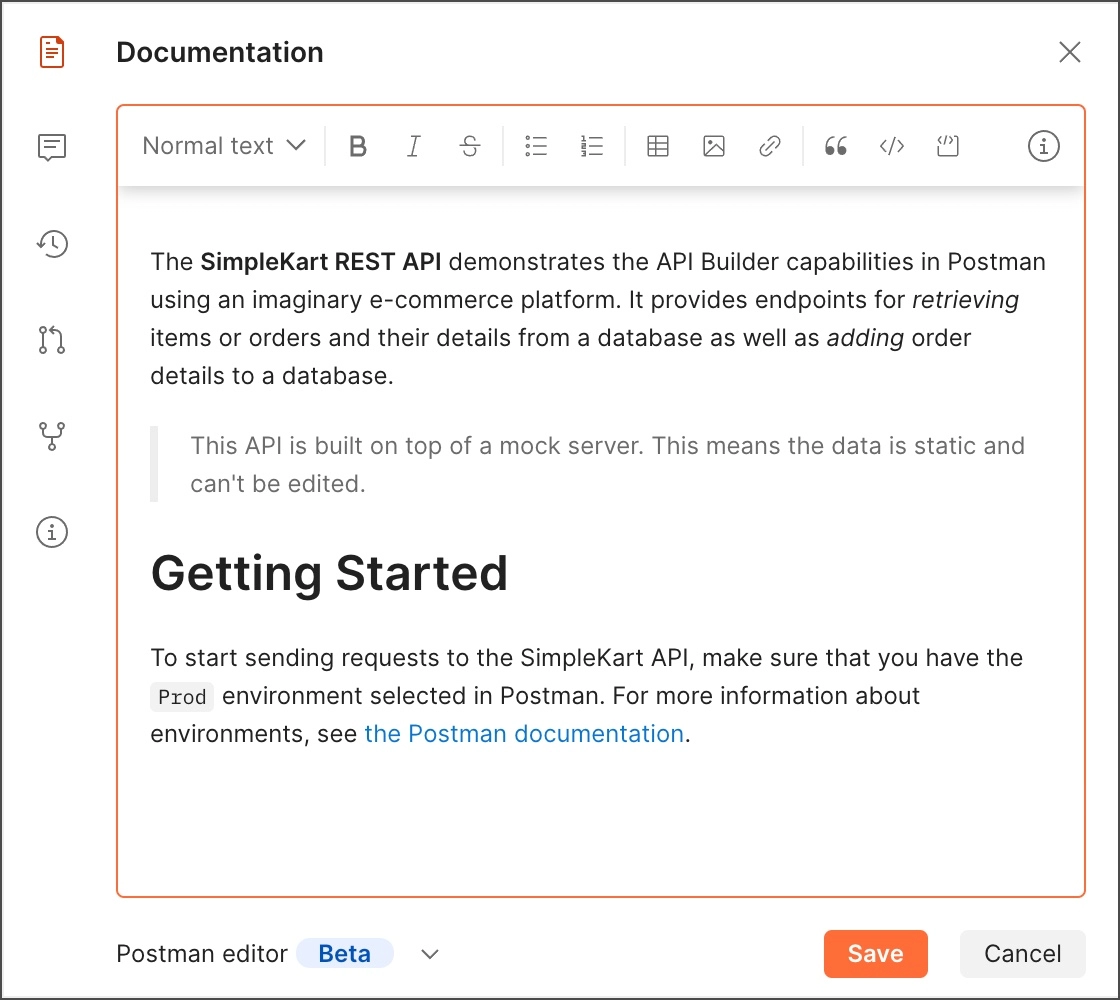
Authoring Descriptions in the Postman Editor👩🏫
Select the Postman editor option to write a description utilizing powerful text editing tools. You may create a description using the Postman editor without writing any markdown code. Work with text and other content as you would in a standard word processor by using the tools on the toolbar. You can also format text using standard keyboard keys, such as Ctrl+B or +B for bold text.
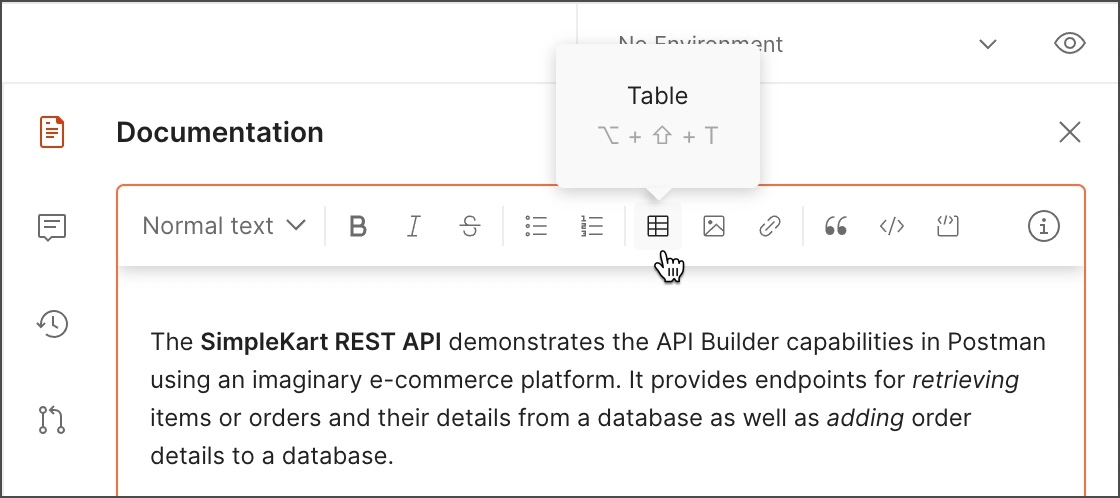
As you work, look at the tooltips for assistance. When you hover your mouse over a tool or keyboard shortcut in the toolbar, a description of the item appears. If not all tools are available on the toolbar, click the more Actions icon.
Without Markdown, create tables. To make your tables work, there is no need to fiddle with markdown code. Select the Table tool to add a table. Select a cell and then choose the shortcut menu to add or remove columns or rows and delete the entire table.
The markdown syntax is supported by the Postman editor. Enter any typical markdown formatting code if you are comfortable doing so. For instance, to add a new heading, enter # followed by a space, or enter —- to add a horizontal line. Copy the existing markdown code and paste it into the editor to rapidly format previously produced markdown documents.
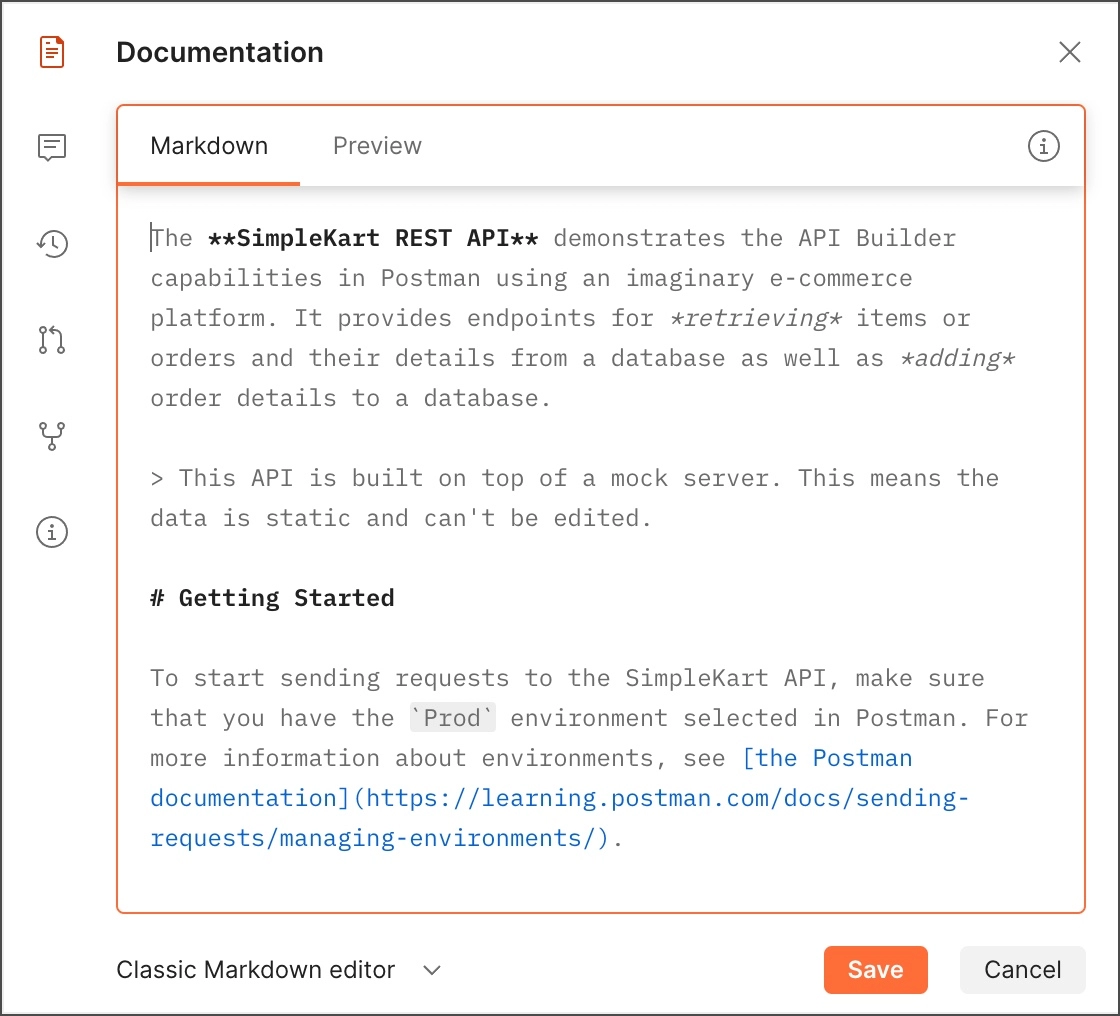
Authoring Descriptions in Markdown👨🎓
Choose the classic markdown editor option to write a description in markdown. When writing your text, follow the usual markdown syntax:
Content should be organized with headings, lists, and tables.
Blockquotes, bold, and emphasis are ways to format text.
Embedding code blocks, links, and images.
As you work, use the Preview tab to check the formatting and see how your documentation will look. Select the markdown tab to continue editing.
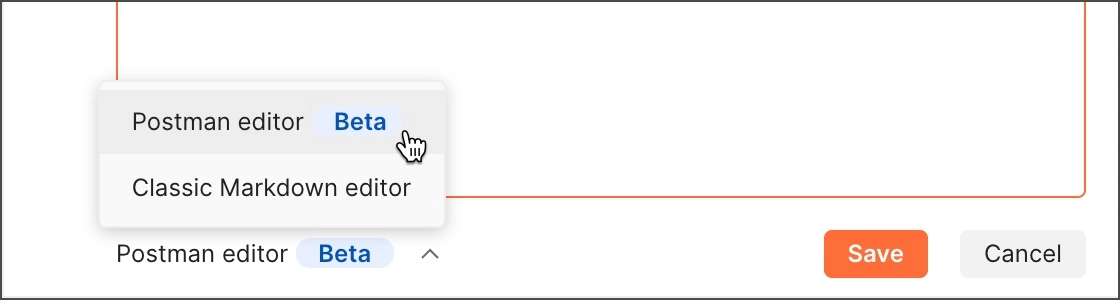
Selecting a Default Documentation Editor🚀
Your choice is the default editor you want to use in Postman to change documentation descriptions. Postman will switch to your favorite editor when you modify a description. (While editing a description, you can still move between the Postman and markdown editors.)
Select settings after selecting the settings icon in the header.
Select a default documentation editor from User Interface (Postman editor or Markdown editor).
Adding Descriptions to Parameters and Headers👨🎓
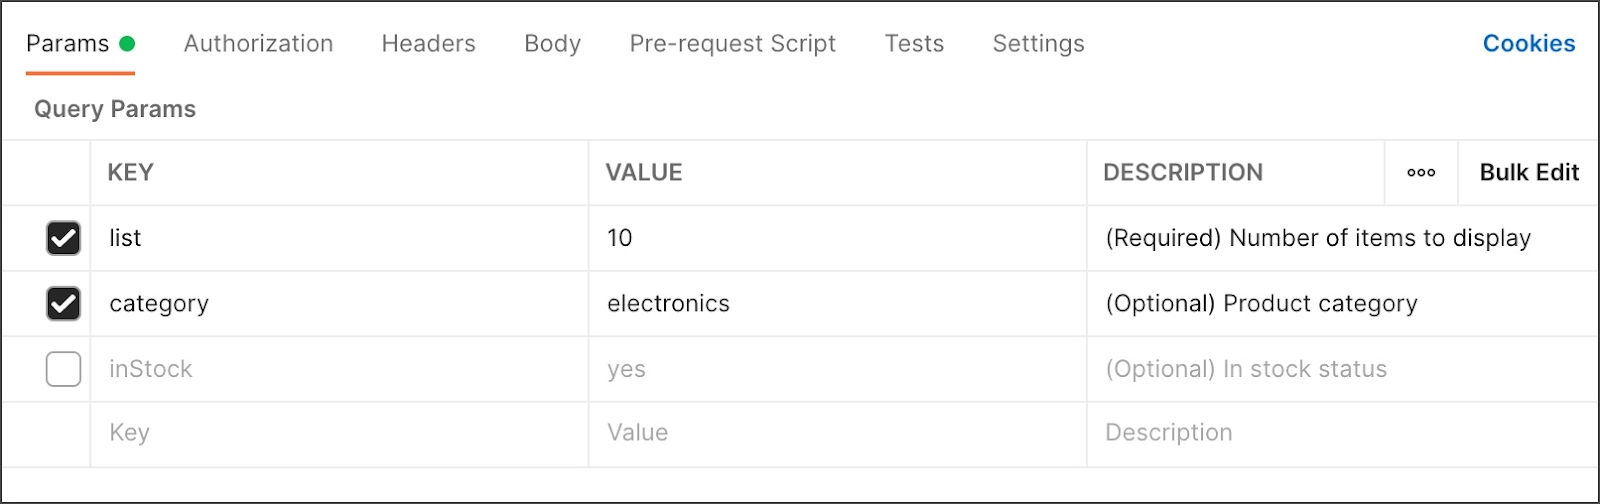
Add descriptions to headers and arguments to make the requests in your collection easier to understand and use. To add a description, open a request and type it in the field adjacent to the key-value pair.
Anyone viewing your published documentation or anyone with access to your collection can see the parameter and header explanations. The descriptions are listed in the documentation next to the name of the parameter or header, along with the request.
Including Authorization Details📟
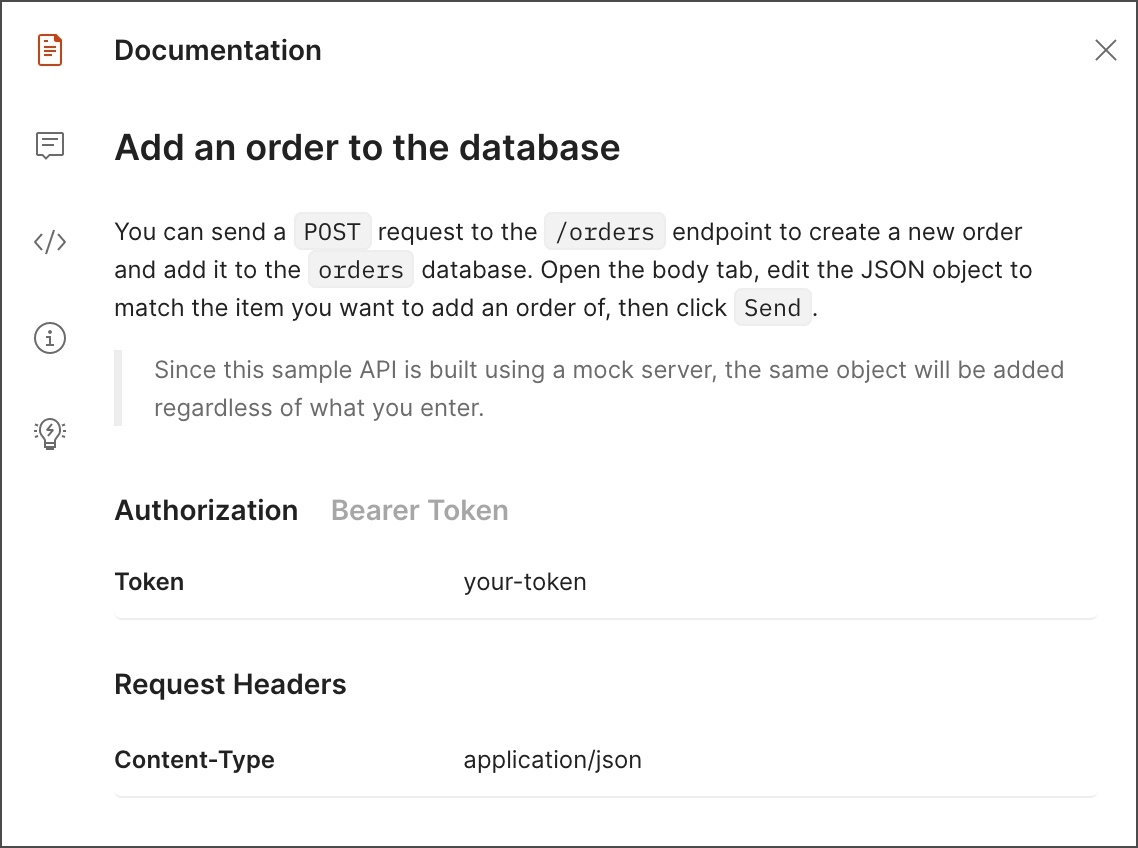
The kind of authorization needed to access your endpoints is automatically described in your documentation. You can find the authorization information in your documentation below each request and the collection description.
Every request in the collection will automatically meet the permission requirements if you define them for the collection. Open the request and modify the authorization information if one of your endpoints needs a different authorization type. Your documentation now reflects the modifications.
Including Examples🔎
The documentation is automatically updated with any examples you add to a collection. Your documentation displays sample code snippets for each request and sample response headers and bodies.
Adding Links🔗
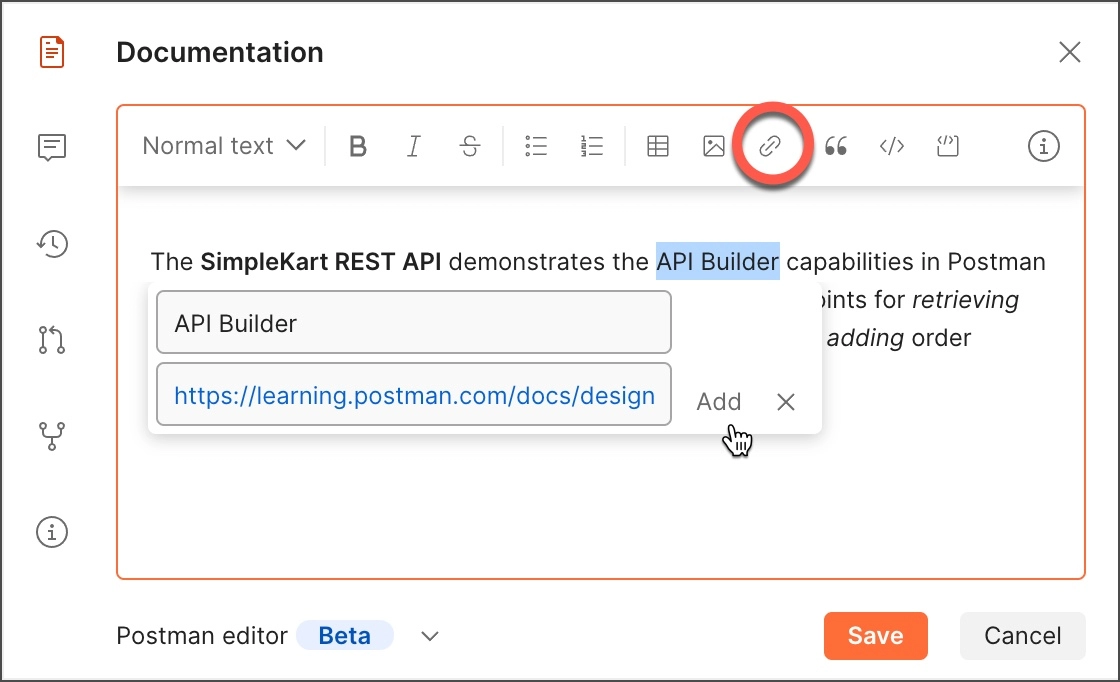
Viewers can use links to your website, repository, or other online resources.
Select the Link tool in the Postman editor to add a link. Select Add after pasting or typing the URL and link text. (If you need to modify the link later, select it, then pick the edit icon.)
Use the following syntax to include a link while using the Markdown editor:
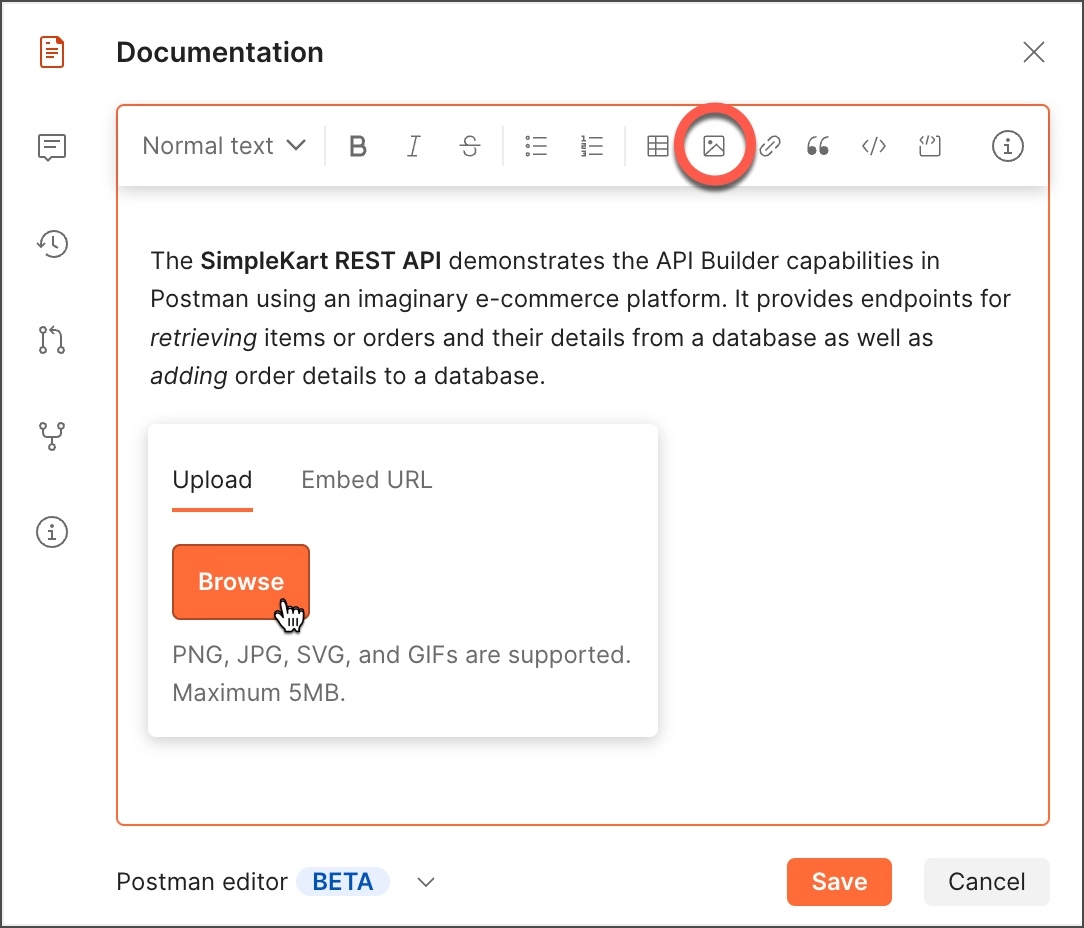
Images add life to your documents and improve the clarity of your thoughts. You can embed a picture stored online or upload an image file from your PC.
Uploading an image🤳
Choose the Image tool and browse the Postman editor to submit an image. Choose Open after selecting the image you want to upload. The Postman editor supports GIF, JPG, PNG, and SVG formats. The largest image size that is supported is 5 MB.
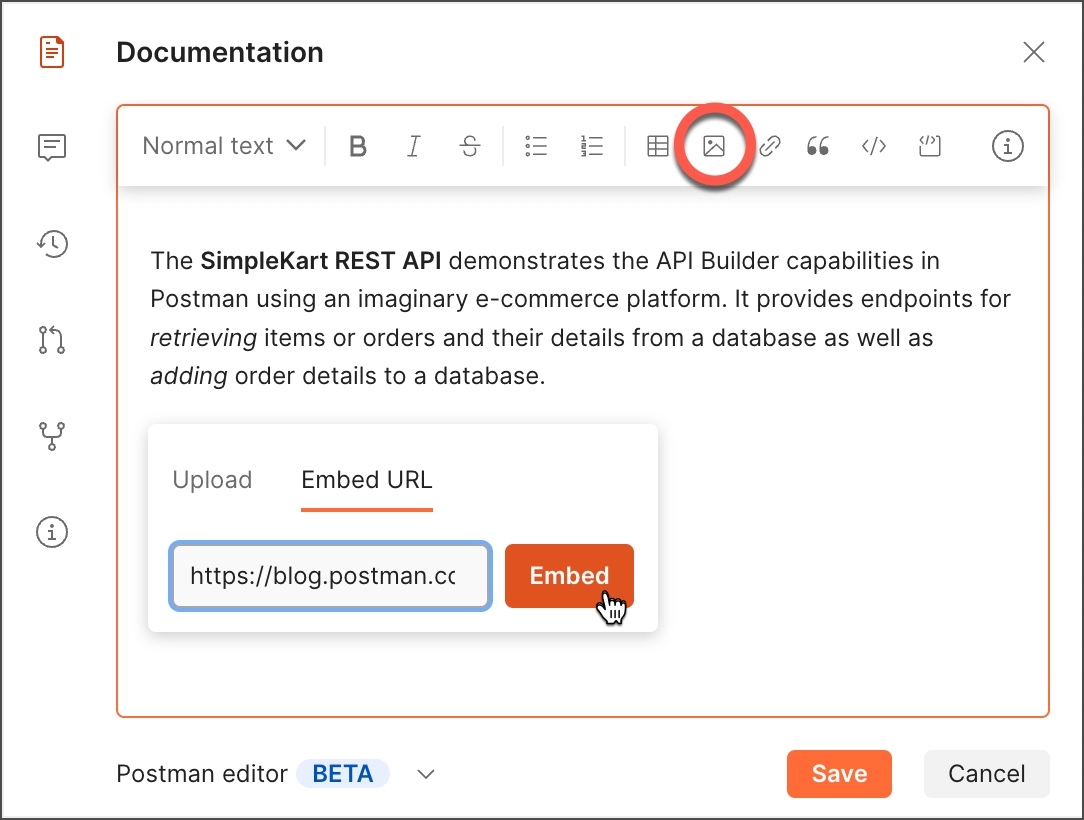
Embedding an Image📷
Before you can embed an image in your documentation, it needs to be hosted online (on a website, for instance).
Use the Image tool and Embed URL option in the Postman editor to embed an image. Select Embed after pasting or typing the image's URL.
Use the following syntax to insert an image using the Markdown editor:
You can change an image after uploading or embedding it:
To change an uploaded image in the Postman editor, select it and select the delete icon. Then upload a new image.
To change an embedded image in the Postman editor, select it and select the edit icon. Enter the new image URL and select Edit.
To change an image in the Markdown editor, edit the Markdown code as needed.
Image Storage Limits🪣
The maximum size for your uploaded photographs on a Postman Free plan if you aren't a team member is 20 MB. The total amount of the submitted photographs for your team, whether you are on a free or paid plan, is 100 MB.
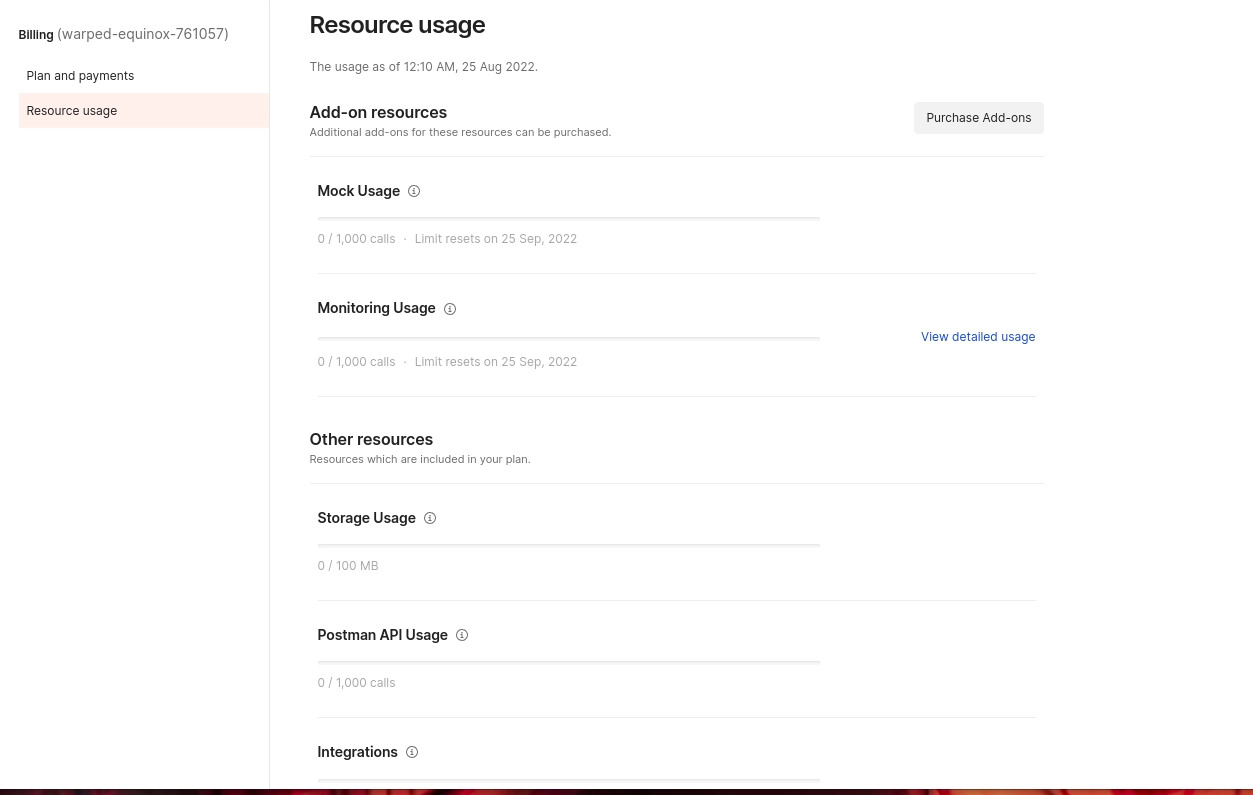
Visit your billing dashboard and choose Resource Usage to view your storage usage.
Under Storage Usage, the amount of space consumed by uploaded files and photographs is displayed. Make contact with Postman support to increase your storage capacity.
Publishing Your Docs📃
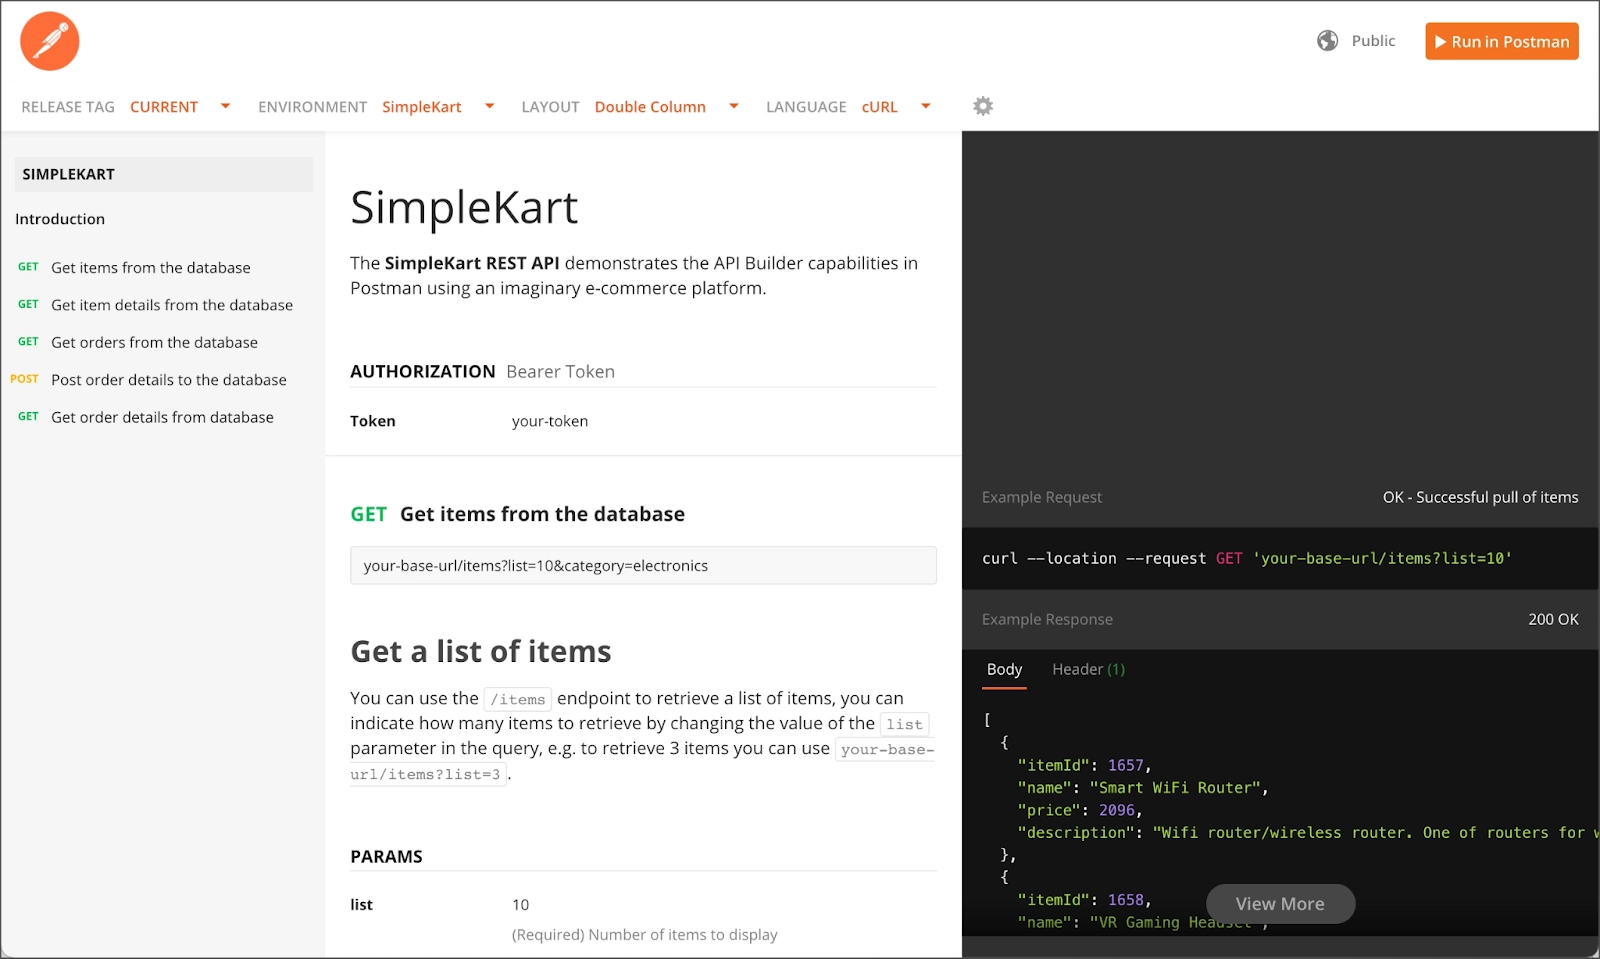
If you publish your documentation, anyone with a web browser and the link to the documentation can access it. To assist individuals all over the world in learning how to utilize your collection or engage with your public API, publish your documentation.
Every request or endpoint in the published collection is automatically described in the public documentation and examples of client-side code in several languages. The published documentation automatically updates to reflect your most recent modifications as you make changes to your collection. After making modifications, the documentation doesn't need to be published again.
Making Your Documentation Public📤
Documentation must be a part of a collection to be published. Any collections you have the authority to update or create can have their documentation published.
To release a collection's documentation:
From the sidebar, choose Collections.
Choose View Documentation after selecting the More actions button next to a collection.
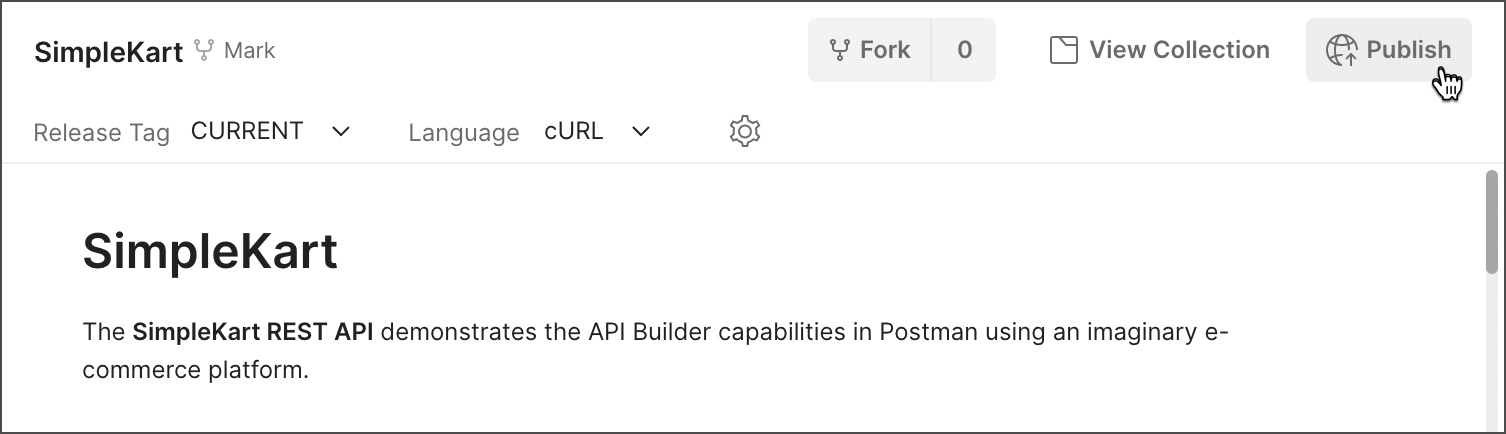
Choose Publish in the upper right corner.
If necessary, to alter the publication settings:
Release Tag-Choose one or more release tags to publish from the list. Each chosen release's documentation is available for users to peruse.
Environment- Decide the environment you want to publish environment variables. All variable initial values are published with your documentation, so make sure they don't contain private data like tokens or passwords.
Custom domain- Choose a custom domain for your documentation to be published.
Default Layout-Choose a layout style for your documentation using the default layout option. The sample code is shown in a column next to the documentation in a double-column format. Sample code is shown inline beneath each request in a single column.
Header background color-Choose a color (in hexadecimal format) for the header background of the documentation window.
Code background color-Choose a color (in hex format) for the sample code blocks' backdrop color.
Highlight color-Provide a color (in hex format) for the hyperlinks' highlight color.
Select Preview Documentation to view your documentation in its current configuration. As you alter the settings, the preview refreshes automatically.
After making all necessary settings changes, make your documentation public.
Postman Free, Basic, and Professional plans-You can choose a public workspace to relocate the collection to if you have a Postman Free, Basic, or Professional subscription. The collection will, after that, be discoverable on the Public API Network as a result. Select "Publish" when you are prepared. Visit the supplied URL to view your public documents.
Postman Enterprise plans-The Postman elements that your team makes public are controlled by your community manager under Postman Enterprise plans. Select Publish and enter a remark for your community manager. After your request is granted, you will be sent an email with a link to the public documentation. Change the pending publication settings and choose to retract the request to withdraw your publish request.
Adding a Custom Logo
You can add a team logo to your published documents if you have the Team Admin status. Edit your team profile in your team settings to add a logo. In the published documentation for your team, your team's logo will take the place of the Postman logo. (The new logo might not display for many minutes.)
Sharing Your Public Docs
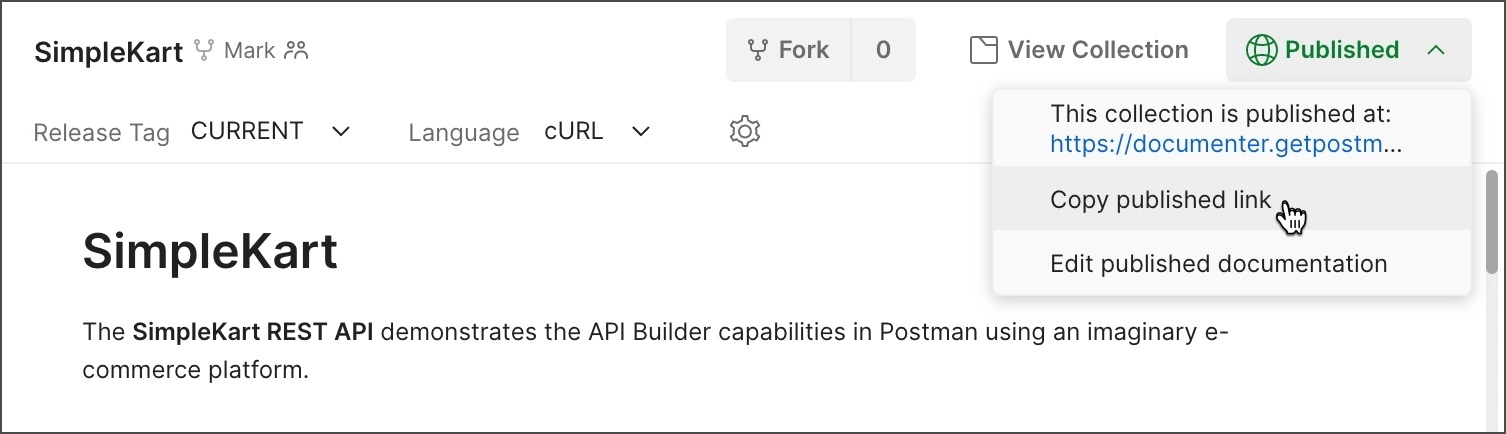
Share the published URL with your team, other users, or the community to distribute your public documents. You can always get the URL to your published documentation if you forget it-
From the sidebar, choose Collections.
Choose View Documentation after selecting the More actions icon next to a published document collection.
At the top right, click Published, and then click Copy published link.
Other users can look up your collection and its documentation on the Public API Network if it is located in a public workspace. If you haven't previously done so, you can change the publication settings at any moment to transfer your collection to a public workspace.
Changing Publication Settings
To add a release, alter the appearance of your documentation, or make your collection accessible to the public, modify the publication settings for your documentation. After publishing your documentation, you can always adjust the publication settings:
From the sidebar, choose Collections.
Choose View Documentation after selecting the More actions icon next to a published document collection.
At the top right, click published, and then click edit.
Edit published materials. Change the publication settings as necessary by selecting Edit settings.
Select Save and republish.
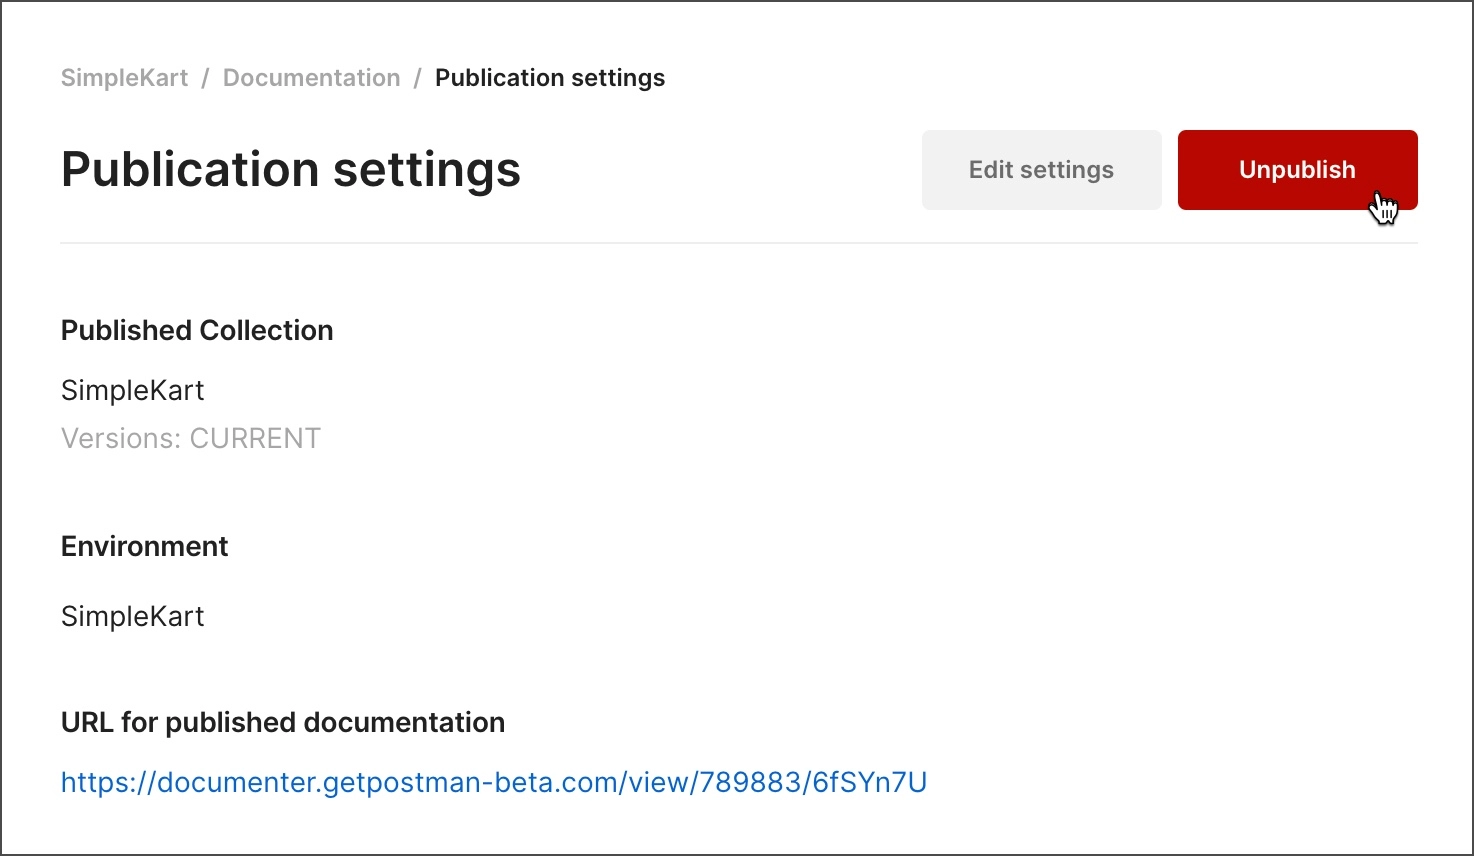
Unpublishing Your Docs
You can unpublish your documentation if you no longer want it to be accessible to the public-
From the sidebar, choose Collections.
View Documentation by selecting the more actions icon next to a collection of published documents.
At the top right, click published and edit published documentation.
Choose Unpublish.
You can always republish your documentation if you change your mind.
We hope you understood everything on how to view and utilize the Postman documentation.🤗
Frequently Asked Questions
What is Postman?
Postman is a free software program based on the HTTP Client protocol. By leveraging GUI (Graphical User Interface), which can be executed and validate the responses, it provides testing of HTTP requests.
What is meant by the term environment in Postman?
In Postman, an environment is a collection of key-value pairs. In Postman, you can set up many environments that can be rapidly changed by pressing a button. Global and local environments come in two varieties.
Can Postman handle duplicate names for global scope variables?
Global variables cannot have identical names since they are global or devoid of surroundings. The names of local variables might be the same across various contexts.
A global variable or a local variable—which one would Postman prefer?
If two variables in Postman have the same name, but one is local and the other global, the local variable will take precedence.
What do you mean by Postman monitors?
Postman monitors ensure constant access to information on the functionality and health of your APIs.
Conclusion
This article taught us how to authorize and publish an API in Postman. We began with a brief introduction to the Postman, followed by a detailed explanation of the authorization and publishing mechanism for an API.


 6+ registered

