Do you think IIT Guwahati certified course can help you in your career?
Introduction
Authorization is a security measure applied to APIs to ensure that only authorized users can access server resources by verifying their entitlement.
APIs allow different systems to communicate with one another and share information, but keeping that information safe is essential. That is where Postman, the popular API development and testing tool, comes into play. Postman is a tool that makes it easier to test and develop APIs. It also has a variety of ways to handle authorization.
In this article, we'll explore Postman's different types of authorization, including No Auth, Basic Auth, Digest Auth, Bearer Token, and OAuth. You will also learn how to set them up for your API requests. But first, let's get acquainted with Postman.
What are the authorizations in Postman?
In Postman, authorizations authenticate API requests with various methods like API Keys, Basic Authentication (username/password in Base64), Bearer Tokens, and OAuth 1.0/2.0. API Keys are included in headers or parameters, while Basic Authentication encodes credentials. Bearer Tokens and OAuth tokens secure requests through headers. Digest Authentication enhances Basic Authentication security. Postman simplifies configuration and management of these methods, ensuring only authorized users or applications access protected resources. These authorizations maintain data integrity and security during API testing and development, offering a user-friendly interface for configuring authentication protocols tailored to different security requirements.
In addition to its API development and testing features, Postman also provides collaboration features. These features allow teams to share API collections and work on API projects. With its ease of use and comprehensive feature set, Postman has become a popular tool for API development and testing among developers and teams.
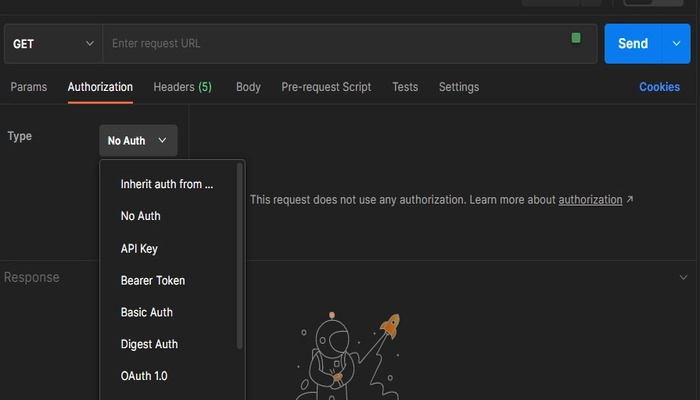
Postman supports various ways to authenticate API requests. The authorization types supported by Postman are No Auth, Basic Auth, Digest Auth, Bearer Token, and OAuth. Let's discuss each of these, one by one, in more detail.
Steps for Authorizing Requests in Postman
To authorize requests in Postman:
Open Postman: Launch the Postman application and create a new request or open an existing one.
Select Authorization Tab: In the request builder, navigate to the "Authorization" tab located below the request URL input field.
Choose Authorization Type: From the dropdown menu, select the appropriate authorization method based on your API requirements, such as Basic Auth, API Key, Bearer Token, OAuth, etc.
Configure Authorization: Enter the necessary credentials, keys, or tokens as per the selected authorization method. Postman provides fields for inputting username/password, API keys, tokens, client IDs, client secrets, etc.
Apply Authorization to Request: Once configured, the authorization settings will be applied to the request automatically.
Send Request: With the authorization configured, send the request to the API endpoint by clicking on the "Send" button.
Review Response: Review the response obtained from the API to ensure successful authentication and access to the desired resources.
Here are the list of various authorization types are:
No Auth
No Auth is the simplest type of authorization where there is no need to provide any credentials to access the API. This type of authorization is suitable for public APIs that do not require authentication.
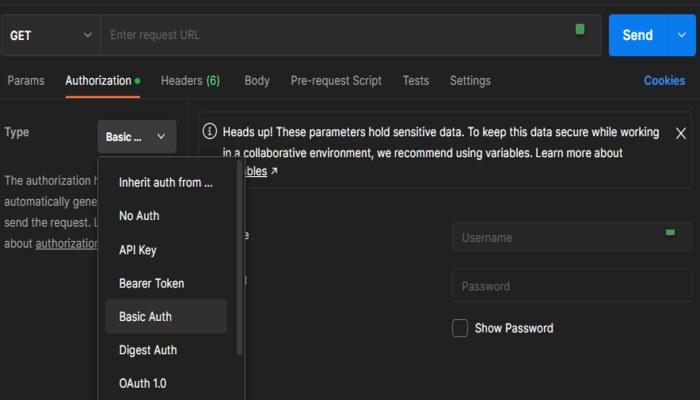
Basic Auth
Basic Auth is the most basic type of authentication. It requires a username and a password to access the API. In Postman, you can provide the credentials in the "Authorization" tab under the "Type" section.
Once you select "Basic Auth," you will be asked to enter your username and password. This will be encoded and included in the API request as an "Authorization" header. The "Authorization" header is used in HTTP requests to pass authentication credentials to the API server.
The password and username are combined into a single string that is separated by a colon (e.g., "username:password"). This string is then encoded using Base64 (a commonly used encoding method for transmitting data over the network). The encoded string is appended to the text "Basic," and the resulting string is set as the "Authorization" header in the HTTP request.
Here's an example:
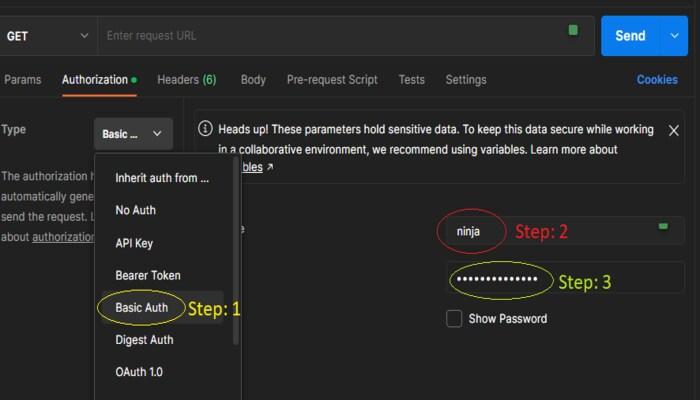
Let's say the username is "ninja," and the password is "codingninjas14."
The string "ninja:codingninjas14" is then encoded using Base64, resulting in "bmluamE6Y29kaW5nbmluamFzMTQ=."
The encoded string is then appended to the text "Basic," resulting in "Basic bmluamE6Y29kaW5nbmluamFzMTQ=."
This string is set as the value of the "Authorization" header in the HTTP request.
The API server can decode the Base64 encoded string and retrieve the username and password, which can then be used to validate the client's identity and grant access to the API.
The steps to use basic authentication are as follows:
Select the Basic Auth option from the list in the request Authorization tab.
Enter your Username in the dialogue box in front of “Username.”
Enter your Password value in the dialogue box before “Password.”
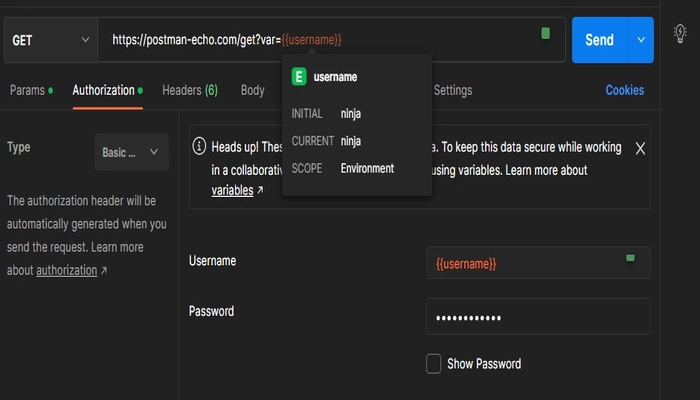
If you want extra security, then there is the option of storing these values in variables. Here are the steps to do so:
Create an environment: In Postman, go to the "Settings" gear icon and select "Manage Environments". Click on the "Add" button to make a new environment.
Add variables: In the environment editor, add two variables, one for the username and one for the password. For example, you can name them "username" and "password".
Set values: Set the values of the variables to your desired username and password. For example, ninja and codingninjas14.
Use variables in request: In your API request, go to the "Authorization" tab and select "Basic Auth". In the "Username" and "Password" fields, use the environment variables by wrapping the variable names in double curly braces (e.g. {{username}}).
Save and send the request: Save your request and send it to the API. The values of the environment variables will be used as the username and password for Basic Auth in the "Authorization" header.
Digest Auth
Digest Auth is a way to securely send authentication information when making API requests. It's a step up from Basic Auth in terms of security. That is because it doesn't send the password as plain text over the network. Instead, it sends a hash value that's calculated using the username, password, nonce (a unique string value), and realm (the domain of the server).
In Postman, you can use Digest Auth by selecting the "Digest Auth" option in the "Authorization" tab and entering the username and password. Postman will handle the calculation of the hash value and include it in the "Authorization" header in subsequent requests.
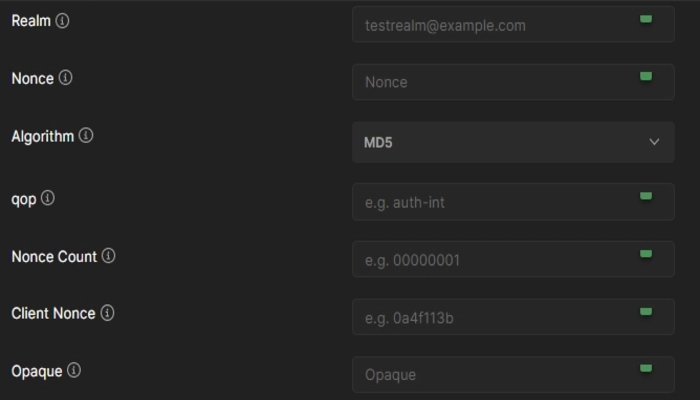
You will notice some advanced fields when you opt for digest auth. These fields are optional. If you don’t fill them up, they get populated by the Postman automatically when your request runs.
Here’s a table for your reference that contains definitions of these fields.
Fields
Definition
Opaque
A string of data in the WWW-Authenticate response header specified by the server. This string should be used unchanged with URIs (Universal Resource Identifiers) in the same protection space.
Client Nonce
This is the string value provided by the client. Both client and server use this value to avoid chosen plaintext attacks, provide mutual authentication, and provide message integrity protection.
Algorithm
This option contains a string that tells a pair of algorithms used to generate the digest and a checksum. The algorithms supported by Postman are MD5 and SHA.
Realm
The server specifies a string that is present in the WWW-Authenticate response header.
Nonce
The server specifies a unique string that is present in the WWW-Authenticate response header.
qop(quality of protection)
It tells us the quality of protection applied to the message. The value must be one of the alternatives specified by the server in the WWW-Authenticate response header.
Nonce Count
The hexadecimal count of the number of requests the client has sent with the nonce value in the request.
Here's how Digest Auth works:
The client sends a request to the server.
The server sends back a unique string value (called a nonce) and the domain of the server (called the realm).
The client calculates a hash value using the username, password, realm, and nonce.
The client sends another request to the server, including the calculated hash value in the "Authorization" header.
The server checks the hash value to see if it's correct. If it is, the server grants access to the client.
The main advantage of Digest Auth over Basic Auth is that the password is not transmitted in plain text over the network. Instead, a hash value is transmitted, which provides a higher level of security. However, Digest Auth is more complex to implement than Basic Auth. Some servers may not support it.
It's important to note that the server must support Digest Auth for it to work. If the server does not support Digest Auth, Postman will not be able to perform the authentication, and the request will fail. In this case, you may need to use Basic Auth or another authentication mechanism supported by the server.
Bearer Token
Bearer Token is a type of authentication used in API requests. It's a string of characters that represents authorization to access a specific resource. In Postman, you add the Bearer Token in the "Authorization" header of the API request.
To use a Bearer Token in Postman, follow these steps:
Obtain the Bearer Token: Before making the API request, you'll need to obtain a Bearer Token from the authorization server. This is usually done by making a request to the server and exchanging credentials for a token.
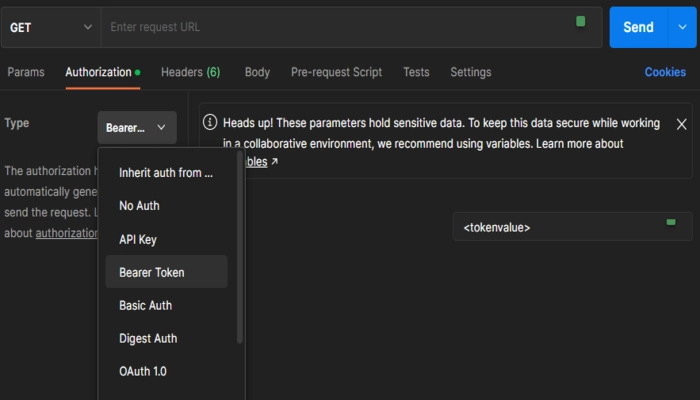
Select "Bearer Token" in Postman: In the "Authorization" tab, select the "Bearer Token" option.
Enter the Token: In the "Token" field, enter the Bearer Token you obtained from the authorization server.
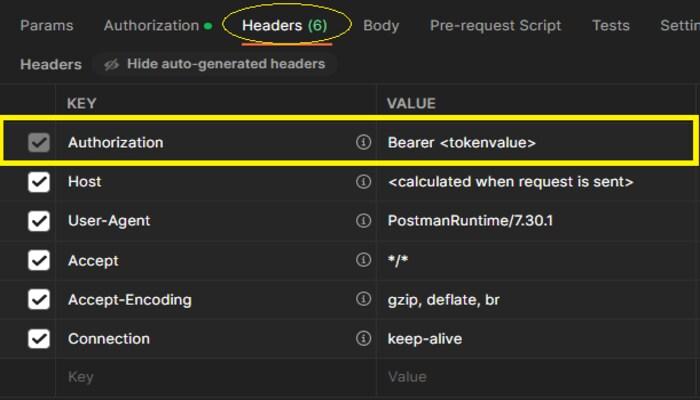
Make the API request: With the Bearer Token added to the "Authorization" header, you can now make the API request.
Postman will append “Bearer” before the token in the desired format in the request authorization header.
Format: Bearer <Token value>
When the API receives the request, it will validate the Bearer Token to ensure that the client is authorized to access the requested resource. If the token is valid, the request will be processed. If the token is invalid or has expired, the request will fail.
It's important to note that Bearer Tokens have a limited lifespan and can expire. If the token has expired, the API request will fail, and the client will need to obtain a new token before making subsequent requests. Storing the token in an environment variable in Postman can make it easier to manage and reuse the token across multiple requests.
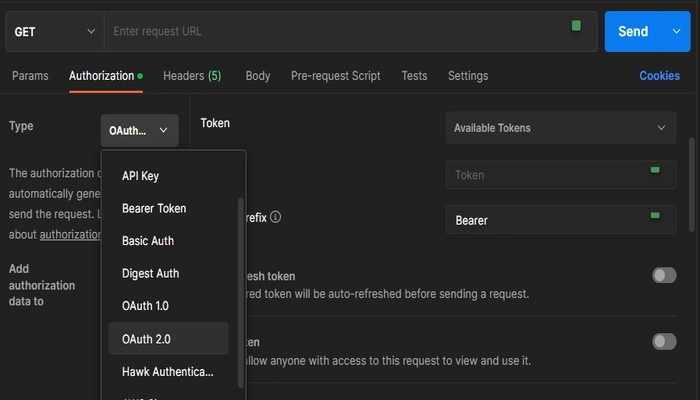
OAuth
OAuth is a widely used authorization standard that provides a secure way to access APIs. OAuth uses a token-based approach, where the client is granted a token by the API server, which it can use to access the API. In Postman, you can provide the OAuth credentials in the "Authorization" tab under the "Type" section. You can select "OAuth 1.0" or "OAuth 2.0", depending on the API server's implementation. You will be asked to enter the credentials and grant permission. That information will be used to generate the OAuth token.
Each type of OAuth has its own strengths and weaknesses, and the specific type you choose will depend on the needs of your application and the authorization server you're using. In Postman, you can easily switch between different types of OAuth as needed.
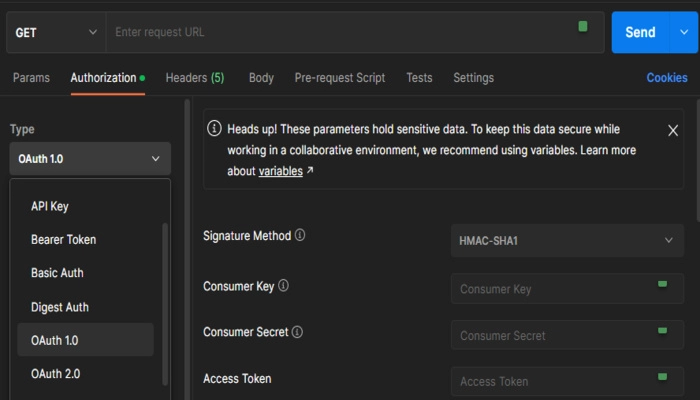
OAuth 1.0
In this method, we take the help of a third-party API for our authentication purposes. As we know, as a user of a service, you have the right to share your data with another application. This method follows the same procedure. During this procedure, requests are exchanged between the service provider, the user, and the client application.
OAuth 1.0 is further divided into the two types listed below:
Two-legged: When only the client and server take part in the authentication process.
Three-legged: When a client requests a third-party API for user data access.
Let’s look at an example for a better understanding of OAuth 1.0
At first, clients request a token using their credentials to access user data with a third-party API.
A token is provided to the client application by the service provider, but that doesn’t give access to user data. Then the client application requests authorization from the user.
When the user grants auth to the client, the client requests to exchange its temporary token for the access token.
The access token is then given to the client by the service provider, allowing the client to access the user’s data by making requests to the service provider.
Now let’s take a look at the OAuth 1.0 parameters.
Parameter
Definition
Consumer Key
This key identifies the consumer and the service provider.
Consumer Secret
The client uses this value to establish ownership of the key.
Signature Method
The method used by your API to validate requests.
Token Secret
The client uses this value to establish ownership of the token.
Access Token
This value represents the client’s permission to access the user’s data.
Private Key
This key generates the auth signature. (For RSA signing methods).
Verifier
The service provider provides the Verification code after user auth.
Nonce
The client generates this string, and it is entirely random.
Time Stamp
The server uses this timestamp to ensure that no replay attacks are performed outside the time window.
Version
The version of the OAuth protocol (1.0).
Realm
The server specifies a string that is present in the WWW-Authenticate response header.
OAuth 1.0 is a secure way to authenticate API requests. But it can be more complex to implement than OAuth 2.0. In Postman, you'll need to manually manage the OAuth tokens and ensure they are correctly added to the API request headers. Nevertheless, OAuth 1.0 is still widely used. It provides a secure and reliable way to authenticate API requests in Postman. Still have doubts? Follow this article to learn more about OAuth 1.0.
OAuth 2.0
In OAuth 2.0, your first step is to get an access token for the API. Then, with the help of that token, you will authenticate all of your future requests.
The procedure to use OAuth 2.0 is given below:
The client makes the first request to users to authorize access to their data.
If the user’s access is granted, the client asks for an access token from the service provider. In this request, the client passes the access grant from the user and other authentication details so that the service provider identifies the client.
Then, the service provider returns an access token after validating these details.
Then, the client requests to access the user data using this token through the service provider.
Now let’s look at the configuration options tab for OAuth 2.0.
Options
Definition
Token Name
The name that is assigned to the token by the user.
State
This option is an opaque value used to prevent cross-site request forgery.
Auth URL
A URL that represents the endpoint for the API provider authorization server, from which we can retrieve the auth code.
Access Token URL
This is used to exchange an authorization code for an access token from the provider's authentication server.
Grant Type
This represents a dropdown list of options that will depend on the API service provider's requirements.
Scope
The scope of access you are requesting may include multiple space-separated values.
Client ID
The registered ID of your client with the API provider.
Client Secret
The client secret is given to you by the API provider.
Audience
A URI (Uniform Resource Identifier) that tells you about the service where we can use the token.
Resource
A URI that tells you about the help where we can use the token.
Still have doubts? Follow this article to learn more about OAuth 2.0.
Let us now address some of the frequently asked questions.
Frequently Asked Questions
What are the authorizations in Postman?
Authorizations in Postman include API Key, Basic Auth, Bearer Token, OAuth 1.0/2.0, and more.
How do I authorize API with Postman?
To authorize an API in Postman, select the authorization tab, choose the desired method, and provide the necessary credentials or tokens.
What is API key Authorization in Postman?
API Key Authorization in Postman involves including a unique key in the request header or parameters.
How do I use Authorization code in Postman?
To use Authorization code in Postman, select OAuth 2.0, choose Authorization Code grant type, and provide client credentials and callback URL for authentication.
Conclusion
In this article, we learned about the different ways to authorize API requests in Postman. We looked at No Auth, Basic Auth, Digest Auth, Bearer Token, and OAuth and learned what each one is used for. We also compared OAuth 1.0 and OAuth 2.0 and explained how they work differently.
To learn more about Postman, you can refer to these articles.


 9+ registered

