Do you think IIT Guwahati certified course can help you in your career?
Introduction
The Azure command-line interface (Azure CLI) is a collection of commands that may be used to build and manage Azure resources. The Azure CLI is accessible across Azure services and is intended to get you up and running with Azure fast, focusing on automation.
What is the Azure CLI?
The Azure Command-Line Interface (CLI) is a command-line tool that connects to Azure and allows you to run administrative commands on Azure services. It enables command execution via a terminal using interactive command-line prompts or a script.
To use interactively, run a shell, such as CMD on Windows or Bash on Linux or macOS, and then type a command at the shell prompt. To automate repeated activities, combine the CLI commands into a shell script using your preferred shell's script syntax, and then run the script.
The Azure CLI may be installed locally on Linux, Mac, or Windows systems. It may also be accessed via a browser using the Azure Cloud Shell or from within a Docker container.
Current Version
The Azure CLI is currently at version 2.37.0. See the release notes for details on the most recent release. Run the az version to determine your installed version and whether an upgrade is necessary.
Data collection
Azure CLI automatically gathers telemetry data. Microsoft compiles collected data to understand usage patterns, spot common issues, and enhance the Azure CLI experience. The Microsoft Azure CLI acquires no private or personal data. For instance, the use of information assists in prioritizing our efforts by identifying problems like commands with low success rates.
Microsoft recognizes that not everyone wants to share use data, even though it values the insights this data offers. With the az config set core.collect_telemetry=false command, data collection may be turned off.
Prepare your environment
You must set up your environment before performing Azure CLI operations.
Use the bash environment to access Azure Cloud Shell.
To execute CLI reference commands, you can install the Azure CLI.
Use the az login command to connect to Azure CLI if you're using a local setup. Follow the instructions provided in your terminal to complete the authentication procedure. For further sign-in options, see Sign in with Azure CLI.
Install Azure CLI extensions as prompted before using them for the first time.
To determine the installed version and dependent libraries, run the az version. Run az upgrade to get the most recent version.
Azure CLI examples
The following Azure CLI examples are provided in this article:
Subscription syntax example
The syntax of the Azure CLI is a simple reference name - command - parameter - parameter value. For instance, changing between subscriptions is frequently a hassle. The syntax is as follows.
az account set --subscription "my subscription name"
Role assignment syntax example
Managing role assignments is another frequent application of the Azure CLI.
az role assignment create --assignee servicePrincipalName --role Reader --scope /subscriptions/mySubscriptionID/resourceGroups/myResourceGroupName
az role assignment delete --assignee userSign-inName --role Contributor
PowerShell syntax comparison
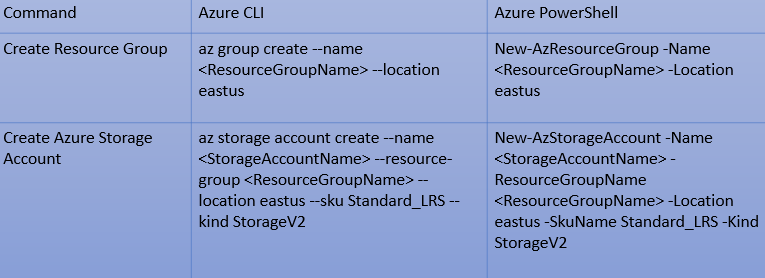
The Azure CLI and Azure PowerShell are highlighted in the article Choose the correct command-line tool to describe the differences between tools and environments. It also provides several comparisons of commands side by side. Here are two illustrations:
Use persisted parameters to simplify sequential Azure CLI commands
In this section, we will use the following Azure CLI commands
az config param-persist delete
az config param-persist off
az config param-persist on
az config param-persist show
az function app create
az group create
az storage account create
Prerequisites
Install the Azure CLI.
To finish the tasks in this tutorial, you may alternatively use Azure Cloud Shell if you'd like. Through your browser, you may interact with the Azure Cloud Shell environment. Use one of these techniques to launch Cloud Shell:
In the top right corner of the Azure portal, click the Cloud Shell icon.
Follow these steps if you are using a local installation of the Azure CLI:
Use the az login command to log in, then follow the instructions in your terminal to finish the authentication procedure.
az login
The Azure CLI must be version 2.12.0 or later to be used with this tutorial. To determine the installed version and dependent libraries, run az version. Run az upgrade to get the most recent version.
1. Determine your local directory
The working directory of the Azure storage account that Azure Cloud Shell uses contains persisted parameter values. Values are kept in the working directory on your computer if you use a local Azure CLI installation.
Use these well-known CLI commands to locate, create, or modify the working directory being used by the Azure CLI.
# List directories
dir
# Make directory
mkdir azCLI
# Change directory
cd azCLI
2. Turn on Persisted parameters
Before parameter values may be saved, persisted parameters must be enabled. Until az config param-persist exits the experimental stage, you will receive a warning.
az config param-persist on
3. Create persisted parameters
Execute an Azure CLI command of your choice that includes the parameters you wish to save to store values for persisted parameters. For example, when you establish a resource group, the —location and —name parameters are saved for future usage.
Save the name of the resource group and its location.
# With persisted parameters turned on, create a resource group
az group create --name RG1forTutorial --location eastus2
# See new persisted parameters
az config param-persist show
2. Create a storage account using the newly persisted parameters.
# Create a storage account
az storage account create --name sa1fortutorial
# See that storage_account_name has been added to persisted parameters
az config param-persist show
3. Without establishing a new resource, create a persisted parameter.
The resource group name and location parameters can be saved without creating a new Azure resource by utilizing non-create commands like show or list.
# Clear all persisted parameters for demonstration.
az config param-persist delete --all
# List all storage accounts which will create the `resource_group_name` stored parameter value.
az storage account show --resource-group RG1forTutorial --name sa1fortutorial
# See the new stored value created for resource group.  The storage account name is only stored with a 'create' command.
az config param-persist show
Executing a command with a different value can be used to replace a stored parameter value.
Create new persisted parameters.
# Clear all persisted parameters for demonstration
az config param-persist delete --all
# Create a storage account placing "location", "resource_group_name", and "storage_account_name" into persisted parameters
az storage account create --name sa1fortutorial --resource-group RG1forTutorial --location eastus2
# See persisted parameters entries
az config param-persist show
# Create a second storage account while changing both the "storage_account_name" and "location" persisted parameters
az storage account create --name sa2fortutorial --location westeurope
# See new persisted parameters
az config param-persist show
# Reminder: function app and storage account names must be unique.
# Turn persisted parameters on.
az config param-persist on
# Create a resource group.
az group create --name RG2forTutorial --location westeurope
# Create an Azure storage account in the resource group omitting "--location" and "--resource-group" parameters.
az storage account create \
 --name sa3fortutorial \
 --sku Standard_LRS
# Create a serverless function app in the resource group omitting "--storage-account" and "--resource-group" parameters.
az functionapp create \
 --name FAforTutorial \
 --consumption-plan-location westeurope \
 --functions-version 2
# See the stored parameter values.
az config param-persist show
2. Without using persisted parameters
# Reminder: function app and storage account names must be unique.
# turn persisted parameters off
az config param-persist off
# Create a resource group.
az group create --name RG2forTutorial --location westeurope
# Create an Azure storage account in the resource group.
az storage account create \
 --name sa3fortutorial \
 --location westeurope \
 --resource-group RG2forTutorial \
 --sku Standard_LRS
# Create a serverless function app in the resource group.
az functionapp create \
 --name FAforTutorial \
 --storage-account sa3fortutorial \
 --consumption-plan-location westeurope \
 --resource-group RG2forTutorial \
 --functions-version 2
6. Delete persisted parameters
To delete entries, use the az config param-persist delete command.
# Remove a single persisted parameters entry by specifying the name, not the value
az config param-persist delete resource_group_name
# Remove all persisted parameters entries and do not prompt for confirmation
az config param-persist delete --all --yes
7. Turn persisted parameters off
By using the az config param-persist off command, you may disable persistent parameters, but the data associated with those values will remain in place.
# Turn persisted parameters off
az config param-persist off
# See that your persisted parameters still exist
az config param-persist show
# Try to create a new resource relying on persisted parameters and receive error "...the following arguments are required:..."
az storage account create --name SA4inAzCLI --sku Standard_LRS
8. Clean up resources
Use the az group delete command to delete the resource group and any associated resources when no longer required
az group delete --name RG1forTutorial
Frequently Asked Questions
What is CLI in Azure?
The Azure Command-Line Interface (CLI) is a command-line tool that connects to Azure and allows you to run administrative commands on Azure services. It enables command execution via a terminal using interactive command-line prompts or a script.
Is Azure CLI PowerShell?
Both may be used in Cloud Shell in PowerShell and remotely at your desktop to control the Azure cloud. If you wish to manage Azure resources, use Azure CLI; if you need to manage Windows Servers, use Azure PowerShell.
How can you access the Azure CLI?
The Azure CLI for Windows is installed through an MSI, enabling you to access the CLI using the Windows Command Prompt (CMD) or PowerShell. Packages for your Linux distribution are available when installing Windows Subsystem for Linux (WSL).
Conclusion
In this article, we have extensively discussed the Azure CLI. We learned what is Azure CLI, and how to use az config param-persist reference commands and Execute sequential commands using persisted parameters.


 8+ registered

