Do you think IIT Guwahati certified course can help you in your career?
Introduction
Hello Ninja! In this article, we will learn about a relatively advanced component of Bootstrap. We are talking about the Bootstrap Affix plugin. True to its name, the affix plugin is used to fix the position of an element after the page is scrolled to a particular place. This article will discuss its syntax, examples, and how to use it on your websites.
Let us begin by understanding what the affix plugin is exactly.
Bootstrap Affix Plugin
The Affix plugin in Bootstrap allows you to pin elements to the screen as you scroll, similar to how the position: sticky CSS property works. You can use the affix plugin in Bootstrap to make a navigation menu or sticky header. To use the plugin, you need to include the Bootstrap JavaScript and Introduction to JQuery libraries and then call the affix() method on the element you want to make affixed. The plugin toggles this property on and off depending on the distance scrolled. It can be customized to fit a website's or web application's specific needs.
For example, if you go to the official Bootstrap website to read the documentation, you'll come across the use of this plugin. You will find that the navigation menus stop scrolling further after scrolling down a certain distance. They get fixed in their position.
The Affix plugin in Bootstrap is most commonly used in conjunction with the Scrollspy plugin.
This plugin toggles between the three classes listed below:
Class Name
Description
.affix-top
It indicates the state of an element when it is at the top of the viewport. It is added to the affixed element when the user scrolls to the top of the page and the element is visible.
.affix
It indicates the state of an element when it is in the middle of the viewport. It is added to the affixed element when the user moves down the page, and the element becomes fixed.
.affix-bottom
This class indicates the state of an element when it is at the bottom of the viewport. It is added to the affixed element when the user scrolls to the bottom of the page and the element is no longer visible.
Let us now look at the implementation of the Bootstrap Affix plugin.
How to Use the Affix Plugin
The Affix plugin in Bootstrap can be applied in two ways, through Data attributes and Javascript. Each of the methods is discussed below:
Include the following bootstrap.js and bootstrap.css files in the head of your HTML file to use the Affix Plugin in Bootstrap.
To use the Bootstrap Affix plugin using the data attribute, you first need to have Bootstrap CSS and JavaScript included in your project. Then, you can add the "data-spy" attribute to the HTML element that should be used as the "affix context" and set its value to "affix."
Next, you can add the "data-offset" attribute to the element you want to affix and set its value to the number of pixels from the top of the page where the element should be affixed.
Here's an example of how you can use the Affix plugin in Bootstrap using the data attribute:
In this example, the "navbar" element will be affixed 60 pixels from the top of the page when the user scrolls down.
Let's look at a working example of the Affix plugin in Bootstrap using data attributes.
Example
<!DOCTYPE html>
<html lang="en">
<head>
<title>Bootstrap Affix plugin Example</title>
<meta charset="utf-8">
<meta name="viewport" content="width=device-width, initial-scale=1">
<link rel="stylesheet" href="https://maxcdn.bootstrapcdn.com/bootstrap/3.3.7/css/bootstrap.min.css" integrity="sha384-BVYiiSIFeK1dGmJRAkycuHAHRg32OmUcww7on3RYdg4Va+PmSTsz/K68vbdEjh4u" crossorigin="anonymous">

<script src="https://maxcdn.bootstrapcdn.com/bootstrap/3.3.7/js/bootstrap.min.js" integrity="sha384-Tc5IQib027qvyjSMfHjOMaLkfuWVxZxUPnCJA7l2mCWNIpG9mGCD8wGNIcPD7Txa" crossorigin="anonymous"></script>
</head>
<body>
<div class="container">
<div class="jumbotron" style="background-color:#ef7706; color: white;">
<h1>Coding Ninjas</h1>
</div>
<div id="navbar" data-spy="affix" data-offset-top="60" data-offset-bottom="200">
<div class="col-md-3">
<ul class="nav nav-pills nav-stacked affix" data-spy="affix" data-offset-top="180">
<li>
<a href="#First">Our Mission</a>
</li>
<li>
<a href="#Second">About Us</a>
</li>
<li>
<a href="#Third">Coding Ninjas Studio</a>
</li>
</ul>
</div>
<div class="col-md-9">
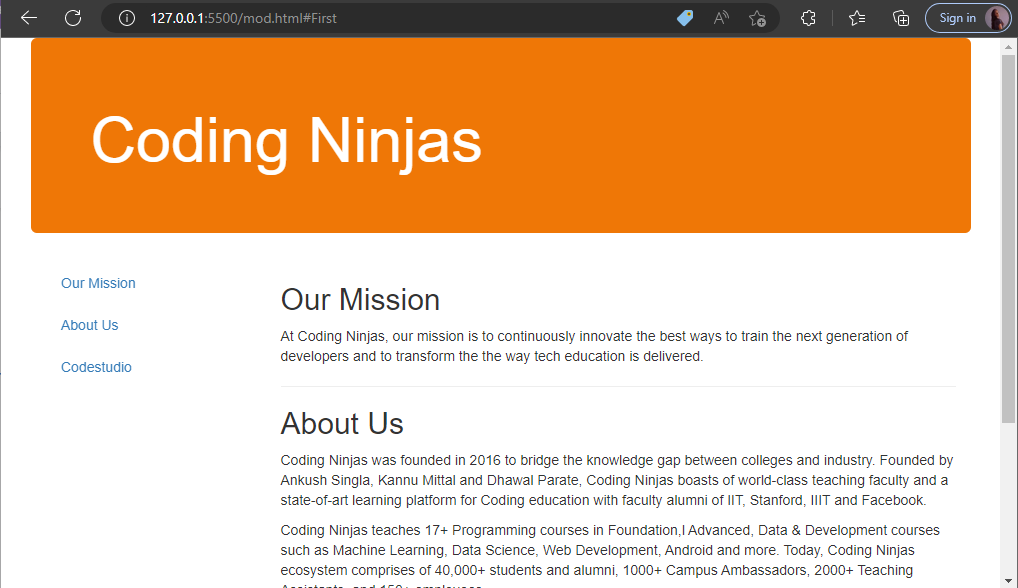
<h2 id="First">Our Mission</h2>
<p>At Coding Ninjas, our mission is to continuously innovate the best ways to train the next generation of developers and to transform the way tech education is delivered.</p>
<hr>
<h2 id="Second">About Us</h2>
<p>Coding Ninjas was founded in 2016 to bridge the knowledge gap between colleges and industry. Founded by Ankush Singla, Kannu Mittal and Dhawal Parate, Coding Ninjas boasts of world-class teaching faculty, and a state-of-art learning platform for Coding education with faculty alumni of IIT, Stanford, IIIT, and Facebook.</p>
<p>Coding Ninjas teaches 17+ Programming courses in Foundation,l Advanced, Data & Development courses such as Machine Learning, Data Science, Web Development, Android and more. Today, the Coding Ninjas ecosystem comprises 40,000+ students and alumni, 1000+ Campus Ambassadors, 2000+ Teaching Assistants, and 150+ employees.</p>
<hr>
<h2 id="Third">Coding Ninjas Studio</h2>
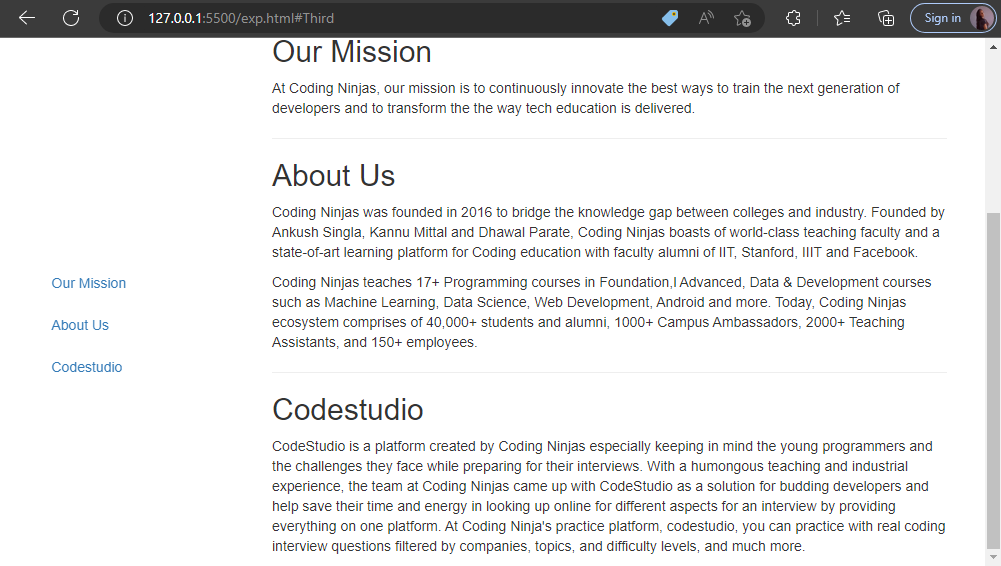
<p>Coding Ninjas Studio is a platform created by Coding Ninjas especially keeping in mind the young programmers and the challenges they face while preparing for their interviews. With a humongous teaching and industrial experience, the team at Coding Ninjas came up with Coding Ninjas Studio as a solution for budding developers and help save their time and energy in looking up online for different aspects for an interview by providing everything on one platform. At Coding Ninja's practice platform, Coding Ninjas Studio, you can practice with real coding interview questions filtered by companies, topics, and difficulty levels, and much more.</p>
<p>Coding Ninjas Studio is a platform where you can read about interview experiences of top product-based companies like Amazon, Facebook, Microsoft, and more. Every young programmer goes through a dilemma of the resources being scattered online. Now imagine this, you find a platform where you can practice questions and not just any questions, carefully curated questions that companies ask during their interviews. It is a platform where you can regularly track your progress, a platform that sorts the questions based on topics to check your readiness, a platform where you get a filtered set of videos, articles, and events to aid in your journey to get closer to your job – sounds like a dream come true? </p>
<p>If you truly want to land your dream job, you have to understand that it won’t come easy to you. You have to think and execute your actions very carefully so that your time is not invested in the wrong places. Coding Ninjas Studio is no less than a boon for you. It has been created keeping in mind the modern needs of a developer and would require you to just devote your time and energy here rather than surfing the internet and vaguely looking for things. It is a one-stop solution for all your coding needs.</p>
<p>Coding Ninjas Studio has a dedicated progress tracker which checks how many problems you were able to solve and how many problems did you attempt. With currently having 1413 problems on the platform, the collection is being regularly updated to provide the students with the best set of questions. </p>
<p>Coding Ninjas Studio has a vast collection of interview experiences for companies like Amazon, Samsung, Microsoft, Goldman Sachs, etc. You can filter interview experiences on the basis of – company, role, location, experience, company type, and interview location. Along with the details of the interviewee, you also can clearly see if they were selected and rejected, based on which you can strategize by learning from their mistakes and noting down the good they did.</p>
<p>Coding Ninjas Studio is not only a platform to prepare for tech interviews but will offer a range of practice problems, competing in international coding challenges on platforms like CodeJam, CodeChef, HackerEarth, HackerRank, LeetCode etc. Coding Ninjas Studio features in-depth interview experiences of companies like Amazon, Samsung, Microsoft, Goldman Sachs, and more tech bigwigs. The platform is a great learning tool for anyone appearing for tech internship interviews and job interviews. Because it captures every stage of the interview process at the leading tech companies on topics like Data Structures, Programming Fundamentals, Recursion & Backtracking, and more. </p>
</div>
</div>
</div>
</body>
</html>
Output
Before Scrolling:
After Scrolling:
Explanation
In this example, the navigation menu is placed inside a div with a data-spy attribute set to "affix." This tells Bootstrap to use the Affix plugin on this element. The data-offset-top attribute is set to "60," which means the menu will become fixed to the top of the screen when the user scrolls 60 pixels from the top of the page. The data-offset-bottom attribute is set to "200," which means the menu will become unfixed from the top of the screen when the user scrolls 200 pixels from the bottom of the page.
In simple words, the navigation menu will not move after you scroll down to certain pixels, even when you scroll the rest of the page.
Note: If you cannot see the scrollbar on your screen with this code, you can try zooming in a little bit.
Affix Plugin Using JavaScript
To use the Affix plugin in Bootstrap using JavaScript, you first need to have Bootstrap CSS and JavaScript included in your project. Then, you can initialize the plugin on a specific element by selecting it with JavaScript and calling the "affix" method on it.
Here's an example of how you might use the Affix plugin in Bootstrap using JavaScript:
In this example, the "navbar" element will be affixed 60 pixels from the top of the page when the user scrolls down.
Alternatively, you can use jQuery methods like .on and .off to attach and detach the affix behaviour.
By using JavaScript, you can have more control over the plugin. You can also attach the events to the affix element.
Example
<!DOCTYPE html>
<html lang="en">

<head>
	<title>Bootstrap Affix plugin Example</title>
	<meta charset="utf-8">
	<meta name="viewport" content="width=device-width, initial-scale=1">
	<link rel="stylesheet" href="https://maxcdn.bootstrapcdn.com/bootstrap/3.3.7/css/bootstrap.min.css"
		integrity="sha384-BVYiiSIFeK1dGmJRAkycuHAHRg32OmUcww7on3RYdg4Va+PmSTsz/K68vbdEjh4u" crossorigin="anonymous">
	<script src="https://maxcdn.bootstrapcdn.com/bootstrap/3.3.7/js/bootstrap.min.js"
		integrity="sha384-Tc5IQib027qvyjSMfHjOMaLkfuWVxZxUPnCJA7l2mCWNIpG9mGCD8wGNIcPD7Txa"
		crossorigin="anonymous"></script>
</head>

<body>
	<div class="container">
		<div class="jumbotron" style="background-color:#ef7706; color: white;">
			<h1>Coding Ninjas</h1>
		</div>
		<div >
			<div class="col-md-3" >
				<ul class="nav nav-pills nav-stacked affix" id="navbar">
					<li>
						<a href="#First">Our Mission</a>
					</li>
					<li>
						<a href="#Second">About Us</a>
					</li>
					<li>
						<a href="#Third">Coding Ninjas Studio</a>
					</li>
				</ul>
			</div>

			<div class="col-md-9">
				<h2 id="First">Our Mission</h2>
				<p>At Coding Ninjas, our mission is to continuously innovate the best ways to train the next generation
					of developers and to transform the way tech education is delivered.</p>

				<hr>
				<h2 id="Second">About Us</h2>
				<p>Coding Ninjas was founded in 2016 to bridge the knowledge gap between colleges and industry. Founded
					by Ankush Singla, Kannu Mittal and Dhawal Parate, Coding Ninjas boasts of world-class teaching
					faculty, and a state-of-art learning platform for Coding education with faculty alumni of IIT,
					Stanford, IIIT, and Facebook.</p>

				<p>Coding Ninjas teaches 17+ Programming courses in Foundation,l Advanced, Data & Development courses
					such as Machine Learning, Data Science, Web Development, Android and more. Today, the Coding Ninjas
					ecosystem comprises 40,000+ students and alumni, 1000+ Campus Ambassadors, 2000+ Teaching
					Assistants, and 150+ employees.</p>

				<hr>
				<h2 id="Third">Coding Ninjas Studio</h2>
				<p>Coding Ninjas Studio is a platform created by Coding Ninjas especially keeping in mind the young programmers
					and the challenges they face while preparing for their interviews. With a humongous teaching and
					industrial experience, the team at Coding Ninjas came up with Coding Ninjas Studio as a solution for budding
					developers and help save their time and energy in looking up online for different aspects for an
					interview by providing everything on one platform. At Coding Ninja's practice platform, Coding Ninjas Studio,
					you can practice with real coding interview questions filtered by companies, topics, and difficulty
					levels, and much more.</p>

				<p>Coding Ninjas Studio is a platform where you can read about interview experiences of top product-based
					companies like Amazon, Facebook, Microsoft, and more. Every young programmer goes through a dilemma
					of the resources being scattered online. Now imagine this, you find a platform where you can
					practice questions and not just any questions, carefully curated questions that companies ask during
					their interviews. It is a platform where you can regularly track your progress, a platform that
					sorts the questions based on topics to check your readiness, a platform where you get a filtered set
					of videos, articles, and events to aid in your journey to get closer to your job – sounds like a
					dream come true? </p>

				<p>If you truly want to land your dream job, you have to understand that it won’t come easy to you. You
					have to think and execute your actions very carefully so that your time is not invested in the wrong
					places. Coding Ninjas Studio is no less than a boon for you. It has been created keeping in mind the modern
					needs of a developer and would require you to just devote your time and energy here rather than
					surfing the internet and vaguely looking for things. It is a one-stop solution for all your coding
					needs.</p>

				<p>Coding Ninjas Studio has a dedicated progress tracker which checks how many problems you were able to solve and
					how many problems did you attempt. With currently having 1413 problems on the platform, the
					collection is being regularly updated to provide the students with the best set of questions. </p>

				<p>Coding Ninjas Studio has a vast collection of interview experiences for companies like Amazon, Samsung,
					Microsoft, Goldman Sachs, etc. You can filter interview experiences on the basis of – company, role,
					location, experience, company type, and interview location. Along with the details of the
					interviewee, you also can clearly see if they were selected and rejected, based on which you can
					strategize by learning from their mistakes and noting down the good they did.</p>

				<p>Coding Ninjas Studio is not only a platform to prepare for tech interviews but will offer a range of practice
					problems, competing in international coding challenges on platforms like CodeJam, CodeChef,
					HackerEarth, HackerRank, LeetCode etc. Coding Ninjas Studio features in-depth interview experiences of
					companies like Amazon, Samsung, Microsoft, Goldman Sachs, and more tech bigwigs. The platform is a
					great learning tool for anyone appearing for tech internship interviews and job interviews. Because
					it captures every stage of the interview process at the leading tech companies on topics like Data
					Structures, Programming Fundamentals, Recursion & Backtracking, and more. </p>

			</div>
		</div>
	</div>

	<script type="text/javascript">
		$(function () {
			$('#navbar').affix({
				offset: {
					top: 60
				}
			});
		});
	</script>
</body>

</html>
Output
Before Scrolling:
After Scrolling:
Explanation
In this example, the ul element is provided with the id “navbar”; it will be affixed to the top of the page when the user scrolls past the element's offset position. The data-offset-top attribute is used to set the offset position.
You'll notice that through both implementations, the output is the same.
Note: If you cannot see the scrollbar on your screen with this code, you can try zooming in a little bit.
It's important to note that this feature is deprecated in Bootstrap 4 and is replaced by the class ".fixed-top" and ".sticky-top".
How Does the Affix Plugin Work?
The Affix plugin in Bootstrap allows you to switch between three classes: .affix, .affix-top, and .affix-bottom. Each class denotes a distinct state. Except for position: fixed on the .affix class, you must add CSS properties to handle the real positions.
The plugin adds the .affix-top or .affix-bottom class to indicate whether the element is at the top or bottom of the page. CSS positioning is not necessary at this time.
When you scroll beyond the affixed element, the plugin replaces the .affix-top or .affix-bottom classes with the .affix class (sets position: fixed). To place the fastened component of the page, use the CSS top or bottom property at this point.
When you scroll past a bottom offset, the .affix class is replaced with .affix-bottom. Because offsets are optional, you must also set the proper CSS to use them. If necessary, add position: absolute in this situation.
Let us now address some frequently asked questions.
Frequently Asked Questions
What is Bootstrap?
Bootstrap is a free and open-source CSS framework that aims to be a mobile-first front-end web development framework. It contains CSS and JavaScript-based interface components and design templates like forms, buttons, navbar, and many more.
What are the benefits of using Bootstrap?
Bootstrap provides many pre-styled components like buttons, forms, etc. It is used to create responsive designs without any effort. The pages made using Bootstrap components are faster and have more functionality.
What is Affix Plugin in Bootstrap?
The Affix plugin in Bootstrap is used to fix an element to a specific position when the page is scrolled to a particular place.
How do I make the navbar stick to the top?
We can use the Affix plugin in Bootstrap to fix it to the top and set the offset to 0.
What is the key difference between Bootstrap and CSS?
The key difference between Bootstrap and CSS is that Bootstrap is a front-end framework, while CSS is a style sheet language.
Conclusion
In this article, we learned how to use the Bootstrap Affix Plugin in our projects. We learned about its uses and how it works. We also saw its implementation through the use of Data attributes and Javascript.
To learn more about Bootstrap, you can refer to the following articles.


 9+ registered

