BoxLayout Widget
Kivy has several layouts for keeping widgets in their proper locations in an app. BoxLayout is a simple yet effective layout that is frequently used in a nested or straightforward way. We use BoxLayout to place widgets vertically, one on top of the other or horizontally, one after the other.
- We use the kivy.uix.boxlayout module to import BoxLayout widget.
- With the aid of the orientation attribute, we can distinguish between vertical and horizontal BoxLayout. If you want all items to be in one row, set the orientation property to 'horizontal,' or just leave it blank because that is the default setting. Set the orientation to vertical if you want the items in a column.
- Also, features like spacing are exploited to meet our needs.
Now, we'll look at how to use the BoxLayout widget in Kivy and different API functions of it.
API Methods
Below are the API functions used in the Kivy BoxLayout module:
-
add_widget(widget, *args, **kwargs)
This function, when called, adds a new widget as a child of this widget.
-
do_layout(*largs)
When a trigger calls a layout, this method is called. If you're creating a new Layout subclass, use _trigger layout() instead of calling this function directly.
The function is called before the next frame by default; thus, the layout isn't altered right away. Anything dependent on the positions of youngsters, for example, should be scheduled for the next frame.
-
minimum_height
This method returns the minimum height required to house all children.
-
minimum_size
This method returns the minimum size required to house all children.
-
orientation
It is used to set the orientation of the layout. The default value is horizontal but it can be vertical also.
-
padding
It sets the padding between layout and children.
-
spacing
It sets the spacing between children in pixels.
Example 1 (Horizontal BoxLayout)
In the below example, we have implemented the horizontal BoxLayout.
Code
#program for horizontal boxlayout in kivy
from kivy.app import App
from kivy.uix.button import Button
from kivy.uix.boxlayout import BoxLayout
from kivy.uix.label import Label
from kivy.uix.textinput import TextInput
#class for the app
class MyApp(App):
def build(self):
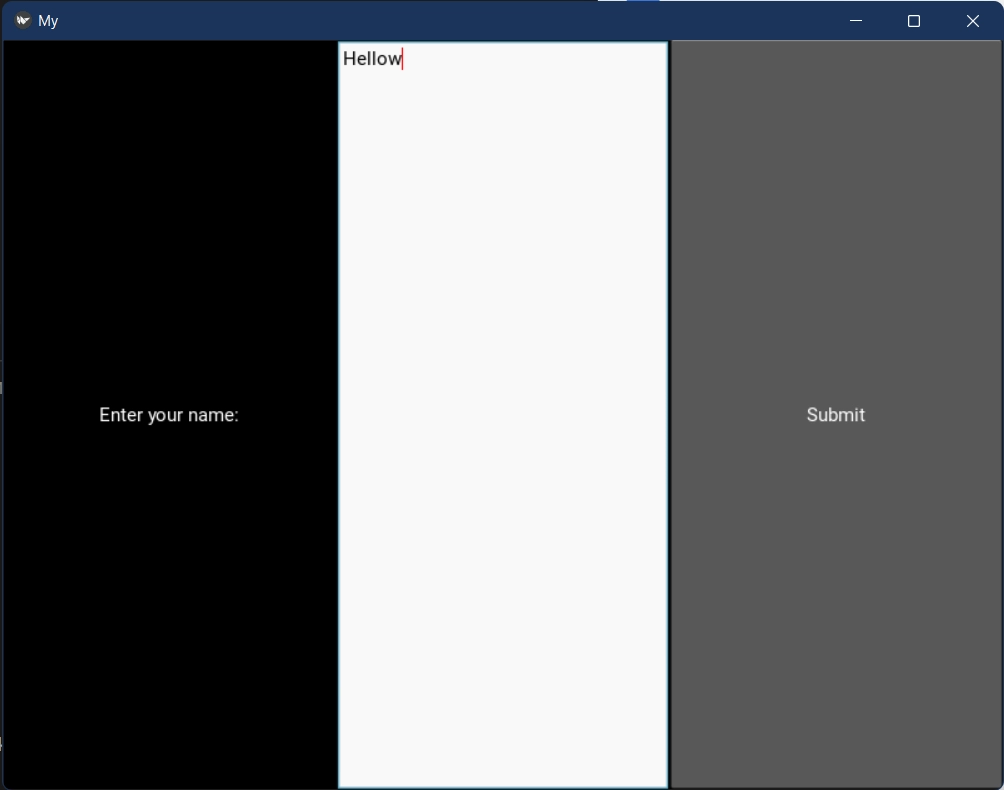
horizontal_box = BoxLayout(orientation='horizontal')
label = Label(text='Enter your name:')
text_input = TextInput(multiline=False)
button = Button(text='Submit')
horizontal_box.add_widget(label)
horizontal_box.add_widget(text_input)
horizontal_box.add_widget(button)
return horizontal_box
if __name__ == '__main__':
MyApp().run()

You can also try this code with Online Python Compiler
The most significant aspect of the above code is the horizontal orientation. This guarantees that the three components, label, text_input, and the button we've made, are arranged horizontally.
Output
Example 2 (Vertical BoxLayout)
Now, we will see how we can implement the BoxLayout in a vertical orientation. Below is the code for vertical orientation.
Code
#program for vertical boxlayout in kivy
from kivy.app import App
from kivy.uix.boxlayout import BoxLayout
from kivy.uix.button import Button
from kivy.uix.label import Label
from kivy.uix.textinput import TextInput

class MyApp(App):
    def build(self):
        vertical_box = BoxLayout(orientation='vertical')
        self.label = Label(text='Enter your name:')
        self.text_input = TextInput(multiline=False)
        self.button = Button(text='Submit',
                                on_press=self.pressed)
        vertical_box.add_widget(self.label)
        vertical_box.add_widget(self.text_input)
        vertical_box.add_widget(self.button)
        return vertical_box
    def pressed(self, instance):
        name = self.text_input.text
        print(name)
if __name__ == '__main__':
    MyApp().run()
You can also try this code with Online Python Compiler
The important thing we can notice in the above program is that the orientation of the BoxLayout has been set to vertical. The three components, label, button, and text_input, are aligned vertically in the output. The output of the above program is as follows.
Output

Example 3 (Vertical and Horizontal BoxLayout)
Now we'll look at how to use kivy to construct both vertical and horizontal BoxLayout. The code is provided below.
Code
#program for vertical and horizontal boxlayout in kivy
from kivy.app import App
from kivy.uix.boxlayout import BoxLayout
from kivy.uix.button import Button
from kivy.uix.label import Label
#class for vertical and horizontal boxlayout
class MyApp(App):
    def build(self):
        box=BoxLayout(orientation='vertical')
        horizontal_box=BoxLayout(orientation='horizontal')
        label1=Label(text='Hello')
        label2=Label(text='World')
        button1=Button(text='Click Me')
        button2=Button(text='Click Me')
        #adding widgets to horizontal box
        horizontal_box.add_widget(label1)
        horizontal_box.add_widget(label2)
        box.add_widget(horizontal_box)
        #adding widgets to vertical box
        box.add_widget(button1)
        box.add_widget(button2)
        return box
#run the app
if __name__ == '__main__':
    MyApp().run()
You can also try this code with Online Python Compiler
Output

In the above example, we can see how we aligned two labels in a horizontal orientation and the two buttons in a vertical orientation.
Frequently Asked Questions
What is Padding in Kivy?
The padding argument informs Kivy how much space between the Layout and its children, while the spacing argument tells it how much space between the children should be. We use a primary loop that loops over a tiny range of values to make the buttons.
In Kivy, what is a builder?
The Builder is in charge of generating a Parser that parses a “kV” file and merges the results into the system's internal rules, templates, etc. Builder is a global Kivy instance that we may use in widgets to load more “kV” files and the usual ones.
Is Kivy suitable for mobile applications?
Kivy is an excellent option if you intend your app to be used across various devices and you need it to have a consistent look and feel. BeeWare, on the other hand, uses a codebase to generate alternative code versions for various systems.
What is KivyMD?
KivyMD is a set of Material Design widgets for use with Kivy, a mobile app development platform. It's comparable to the Kivy framework but with a more appealing user interface.
Conclusion
In this article, we have extensively discussed the basics of the Kivy library of python and discussed the followings:
- Overview of Kivy
- Advantages
- Disadvantages
- BoxLayout Widget
- API Methods
- Implementations of horizontal and vertical BoxLayout
We hope that this blog has helped you enhance your knowledge regarding the BoxLayout widget in Kivy, and if you would like to learn more, check out our articles on the "Dropdown list in Kivy," "Scroll View Widget in Kivy," "Button color in kivy," "Button action in kivy," and "Kivy float layout." Do upvote our blog to help other ninjas grow.
Head over to our practice platform Coding Ninjas Studio to practice top problems, attempt mock tests, read interview experiences, interview bundle, follow guided paths for placement preparations and much more!
Happy Reading!


 9+ registered

