


Introduction
Maven is a software project management tool. It helps us automate certain parts of software development, such as compiling, testing, etc. It is popular with JVM languages, such as Java, Scala, Kotlin,etc.
In large software, projects are often interdependent on each other. Thus, changes to one project can affect another project. We can use Maven to help us automate testing across different projects. Let us look how.
Build Automation using Maven
Suppose we have software that has been divided into 3 parts. One part is for the backend, another for the frontend of the website, and the last one for the mobile application frontend. The mobile application and the website use the same backend to maintain consistency in both of them.
Thus, changes to the backend code should not cause any errors in the mobile/website frontend code. Checking for errors across different projects is generally a part of integration testing.
Maven has a phase for integration testing in its lifecycle. You can read more about Maven phases by visiting our article on Maven Phases - Introduction to Maven Phases. So, we will need to include our website and mobile frontend projects in the integration testing phase of the backend project.
Let's see how we can do this.
Example Project Structure
Let's look at the structure for the example project we are considering.
We have three projects - NinjaAppFrontend, NinjaWebFrontend, and NinjaBackendAPI.
NinjaAppFrontend and NinjaWebFrontend projects both depend on the NinjaBackendAPI.
All three projects are Maven projects.
pom.xml for NinjaBackendAPI
<?xml version="1.0" encoding="UTF-8"?>
<project xmlns="http://maven.apache.org/POM/4.0.0"
         xmlns:xsi="http://www.w3.org/2001/XMLSchema-instance"
         xsi:schemaLocation="http://maven.apache.org/POM/4.0.0 http://maven.apache.org/xsd/maven-4.0.0.xsd">
    <modelVersion>4.0.0</modelVersion>


    <groupId>com.codingninjas</groupId>
    <artifactId>NinjaBackendAPI</artifactId>
    <version>1.0-SNAPSHOT</version>
    <packaging>jar</packaging>
    <properties>
        <maven.compiler.source>9</maven.compiler.source>
        <maven.compiler.target>9</maven.compiler.target>
    </properties>


</project>
pom.xml for NinjaWebFrontend
<?xml version="1.0" encoding="UTF-8"?>
<project xmlns="http://maven.apache.org/POM/4.0.0"
         xmlns:xsi="http://www.w3.org/2001/XMLSchema-instance"
         xsi:schemaLocation="http://maven.apache.org/POM/4.0.0 http://maven.apache.org/xsd/maven-4.0.0.xsd">
    <modelVersion>4.0.0</modelVersion>


    <groupId>com.codingninjas</groupId>
    <artifactId>NinjaWebFrontend</artifactId>
    <version>1.0-SNAPSHOT</version>
    <properties>
        <maven.compiler.source>9</maven.compiler.source>
        <maven.compiler.target>9</maven.compiler.target>
    </properties>
    <packaging>jar</packaging>
    <dependencies>
        <dependency>
            <groupId>com.codingninjas</groupId>
            <artifactId>NinjaBackendAPI</artifactId>
            <version>1.0-SNAPSHOT</version>
        </dependency>
    </dependencies>


</project>
pom.xml for NinjaAppFrontend
<?xml version="1.0" encoding="UTF-8"?>
<project xmlns="http://maven.apache.org/POM/4.0.0"
         xmlns:xsi="http://www.w3.org/2001/XMLSchema-instance"
         xsi:schemaLocation="http://maven.apache.org/POM/4.0.0 http://maven.apache.org/xsd/maven-4.0.0.xsd">
    <modelVersion>4.0.0</modelVersion>


    <groupId>com.codingninjas</groupId>
    <artifactId>NinjaAppFrontend</artifactId>
    <version>1.0-SNAPSHOT</version>
    <packaging>jar</packaging>
    <properties>
        <maven.compiler.source>9</maven.compiler.source>
        <maven.compiler.target>9</maven.compiler.target>
    </properties>


    <dependencies>
        <dependency>
            <groupId>com.codingninjas</groupId>
            <artifactId>NinjaBackendAPI</artifactId>
            <version>1.0-SNAPSHOT</version>
        </dependency>
    </dependencies>


</project>
As you can see, NinjaBackendAPI is present under dependencies section of both NinjaAppFrontend and NinjaWebFrontend.
Automating Build using Maven Invoker Plugin
Apache provides the Maven Invoker plugin. It is a plugin that is useful in running multiple Maven projects together. This ability makes it perfect for our purpose of integration testing.
Integration testing is one of the most important uses for this plugin. Unless specified otherwise, this plugin is executed in the integration test phase by default.
We want to run the builds of NinjaWebFrontend and NinjaAppFrontend, anytime we perform integration testing for NinjaBackendAPI. This will ensure that changes to NinjaBackendAPI do not cause errors in the other 2 projects. If any errors are found, the Maven Invoker Plugin will detect them and report them to us, and the integration test will fail.
Let us see how we can use it.
We need to add the plugin to the pom.xml of NinjaBackendAPI and configure it. The final pom.xml should look like this.
<?xml version="1.0" encoding="UTF-8"?>
<project xmlns="http://maven.apache.org/POM/4.0.0"
         xmlns:xsi="http://www.w3.org/2001/XMLSchema-instance"
         xsi:schemaLocation="http://maven.apache.org/POM/4.0.0 http://maven.apache.org/xsd/maven-4.0.0.xsd">
    <modelVersion>4.0.0</modelVersion>


    <groupId>com.codingninjas</groupId>
    <artifactId>NinjaBackendAPI</artifactId>
    <version>1.0-SNAPSHOT</version>
    <packaging>jar</packaging>
    <properties>
        <maven.compiler.source>9</maven.compiler.source>
        <maven.compiler.target>9</maven.compiler.target>
    </properties>


    <build>
    <plugins>
        <plugin>
            <artifactId>maven-invoker-plugin</artifactId>
            <version>3.3.0</version>
            <configuration>
                <pomIncludes>
                    <pomInclude>NinjaWebFrontend/pom.xml</pomInclude>
                    <pomInclude>NinjaAppFrontend/pom.xml</pomInclude>
                </pomIncludes>
                <projectsDirectory>C:\Administrator\NinjaProject</projectsDirectory>
            </configuration>
            <executions>
                <execution>
                    <id>build</id>
                    <goals>
                        <goal>run</goal>
                    </goals>
                </execution>
            </executions>
        </plugin>
    </plugins>
    </build>


</project>
Let us understand the meaning of the lines we have added.
-
The plugin has been added under the <build> tag because it is a build plugin.
-
The artifactId for the plugin is maven-invoker-plugin. We are using the latest version, 3.3.0.
-
In the <configuration> section, we specify a <pomIncludes> tag. In this, we specify which pom.xml files we want to include in our integration testing. We specify the paths to the pom.xml files.
-
The <projectsDirectory> is the directory in which the plugin will look for the projects we specified in the <pomIncludes> section. By default, the plugin looks in "/src/it" of the current project.
Here, we have specified a different value because our project structure is different.
-
The <execution> tag specifies what executions need to be done when this plugin is run during its phase (integration testing phase in our case).
We can specify as many executions as we want. Here, we only have one.
The <id> tag of the execution is so that we ourselves can distinguish it from other executions. It serves no purpose to Maven.
The <goals> are the goals of the invoker plugin that we want to run during this execution.
Here, we only want to run one goal - run. The run goal will run each of the projects we specified in <pomIncludes>. It will output any logs collected to the command line.
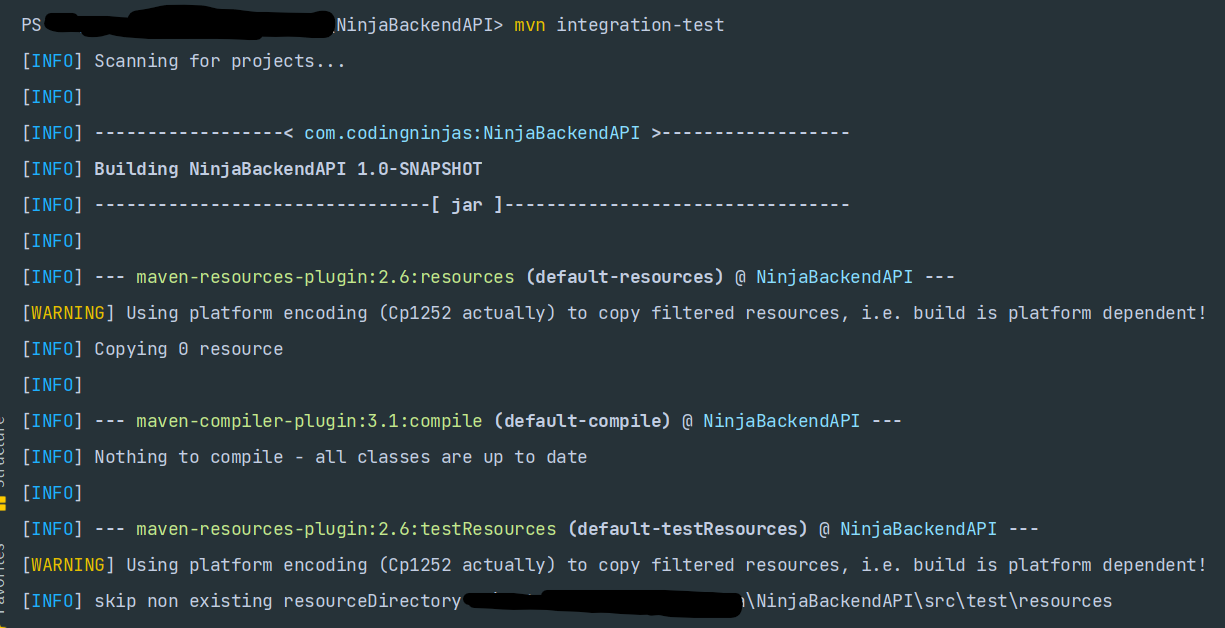
Let's try running it now. Type
mvn integration-test
Into the terminal. This will run the integration test phase. You can also run the install, deploy, or any other phases that come after integration testing. Integration testing will run as a part of them by default.
The output is shown below.

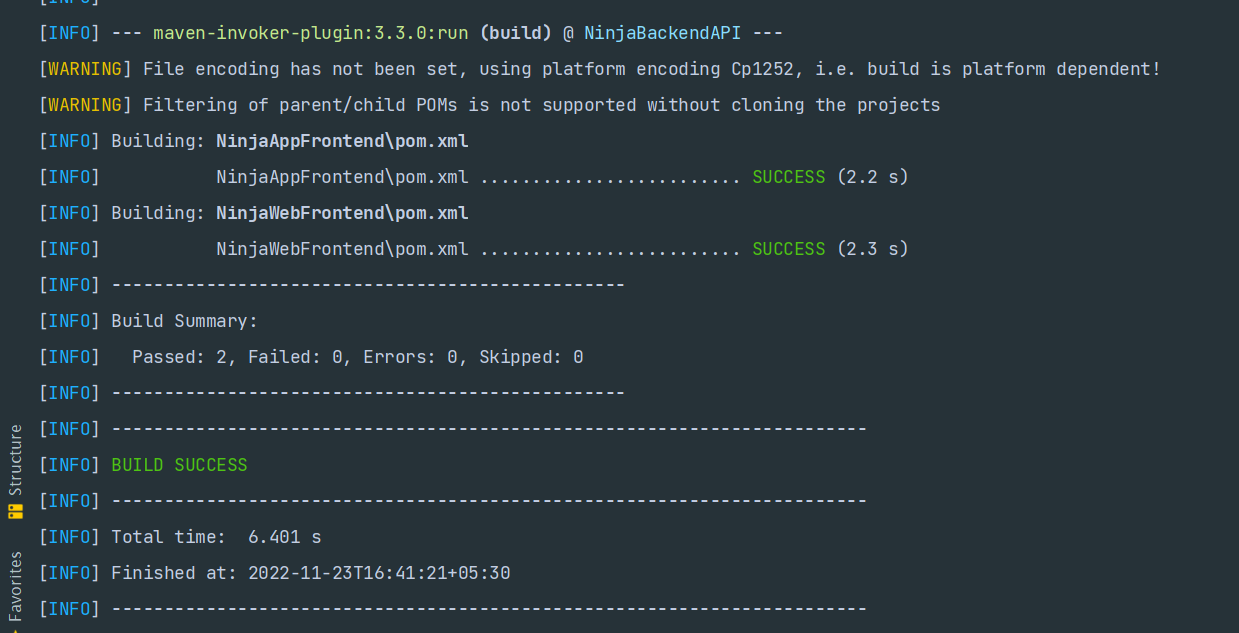
As you can see in the last screenshot, the invoker plugin has run both NinjaAppFrontend and NinjaWebFrontend. Both of them have passed. If either failed, the entire Maven build would have also failed.
Must Read Apache Server


 9+ registered

