


Introduction
A Todo App is a simple and effective way to manage your daily tasks and ensure that nothing falls through the cracks. Using Javascript, we can create a Todo App with additional features like edit and delete functionality. These features make it easier to modify or remove tasks that have been added, which is especially useful for tasks that may change or become irrelevant over time.

In this blog post, we will go through the steps of building a Todo App in JavaScript, using HTML and CSS to style the application.
What are HTML, CSS, and JavaScript?
Before we start, let's talk briefly about what HTML, CSS, and JavaScript do.
HTML (Hypertext Markup Language) is the standard markup language used to create web pages. HTML is used to structure content and provide meaning and context to web content. HTML consists of a series of elements that can be used to create headings, paragraphs, lists, images, and other types of content.
CSS (Cascading Style Sheets) is used to style HTML elements. CSS allows web developers to control the layout and presentation of web content, including fonts, colors, spacing, and other visual properties.
JavaScript is a programming language used to create dynamic web content. JavaScript allows web developers to add interactivity and functionality to web pages, such as form validation, animation, and user interface components.
Font Awesome is a popular icon toolkit that provides a collection of scalable vector icons that can be easily customized and integrated into websites and web applications.
Now that we understand the basics of HTML, CSS, and JavaScript, let's dive into building our Todo App!
Explore the Source Code on GitHub
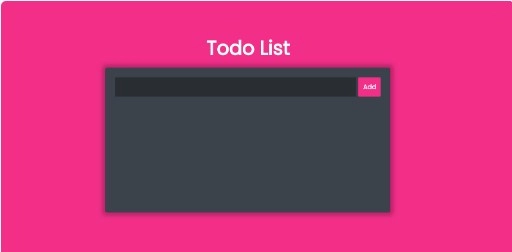
Step 1: Create the HTML Structure
Let’s start with building the HTML structure. The HTML structure of the app will contain three elements: the header, input wrapper, and to-do item lists.
Header Section
The header section contains the title of the Todo App and any other relevant information about the application. In this example, we have used an h1 tag to display the title.
<div class="heading">
	<h1>Todo App</h1>
</div>
Input Wrapper
The input wrapper is where users can add new tasks to their list. The input wrapper consists of an input field and an “Add” button.
<div class="input-wrapper">
	<input type="text" id="todo-input">
	<button id="submit">Add</button>
</div>Todo item lists
The todo item list is where all the todo items are going to append dynamically using javascript.
<div class="todo-lists">
</div>
Wrapping up the HTML, here are we with final structure:
<!DOCTYPE html>
<html lang="en">

<head>
<meta charset="UTF-8">
<meta http-equiv="X-UA-Compatible" content="IE=edge">
<meta name="viewport" content="width=device-width, initial-scale=1.0">
<title>Document</title>
<link rel="stylesheet" href="style.css">
<script src="https://kit.fontawesome.com/d5f22ee4f8.js" crossorigin="anonymous"></script>
</head>

<body>
<div class="main-container">
  <div class="ta-container">
    <div class="heading">
      <h1>Todo App</h1>
    </div>
    <div class="ta-wrapper">
      <div class="input-wrapper">
        <input type="text" id="todo-input">
        <button id="submit">Add</button>
      </div>
      <div class="todo-lists">
        <!-- todo item append here -->
      </div>
    </div>
  </div>
</div>
</body>

<script src="script.js"></script>

</html>
The HTML code above makes a final structure of our app, the app is wrapped under “main-container” class div. The HTML structure for a single todo-item will be:
<div class="todo-item">
<div>
  <input type="text" class="text" readonly="readonly">
</div>
<div class="action-items">
  <i class="fa-solid fa-check"></i>
  <i class="fa-solid fa-pen-to-square edit"></i>
  <i class="fa-solid fa-trash"></i>
</div>
</div>
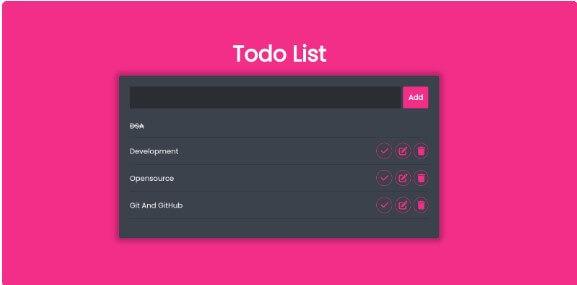
This is what it will look like:

We are going to append this item into the todo-item list from javascript.
You can compile with the help of Online Javascript Compiler for better understanding.
Step 2: Style the app with CSS
The CSS code for the application contains styling different components. The components to style contain different containers(`div`), heading(`h1`), input, button, i(`icons`), and hover effects on i(`icons`) and button.
Step 3: Add functionality with JavaScript
Now that our app has the bone and skin, let’s start making the brain function.
// access input field
const input = document.querySelector('#todo-input');

// Listening to the click event from the "Add" button.
document.querySelector('#submit').addEventListener('click', () => {
 // value of the input field
 const inputData = input.value;
input.value = "";

 // creating todo item element
 const todo_el = document.createElement('div');
todo_el.classList.add('todo-item');

 const todo_content_el = document.createElement('div');
todo_el.appendChild(todo_content_el);

 const todo_input_el = document.createElement('input');
todo_input_el.classList.add('text');
todo_input_el.type = 'text';
todo_input_el.value = inputData;
todo_input_el.setAttribute('readonly', 'readonly');

todo_content_el.appendChild(todo_input_el);

 const todo_actions_el = document.createElement('div');
todo_actions_el.classList.add('action-items');

 const todo_done_el = document.createElement('i');
todo_done_el.classList.add('fa-solid');
todo_done_el.classList.add('fa-check');

 const todo_edit_el = document.createElement('i');
todo_edit_el.classList.add('fa-solid');
todo_edit_el.classList.add('fa-pen-to-square');
todo_edit_el.classList.add('edit');

 const todo_delete_el = document.createElement('i');
todo_delete_el.classList.add('fa-solid');
todo_delete_el.classList.add('fa-trash');

todo_actions_el.appendChild(todo_done_el)
todo_actions_el.appendChild(todo_edit_el);
todo_actions_el.appendChild(todo_delete_el);

todo_el.appendChild(todo_actions_el);
 console.log(todo_el)
 // add the todo-item to lists
 document.querySelector('.todo-lists').appendChild(todo_el);

 // done functionality
todo_done_el.addEventListener('click', () => {
  todo_input_el.classList.add('done')
  todo_el.removeChild(todo_actions_el);
})

 // edit functionality
todo_edit_el.addEventListener('click', (e) => {
  if (todo_edit_el.classList.contains("edit")) {
    todo_edit_el.classList.remove("edit");
    todo_edit_el.classList.remove("fa-pen-to-square");
    todo_edit_el.classList.add("fa-x");
    todo_edit_el.classList.add("save");
    todo_input_el.removeAttribute("readonly");
    todo_input_el.focus();
  } else {
    todo_edit_el.classList.remove("save");
    todo_edit_el.classList.remove("fa-x");
    todo_edit_el.classList.add("fa-pen-to-square");
    todo_edit_el.classList.add("edit");
    todo_input_el.setAttribute("readonly", "readonly");
  }
});

 // delete functionality
todo_delete_el.addEventListener('click', (e) => {
  console.log(todo_el);
  document.querySelector('.todo-lists').removeChild(todo_el);
});
})
It allows users to input a task and add it to a list of todos, and also provides functionality to mark todos as complete, edit them, and delete them.
Accessing Input Field
The first line of the code uses the document.querySelector method to select the input field with the ID #todo-input. This input field will be used to get the text entered by the user.
Listening to the Click Event
The next line of code adds an event listener to the submit button. The addEventListener method is called on the button, with the first argument being the string 'click'. This specifies that the event being listened to is a click on the button. The second argument is a callback function that will be executed when the button is clicked.
Getting Input Data
Inside the callback function, the first line of code gets the value of the input field using the input.value property. This value is then stored in a variable called inputData. The second line of code sets the value of the input field to an empty string.
Creating the Todo Item Element
The below HTML code is a structure of a single todo-item that we are trying to achieve using javascript.
<div class="todo-item">
<div>
  <input type="text" class="text" readonly="readonly">
</div>
<div class="action-items">
  <i class="fa-solid fa-check"></i>
  <i class="fa-solid fa-pen-to-square edit"></i>
  <i class="fa-solid fa-trash"></i>
</div>
</div>
The next few lines of code create a new div element to represent the todo item. This element is given a class of todo-item using the classList.add method. The element is then appended to the DOM using the appendChild method.
Inside the todo-item div, two more elements are created: a div to hold the todo item content, and an input element to display the todo text. The input element is given a class of text and set to read-only mode using the setAttribute method.
The todo-content div is then appended to the todo-item div, followed by the todo-input element.
Creating Action Items
Next, a div element is created to hold the action items for the to-do item. This element is given a class of action items.
Inside the action-items div, three new elements are created using the createElement method. These are icons from the Font Awesome library: a checkmark icon, an edit icon, and a trash icon. Each icon element is given appropriate classes using the classList.add method, and then appended to the action-items div using the appendChild method.
Appending Todo Item to the List
Finally, the todo-item div is appended to the list of todos using the appendChild method, which is called on the element selected using the document.querySelector method with the class name todo-lists.
Adding Functionality to Action Items
Three event listeners are added to the action items in order to add functionality to them: done, edited, and delete.
Done Functionality
 // done functionality
todo_done_el.addEventListener('click', () => {
  todo_input_el.classList.add('done')
  todo_el.removeChild(todo_actions_el);
})
The done listener is added to the checkmark icon using the addEventListener method. When the icon is clicked, it adds a class of done to the todo-input element and removes the action-items div from the todo-item div using the removeChild method.
Edit Functionality
 // edit functionality
todo_edit_el.addEventListener('click', (e) => {
  if (todo_edit_el.classList.contains("edit")) {
    todo_edit_el.classList.remove("edit");
    todo_edit_el.classList.remove("fa-pen-to-square");
    todo_edit_el.classList.add("fa-x");
    todo_edit_el.classList.add("save");
    todo_input_el.removeAttribute("readonly");
    todo_input_el.focus();
  } else {
    todo_edit_el.classList.remove("save");
    todo_edit_el.classList.remove("fa-x");
    todo_edit_el.classList.add("fa-pen-to-square");
    todo_edit_el.classList.add("edit");
    todo_input_el.setAttribute("readonly", "readonly");
  }
});
The edit listener is added to the edit icon using the addEventListener method. When the icon is clicked, it toggles between two modes: edit and save. When in edit mode, it removes the read-only attribute from the todo-input element and sets the focus on it. When in safe mode, it adds the read-only attribute back and removes the focus from it.
Delete functionality
// delete functionality
todo_delete_el.addEventListener('click', (e) => {
  console.log(todo_el);
  document.querySelector('.todo-lists').removeChild(todo_el);
});
The delete listener is added to the trash icon using the addEventListener method. When the icon is clicked, it removes the entire todo-item div from the list of todos using the removeChild method.
Check this out : Versions of CSS


 8+ registered

