Button Creation
The basic approach followed while creating buttons is
- Importing kivy
- Importing the kivy App
- Importing button
- set the minimum version(it is optional)
- Extend the class
- Add and return a button.
- Run an instance of the class
Button Creation in Kivy
As we have seen above the steps are to be followed while creating a button. Now we will be discussing with the help of a program.
Program
# import kivy module
import kivy

# this restricts the kivy version
# below this kivy version, we cannot
# use the app or the software
kivy.require("1.9.1")

# base Class of the App inherits from App class.
# app: it always refers to the instance of your application
from kivy.app import App

# this creates a button in kivy, and if it is not imported, it shows the error
from kivy.uix.button import Button

# the class where we are creating the button
class DemoButtonApp(App):

	def build(self):
		btn = Button(text ="Push Me !")
		return btn

# creating the object root for ButtonApp() class
root = DemoButtonApp()

# run function runs the whole program
# i.e run() method which calls the
# target function passed to the constructor.
root.run()

You can also try this code with Online Python Compiler
Output
In this output, the button will cover the whole window as we have not given any specific size or done any styling on the button, so by default, it shows button size equal to window size.

Button Styling
Creating a button using Kivy is done. Now we will look at how we can style the button with the help of different parameters like color, the position of the button, background color, etc. A sample program is shown below to demonstrate the same.
Program
def build(self):
        # use a (r, g, b, a) tuple
        sampleBtn = Button(text ="Push Me !",
                   font_size ="20sp",
                   background_color =(1, 1, 1, 1),
                   color =(1, 1, 1, 1),
                   size =(32, 32),
                   size_hint =(.2, .2),
                   pos =(300, 250))

        return sampleBtn
You can also try this code with Online Python Compiler
Output
These are just similar to the HTML, and CSS effects. By this, we fix the position of a button at the center of the window, text size, color, and anything you want.

Adding Button Functionality
One of the basic problems is how to add functionality to the button. So to add functionality we use the bind() function which binds the function to the button. bind() creates an event that is sent to the callback().
And one of the most common problems for the new Kivy users is the misunderstanding of how the bind method works, and especially among the new Python users who haven’t fully formed their intuition about function calls.
The bind() method doesn’t know about the existence of a function or its arguments, it only receives result of this function call. And as in the given code below when the button is pressed it prints “button pressed” def in the callback function. In the given code below inside the bind() we use on_press because when the button pressed it tells the function that the button is pressed then the bind uses its functionality.
Program
# import kivy module
import kivy

# this restricts the kivy version i.e
# below this kivy version you cannot
# use the app or software
kivy.require("1.9.1")

# base Class of the App inherits from App class.
# app: it always refers to the instance of your application
from kivy.app import App

# creates button in kivy and if it is not imported it shows the error
from kivy.uix.button import Button

# the class where we are creating the button
class DemoButtonApp(App):
	def build(self):
		# use a (r, g, b, a) tuple
		sampleBtn = Button(text ="Push Me !",
                   font_size ="20sp",
                   background_color =(1, 1, 1, 1),
                   color =(1, 1, 1, 1),
                   size =(32, 32),
                   size_hint =(.2, .2),
                   pos =(300, 250))

		# the bind() is used to bind the button to function callback
		sampleBtn.bind(on_press = self.callback)
		return btn

	# callbackis the function tells which when button pressed
	def callback(self, event):
		print("button pressed")
		print('Yoooo !!!!!!!!!!!')

# creating the object root for ButtonApp() class
root = DemoButtonApp()

# run function runs the whole program
# run() method which calls the target
# function is passed to the constructor.
root.run()
You can also try this code with Online Python Compiler
Output

Button Using KivyMD
The KivyMD is an extension of the Kivy framework. It is a collection of Material Design widgets for use with Kivy, a GUI framework for making mobile applications.
We have given an example of MDRectangularFlatButton below :
MDRectangleFlatButton has the following parameters:
-
text - the text is what we want to put on the button
-
pos_hint - it is a dictionary having the position with respect to the x-axis and the y-axis
-
on_release - is a function that contains the properties that we want to call on clicking the button
Program
#importing MDApp from kivymd.app
from kivymd.app import MDApp
#importing Screen from kivymd.uix.screen
from kivymd.uix.screen import Screen
#importing MDRectangleFlatButton from kivymd.uix.button
from kivymd.uix.button import MDRectangleFlatButton
#Demo class
class DemoButton(MDApp):
def build(self):
#initializing the screen
screen = Screen()
#creating button
sampleBtn = MDRectangleFlatButton(text="Submit",pos_hint={'center_x':0.5,'center_y':0.3},on_release=self.btnFunc)
# adding widgets to screen
screen.add_widget(sampleBtn)
return screen
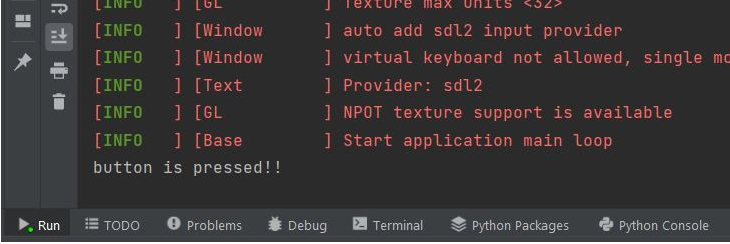
def btnFunc(self,obj):
print("button is pressed!!")
if __name__=="__main__":
DemoButton().run()
You can also try this code with Online Python Compiler
Output

Following is the output is displayed when the button is pressed :
FAQs
What is float layout in kivy?
The FloatLayout honors pos_hint and size_hint properties of its children. For example: layout = FloatLayout(size=(300, 300)).
What is the box layout in kivy?
The BoxLayout arranges the children in a vertical or horizontal box. For example: layout = BoxLayout(orientation='vertical').
What is a widget in kivy?
A Widget is a base building block of GUI interfaces in Kivy. It provides a Canvas that can be used to draw on the screen.
Which is better among kivyMD and kivy?
KivyMD is similar to the kivy framework, but kivyMD provides a more attractive GUI than kivy.
Conclusion
In this blog, we started with the kivy framework and button introduction. Then we discussed the creation of a button by adding style and functionalities to it in kivy. After that, we the button creation in kivyMD with the help of a simple program.
We hope that this blog helped you enhance your knowledge in enhancing your knowledge about the button actions in kivy.
You may also want to learn more so please visit interesting articles about buttons, kivy, and python libraries.
Learning never stops, and to learn more and become more skilled, head over to our practice platform Coding Ninjas Studio, practice top problems, attempt Mock Tests, read informative blogs, and interview experiences. Do upvote our blog to help other ninjas grow.
Happy Learning!


 9+ registered

