Button control properties
We have discussed some important button control properties which we think you should know.
Name
It is the name of a button control or its identifier. We can name the button anything, but it's a good practice to name it with the prefix "btn." For example, a cancel button can be named as btnCancel.
Text
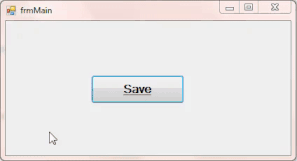
This property is the text you want to display on your button. In the below-given example, we can see that the "Save" text is shown on the button. The text property sets this.

Source
To dynamically change the text property, we can use the below-given code.
private void frmMain_Load(object sender, EventArgs e)
    {
        btnSave.Text = "Save";
    }
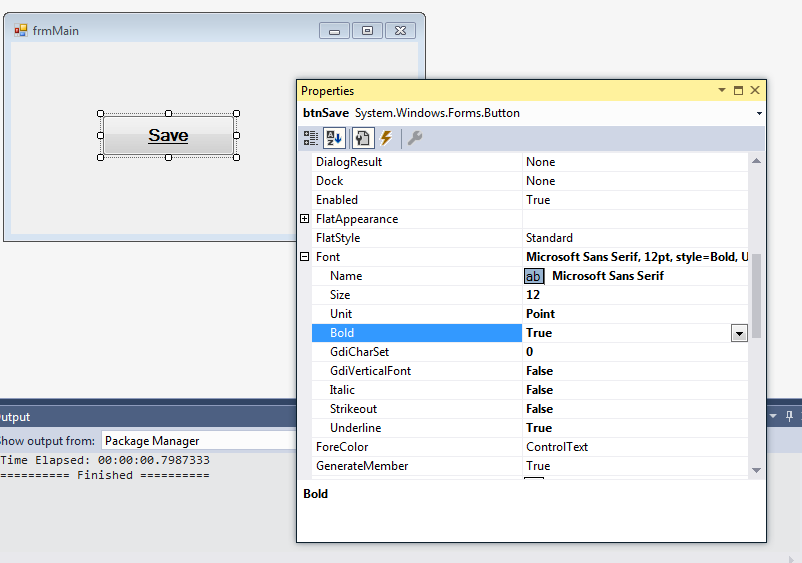
Font
This property changes the font of the text on the button control. To change the font of the button control, right-click on that button and click on 'Properties.' Now scroll down and reach the font properties. You can change the font of the text as desired, like boldness, size, font family, etc. The below-given image shows the available options to change the font.
Source
We can also change the font programmatically using the below-given code.
button1.Font = new Font(button1.Font.FontFamily, 33);
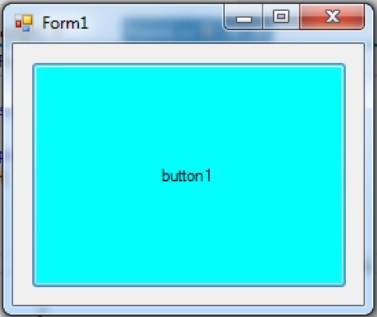
Background color
When we want to change the background color of the button, then we can use the BackColor property. We have taken an example to explain its working. Let's change the background color of a button named button1 to aqua. We can use the below-given code to perform this task.
button1.BackColor = Color.Aqua;
When the above code is executed, then we get button1 something like this:
Source
Button Control Events
Every time you interact with a button, you expect it to perform some task. Now, where would you write the code for the functions to be performed? We will discuss the two most widely used button control events in this article and explain how to use them. The first button control event that we will discuss is the button click event, and the second is the button mouse enter event. So, let's begin with it.
Button click event
The button click event is the most used event of button control. In this, we perform some functionality when the user clicks on the button. We use _Click event, which is an in-built event. First, we need to write the button's name and then write _Click. Suppose the button's name was btnSave, then we can create a method using btnSave_Click. Below given is the code to perform some functionality on button click.
private void btnSave_Click(object sender, EventArgs e)
      {
          // Code to perform some functionality
      }
Button mouse enter event
You may have observed that whenever you enter the mouse pointer into a button, the background color of the button is changed. This functionality is implemented using the button mouse enter event. We have given a code to change the background and foreground color of the save button when the mouse pointer enters the button.
private void btnSave_MouseEnter(object sender, EventArgs e)
      {
          btnSave.BackColor = Color.Green;
          btnSave.ForeColor = Color.White;
      }
The effect of the above code can be seen in the below-given gif.
Source
FAQs
What is the use of Button control?
Button control is used to perform events like button click, mouse enter, mouse hover, etc. Along with this, it can also be used to change the button's properties.
How can we change the properties of a button?
After adding a button, right-click on the button and click on properties. We can change multiple properties of the button that we selected, like font, background color, etc.
How to change the background color of a button?
The background color of a button can be changed using the properties menu or code to change the background color dynamically.
button1.BackColor = Color.Aqua;
This code can change the background color of button1 to aqua.
What is the difference between a button click event and a button mouse enter event?
In the button click event, the code gets executed only when the button is clicked, but in the button mouse enter event, the code gets executed as soon as the mouse pointer enters the button.
What is the button mouse leave event?
The button mouse leave event is the same as the button mouse enter event. The only difference is that the code gets executed only when the mouse pointer leaves the button in this. It can be used as
private void button1_MouseLeave(object sender, EventArgs e)
{
      // code goes here
}
In this code, the code between the braces gets executed when the mouse pointer leaves the button1.
Conclusion
In this article, we have extensively discussed C# Button Control.
We hope that this blog has helped you enhance your knowledge regarding C# Button Control and if you would like to learn more, check out our articles on
Refer to our carefully curated articles and videos and code studio library if you want to learn more. Refer to our guided paths on Coding Ninjas Studio to learn more about DSA, Competitive Programming, JavaScript, System Design, etc. Enroll in our courses and refer to the mock test and problems available. Take a look at the interview experiences and interview bundle for placement preparations.
Do upvote our blog to help other ninjas grow.
Happy Learning!!!


 8+ registered

