Different Properties of Camera
Lens
The camera lens settings determine how 3D things appear in a 2D image.
This corresponds to how you perceive things in the real world. Parallel lines (such as railroad rails) will appear to converge as they grow farther away, and objects in the distance will appear smaller than objects in the front.
There are different options available inside camera lens settings.
1. Perspective: This corresponds to how you see things in the real world. Parallel lines (such as railroad tracks) will appear to converge as they grow farther away, and objects in the distance will appear smaller than objects in the front.
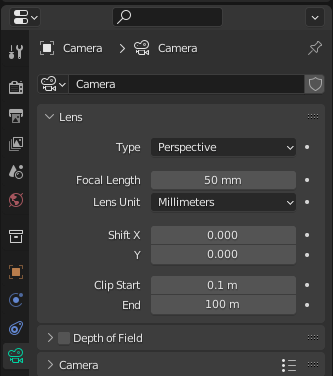
As you can see in the above image. There are various options available inside perspective. The amount of zoom is controlled by focal length.

Image source: link
2. Orthographic: Objects in orthographic perspective appear to be the same size regardless of distance. This means that parallel lines appear to be parallel rather than converge, as they do in Perspective.
3. Shift: The vanishing point can be adjusted. The vanishing point is where the parallel lines converge. In the below image, the most obvious vanishing point is the end of the railroad.

Image source: link
Depth of Field
As seen in images from real-world cameras the objects that are present at a certain distance will appear to be sharp while other objects will be blurred. The Depth of Field mimics this property of real-world cameras. The area that is in the focus is known as the focal point.
Example of DOF (Depth of Field) Bokeh effect.

Source: link
Aperture
There are 4 settings available in aperture.
-
F-Stop: Controls the amount of blur.
Lower th/e value, Stronger the depth of field effect.
-
Blades: The total number of polygon blades used to reshape blurred objects in render and render previews. Similar to the viewport, the minimum number of leaves that allows for a bokeh effect is 3, which is a triangular blur.
-
Rotation: As the name suggests, used to rotate the polygonal blade along the facing axis, and can be used to rotate in clockwise as well as anti clockwise direction.
- Ratio: Change the level of distortion to simulate the anamorphic bokeh effect. A setting of 1.0 causes no distortion, values less than 1.0 cause horizontal distortion, and higher numbers cause vertical distortion.
Camera
Different properties that are related to the physical camera body can be changed using this setting.
-
Sensor Fit: Adjust how the camera sensor adapts to the size of the output by adjusting the field of view.
- Size / Width, Height: The alternative way to control the field of view.
These were some of the major properties of cameras object inside blender.
Now let’s discuss lighting in blender.
Lighting

Source: link
Depending on what you are doing in Blender, good lighting may be required.
If you are creating 3D models, textures, or animating 2D, you may not need light. However, when designing a rendered 3D scene, such as an object with a background, lighting can change everything.
Blender provides a variety of "lights" that will shine light into your scene to make it easier to see. These different lights can be added manually through the "Create" tab.
Types of Lighting
“Point”, “Sun”, “Spot” are most commonly used blender lighting types.
-
Point: Point lights emit light in all directions. This can be useful in scenes with a small light source (like a candle) or to light one side of the scene with a light and the other with a different type of light, trying different settings and combinations.
-
Sun: Solar lights, as the name suggests, work like the sun in 3D space. It's quite powerful and can often light up an entire scene with just one of them. We recommend using solar lights as a backlight with white light, and then add extra lights to each part of the scene, if needed, for better effect.
-
Spot: Finally, the spotlight emits light through a cone in a specified direction. Cones can have amplitudes from 0 to 180 degrees. Since this light only emits light in the direction you specify, it is best used for parts of the scene where you want to illuminate an area or small object without affecting other nearby objects. It also has a very nice effect with volumetric lighting, which we will talk about in the next section.
- Objects: Objects can also act as lights if their texture is set to emit light. Lights and glowing objects will give you good lighting and it's up to you to experiment with them until you find the best combination for your scene.
FAQs
How do I add a camera in blender?
Firstly, Press Shift + A, and the “Add” menu appears. Then Move your mouse
cursor over “Camera” and left-click to highlight “Camera”. Alternatively, you could use the up
and down arrow keys on your keyboard. After that, After “Camera” is highlighted, press enter.
What is the camera used for in blender?
A camera is an object in Blender that allows you to render images. It specifies which parts of a scene appear in the produced image.
What is Point Light in Blender?
Ans: The point light is an omni-directional point of light, that is, a point radiating the same amount of light in all directions.
Conclusion
In this article, we learned about cameras, different properties of cameras, lighting and different types of lighting in blender.
We hope that this blog has helped you enhance your knowledge regarding Cameras and lighting in blender and if you are interested in Augmented Reality, checkout our Blog “Passion for AR & VR leads to Snake Snack Game”.
To learn, see Operating System, Unix File System, File System Routing, and File Input/Output.
Refer to our Guided Path on Coding Ninjas Studio to upskill yourself in Data Structures and Algorithms, Competitive Programming, JavaScript, System Design, and many more! If you want to test your competency in coding, you may check out the mock test series and participate in the contests hosted on Coding Ninjas Studio! But if you have just started your learning process and are looking for questions asked by tech giants like Amazon, Microsoft, Uber, etc; you must look at the problems, interview experiences, and interview bundle for placement preparations.
Nevertheless, you may consider our paid courses to give your career an edge over others!
Do upvote our blogs if you find them helpful and engaging!
Happy Learning!


 9+ registered

