Do you think IIT Guwahati certified course can help you in your career?
Introduction
A highly available, scalable Google Cloud service called Certificate Authority Service makes it possible for you to create, administer, and secure private certificate authorities in a way that is simple, automated, and customized (Certificate Authority). A collection of multiple CAs is known as a CA pool. Rotating trust chains is made possible by a CA pool without disrupting workloads. After it is created, a CA pool can only exist in one Google Cloud location.
Let's dive into the article for more information about Certificate Authority Service.
Create a certificate by using the console
Without managing infrastructure, Certificate Authority Service enables you to deploy and administer private certificate authorities (CAs). This section covers generating certificates using the Google Cloud interface and the Certificate Authority Service.
Create a CA pool
Follow these steps to build a CA pool with default settings:
Navigate to the Google Cloud console's Certificate Authority Service page. Go to Certificate Authority Service
Press the add boxCreate pool button under the CA pool manager tab.
Give the CA pool a name on the Create CA pool page.
The CA pool's region can be chosen by clicking Region and us-east1 (South Carolina).
For each step, click Next.
Select "Done"
This CA pool is displayed in the CA pool management tab's list of CA pools.
Create a root Certificate Authority
A CA pool is initially empty. To request certificates, a CA must be added to the CA pool. A self-signed certificate belonging to a root CA is stored in the client's trust store. This section describes how to expand the CA pool you made by including a root CA.
Do the following to include a root CA in your CA pool:
Press CA Manager.
Press add box.
Develop CA.
Select US-east1 (South Carolina) as the CA region by clicking Region.
Choose Next.
Put the name of your organization in the Organization (O) field.
Enter the CA's name in the CA common name (CN) column. You will require the CA name when getting a certificate, so make a note of it.
Put the name of your CA pool in the Pool ID field.
For each step, click Next.
Review the CA's specifications, then click Create.
Create a certificate
Use the CA to request a certificate by doing the actions below:
Click Request a certificate on the Certificate authority page.
To enter details, click.
Enter the fully qualified domain name of the website you want to secure with this certificate under Add domain name.
Choose Next.
Click Continue after selecting Configure key size and algorithm.
The produced certificate will be shown for you to copy or download. Press the content_copy button to copy the certificate.
Select "Done"
Clean up
Revoking the certificate and destroying the CA pool, the CA, and the project you made for this quickstart are the appropriate ways to finish up.
Take away the certificate.
The Private Certificate Manager tab should be clicked.
Click more vertView more in the row of the certificate you want to delete in the list of credentials.
Click Revoke.
Click Confirm in the following dialogue box.
Delete the CA.
A CA cannot be deleted until all its certificates have been revoked. Do the following after revoking the certificate:
On the CA Manager tab, click.
Pick the CA you want to eliminate from the list of CAs.
Click disableCancel.
Click Confirm in the following dialogue box.
Press delete to remove.
Click Confirm in the following dialogue box.
The CA now displays the state Deleted. Thirty days after you start the deletion, the CA is permanently destroyed.
Get rid of the CA pool.
Only once the CA Service removes the CA may you delete a CA pool. After removing the CA from the CA pool, take the following actions:
On the CA pool management tab, click.
Choose the CA pool you want to eliminate from the list of CA pools.
Press delete to remove.
Click Confirm in the dialogue box that appears.
Follow these steps to delete the project:
Navigate to the Manage resources page in the console. Go to Manage resources.
Select the project you wish to delete from the list, and then click Delete.
Enter the project ID in the dialogue box, then click Shut down to destroy the project.
Creating CA pools
The process for developing certificate authority (CA) pools is covered in this section. A CA pool is a grouping of different CAs with a shared identity and access management (IAM) policy and certificate issuance policy. With a CA pool, managing CA rotation is more straightforward, and you can execute better total effective queries per second (QPS).
Deciding the CA pool’s setting
The settings of a CA pool are described in this section, along with suggestions for choosing the settings.
Permanent CA pool settings
After creating the CA pool, the following settings cannot be altered.
Location
Indicate the location of the CA pool. One Google Cloud site serves as the repository for a CA pool. You should build your CA pool in or close to the area where you plan to use it.
Tier
DevOps or Enterprise tiers can be used to construct the CA pool as desired. This decision impacts the maximum rate at which you may create certificates from the CAs in the CA pool, as well as whether or not CA Service persists the completed certificates and whether or not created certificates can later be revoked.
Optional CA pool settings
Certificate issuance policy
A certificate issuance policy may be present in a CA pool. The certificates that the CAs in the CA pool are permitted to issue are constrained by this issuance policy. After you build a CA pool, you can modify its issuance policy.
Publishing options
The CA certificates for each CA pool's CAs can be configured to be published. The authority information access (AIA) extension of the issued certificate includes the URL to this CA certificate. Certificate revocation lists (CRLs) can be published to the corresponding Cloud Storage bucket by CAs in Enterprise tier CA pools. When a certificate is issued, the CRL Distribution Point (CDP) extension contains a URL to this CRL.
Creating a CA pool
Make a CA pool by using the guidelines below:
The CA pool should have a name.
Navigate to the Google Cloud console's Certificate Authority Service page. Go to Certificate Authority Service
Press CA pool manager.
Press add box.
Make a pool.
Give the CA pool a name that is exclusive to the area.
From the drop-down menu in the Region field, choose a region. See Choosing the optimal place for further details.
Choose between the Enterprise and DevOps tiers. See Workload-optimized levels for more details.
Choose Next.
Set up the permitted key sizes and algorithms
The Cloud KMS keys that support the CAs in the CA pool can be signed using several techniques, thanks to CA Service. By default, all key algorithms are accepted.
Do the following to limit the permitted keys in the certificates issued by the CA pool. This process is optional.
Click the toggle.
Click Add an item.
Choose the key type from the Type list. To use RSA keys, take the following actions:
Add the minimum modulus size in bits, if desired.
Add the maximum modulus size in bits, if desired.
Select "Done"
Use the following steps if you wish to use elliptic curve keys:
Selecting the elliptic curve type from the list of elliptical curve types is optional.
Select "Done"
Click Add an item, then repeat Step 2 to add the permitted key.
Choose Next.
Set up certificate request procedures
Do the following to restrict the ways that certificate requesters may employ to obtain certificates from the CA pool:
Click the toggle if you want to limit CSR-based certificate requests.
Click the toggle if you restrict certificate requests based on settings.
Set publishing preferences
Do the following to configure publication options:
Optional: Click the option to prevent the CAs in the CA pool from publishing CA certificates to the Cloud Storage bucket.
Optional: Click the toggle to prevent the CAs in the CA pool from publishing CRLs to the Cloud Storage bucket.
Select Next.
Set up identity restrictions.
The following should be done to set restrictions on the subject and SANs in the certificates that the CA pool issues:
Click the toggle to prevent the subject of certificate requests from being transmitted through.
Click the checkbox to prevent alternate topic names from passing in certificate requests.
Add a Common Expression Language (CEL) expression as an option to limit the topics of the certificate.
Choose Next.
Set up extension restrictions.
Click the option to prevent any extensions from certificate requests from being included in the granted certificates. The Known certificate extensions area, which you may use to choose the certificate extensions, will appear once you click the toggle. Do the following to select the certificate extensions:
Optional: Select the Unrequired extensions option from the menu under the Known certificate extensions box.
Including the object identifiers for extensions you want to be present in the certificates, the CA pool issues in the Custom extensions field are optional.
Configure baseline values
Do the following to set baseline values for certificates issued from the CA pool:
Toggle the switch.
Select Set baseline values by clicking.
Creating certificate authorities
The creation of certificate authorities (CAs) in a CA pool is covered in this section.
Deciding the CA's settings
After forming the CA, you cannot change specific CA settings. While some of these parameters are unique to the Certificate Authority Service, others are immutable for CAs by default because they are listed in the CA's certificate. One permanent setting is the CA type (root or subordinate).
Creating a root CA
You must send the self-signed certificate from a root CA to your clients' trust stores. The certificate for the root CA is at the beginning of the chain. Another CA cannot revoke the CA certificate. The root CA's CRL only applies to the other certificates it issued; it does not apply to the root CA itself.
Make a root CA by carrying out the following:-
Navigate to the Google Cloud console's Certificate Authority Service page. Go to Certificate Authority Service
On the CA Manager tab, click.
Choose Create CA.
Select CA type
Make the following adjustments to the CA's permanent settings, including its tier, location, lifetime, and operational condition at creation:
Choose Root CA.
Enter the amount of time you want the certificates issued by the CA certificate to be valid in the Valid for the field.
Select a tier for the CA, if desired. See Workload-optimized tiers for more details.
Select where you wish to construct the CA by clicking Region and choosing it from the list. We advise establishing the CA close to the clients of your application.
Choose the operational state where the CA will be built if you choose.
Click Certificate profile if you wish. Choose the certificate profile from the list that corresponds to the kind of certificates you want the CA to issue.
Choose Next.
Create a CA Subject name
The name of your business should be entered in the Organization (O) field.
Optional: Enter the corporate division or business unit in the Organization unit (OU) section.
Enter a two-letter country code in the field labeled "Country name," if desired.
Enter your state's name in the State or province name section if you like.
Enter the name of your city in the Locality name field, if desired.
Enter the CA name in the CA common name (CN) column.
Enter the name of the CA pool in the Pool ID field. After generating the CA, the CA pool cannot be changed.
Choose Next.
Configure the algorithm and key size for CA
Pick the key algorithm that best satisfies your requirements.
Choose Next.
Create CA artifacts
The actions that come next are optional. The default settings are used if these steps are skipped.
Select a Cloud Storage bucket that is either self-managed or managed by Google.
The exact location as the CA Service creates a Google-managed bucket if you don't choose a self-managed Cloud Storage bucket.
You can decide whether to turn off the publication of CA certificates and certificate revocation lists (CRLs) to the Cloud Storage bucket.
On a Cloud Storage bucket, the publication of CRL and CA certificates is by default enabled. Click the toggles to make these options inactive.
Choose Next.
Add labels
The actions that come next are optional. To add labels to the CA, take the following actions:
Then click Add Item.
Enter the label key in the Key 1 field.
Enter the label value in the Value 1 field.
Click the addAdd item if you want to add another label. Then, as described in steps 2 and 3, add the label key and value.
Choose Next.
The CA can be enabled to begin issuing load-balanced certificates for the CA pool once you have confirmed that it functions as planned.
Testing a CA
Request a certificate from the associated CA pool and use the —ca flag to identify the CA you want to test to confirm that it has the authority to issue certificates.
The following procedures can be used to ask a CA pool for a certificate:
Have a private or public key generated for you by CA Service.
Create a private or public key for yourself and send a certificate signing request (CSR).
It is simpler to seek a certificate from a CA in a CA pool using an automatically produced private key or public key.
Run the following gcloud command to request a certificate from a CA in a CA pool using an automatically created private key or public key:
ROOT_CA_ID: The particular ID for the CA you want to test.
KEY_FILENAME: The PEM-formatted file in which the produced key is stored.
CERT_FILENAME: The file name into which the final certificate chain file is written in PEM format. The certificate chain is organized from leaf to root.
DNS_NAME: One or more DNS Subject Alternative Names separated by commas (SANs).
A new RSA-2048 private key is generated via the —generate-key flag on your computer.
Enabling a root CA
Run the gcloud command below to enable a root CA on the gcloud platform:
Root CAs are more challenging to revoke and rotate than subordinate CAs. You can establish a subordinate CA for each possible certificate issuance scenario if you have more than one. You can achieve better load-balancing of certificate requests and a higher overall effective QPS by adding additional subordinate CAs to a CA pool.
Make a subordinate CA by performing the following on the gcloud platform:
The subordinate CA should have a CA pool created:
gcloud privateca pools create SUBORDINATE_POOL_ID
In the newly established CA pool, build a subordinate CA.
gcloud privateca subordinates create SUBORDINATE_CA_ID \
  --pool=SUBORDINATE_POOL_ID \
  --issuer-pool=POOL_ID \
  --key-algorithm="ec-p256-sha256" \
  --subject="CN=Example Server TLS CA, O=Example LLC"
When the subordinate CA is created, the ensuing statement is returned.
Created Certificate Authority [projects/my-project-pki/locations/us-west1/caPools/SUBORDINATE_POOL_ID/certificateAuthorities/SUBORDINATE_CA_ID].
Run the gcloud command below to see a complete list of settings:
gcloud privateca subordinates create --help
The command provides examples for building a subordinate CA whose issuer is either situated on the CA Service or elsewhere.
Creating a subordinate CA from an external CA
Three steps are involved in converting an external CA into a subordinate CA. Making a CSR for this CA and downloading it are the first steps. Your external CA must sign the CSR once you obtain it (specific instructions depending on your setup). The signed PEM certificate chain can then be uploaded using the Google Cloud console or the gcloud CLI command-line tool.
Step 1: Create a CSR
Run the following command to build a CA pool for the subordinate CA.
gcloud privateca pools create SUBORDINATE_POOL_ID
Run the following gcloud command to construct a subordinate CA in the newly created CA pool. Additionally, a CSR is created by the gcloud command and saved to the FILE NAME file.
gcloud privateca subordinates create SUBORDINATE_CA_ID \
  --pool=SUBORDINATE_POOL_ID \
  --create-csr --csr-output-file=FILE_NAME \
  --key-algorithm="ec-p256-sha256" \
  --subject="CN=Example Server TLS CA, O=Example LLC"
The managed Cloud HSM key creation algorithm you want to employ for the CA is specified by the —key-algorithm flag.
The X.501 name of the certificate topic is the value for the —subject flag.
When the CSR is formed, the following declaration is returned:
Created Certificate Authority [projects/my-project-pki/locations/us-west1/caPools/SUBORDINATE_POOL_ID/certificateAuthorities/SUBORDINATE_CA_ID] and saved CSR to FILE_NAME.
Run the following command to see every setting that is offered:
gcloud privateca subordinates create --help
The following command can be used to download the CSR once more if you misplace it:
Give the employee in your organization in charge of certificate issuing the produced CSR file from step 1 and ask them to sign it. Depending on how your organization is set up, different steps may apply. The following openssl commands can be used to experiment with a basic root CA:
SUBORDINATE_CA_ID: The unique ID of the subordinate CA you want to activate.
SUBORDINATE_POOL_ID: The identifier for the subordinate CA pool.
It must have the —pem-chain flag. The file holding the list of PEM-encoded certificates is what this flag accepts. The root CA certificate is at the end of the list of certificates, which begins with the current CA certificate.
When the signed certificate is submitted, the following response is given:
Enabling a subordinate CA
Run the following command to duplicate an existing CA so that you can either renew it or make a new CA with the same configuration:
NEW_CA_ID: The new CA's unique identification number.
POOL_ID: The name of the CA pool where the new CA is to be created.
The whole CA configuration from the existing CA is copied by the —key-algorithm flag (except for the Cloud KMS key version and Cloud Storage bucket). You can still override any configuration value in the new CA by explicitly supplying the required flag. For example, you can still utilize a new subject by specifying '—subject SUBJECT.'
The algorithm defaults to: - rsa-pkcs1-4096-sha256 for root CAs if the —key-algorithm parameter is omitted. - For inferior CAs, rsa-pkcs1-2048-sha256.
Managing CA rotation
The rotation of a CA in a CA pool can be managed, as explained in this section.
Ensuring seamless CA rotation
To prevent a service outage, it's crucial to guarantee smooth CA rotation. You can smoothly rotate a CA by following the steps in the process below.
Locate the CA pool for the current CA that is about to expire.
In the same CA pool, create a CA. Because the CA was built in the STAGED state, load-balancing for the CA pool prevents it from issuing certificates. In the STAGED state, CAs can only grant certificates in response to direct client requests. Visit CA states for more details about CA states.
Make sure that everyone has downloaded the most recent CA certificates from the CA pool.
Set the new CA's status to ENABLED. As a result, both the old CA and the new CA can issue certificates.
Change the old CA's status to DISABLED. This makes sure that only the new CA can issue certificates.
Wait until every client has stopped utilizing certificates generated by the previous CA. You can do that in two different ways:
You have the option of waiting for the entire certificate lifetime.
The certifications that your clients are using can be tracked.
Erase the previous CA.
Creating certificate templates
The creation of a certificate template is covered in this section.
Creating a certificate template
Make a certificate template using the gcloud command below:
TEMPLATE_ID: the unique identifier of the certificate template.
FILE_PATH: the YAML file that describes the X.509 values set by the certificate template.
The --copy-sans flag allows the Subject Alternative Name (SAN) extension from the certificate request to be copied into the signed certificate. You can alternatively specify --no-copy-sans to drop any caller-specified SANs from the certificate request.
The --copy-subject flag allows the certificate request to be copied into the signed certificate. You can alternatively specify --no-copy-subject to drop any caller-specified subjects from the certificate request.
The —identity-cel-expression flag accepts a CEL expression and compares it to the Subject and Subject Alternative Name of the certificate before issuing it. It then returns a boolean value indicating if the request should be approved.
The location of a YAML file describing any predetermined X.509 values provided by this template is specified by the flag —predefined-values-file. Any certificate requests that utilize this template will copy the defined extensions, which precede any permissible extensions in the certificate request. The complete set of the predefined X.509 values is replaced whenever any portion of the predefined X.509 values is updated.
All extensions listed in the certificate request are copied into the signed certificate if the —copy-all-requested-extensions flag is set. As an alternative, the —copy-extensions-by-oid flag and the —copy-known-extensions flag can be used to copy specific OIDs from the certificate request into the signed certificate and the signed certificate, respectively. Base-key-usage, extended-key-usage, ca-options, policy-ids, and aia-ocsp-servers are all required.
Remove the —copy-all-requested-extensions parameter to preserve the default settings defined in this template while ignoring all X.509 extensions in the certificate request.
Creating a certificate template for common scenarios
This section offers gcloud instructions for producing certificate templates for frequent use scenarios.
DNS server TLS certificates for any domain
Use the steps below to construct a certificate template for creating server TLS certificates that support any domain.
The following end-entity server TLS configuration should be added to a file called leaf server tls values.yaml:
You can utilize a certificate template if you hold the role of "CA Service Certificate Template User" (roles/privateca.templateUser). We advise certificate template authors to grant the CA Service Certificate Template User role to all organization members who might utilize their certificate template.
Use the gcloud command below to assign the CA Service Certificate Template User (roles/privateca.templateUser) role to every user in the example.com domain:
TEMPLATE_ID: The certificate template's unique identification number.
Using a certificate issuance policy
The use of a certificate issuance policy on a certificate authority (CA) pool is explained in this section.
Using a certificate issuance policy, you can specify the subject and subject alternative names (SANs) that can be used in the issued certificates. You can add an issuance policy to an existing CA pool by updating it or specifying the policy while building a CA pool.
Add a certificate issuance policy file.
Do the following to add a certificate issuance policy to an active CA pool:
You must produce a YAML file that details the limitations on the certificates that the CA pool can issue to use the Google Cloud CLI to add a certificate issuance policy to a CA pool. The information is in line with an IssuancePolicy.
Create a file called policy.yaml with the following information in it using the Cloud Shell Editor.
AllowSubjectPassthrough is a necessary field. The topic field is copied from a certificate request into the signed certificate if the allowSubjectPassthrough field is true. The desired Subject is rejected in any other case.
When a certificate request's SubjectAltNames extension is incorporated into a signed certificate, the allowSubjectAltNamesPassthrough field determines whether this is allowed. If not, the requested SubjectAltNames are not used.
Supported restrictions
CA Service supports the following issuance policy limits. The following limitations can be combined to create a unique certificate issuing policy.
Restrict or force allowed X.509 values
Restrict allowed identity fields
Restrict the maximum lifetime of the issued certificates
Restrict allowed certificate issuance modes
Restrict the public key algorithms of the certificate request
Requesting certificates
This section explains how to contact the Certificate Authority Service for a certificate and view the certificates that have been issued.
Overview
The following techniques are available for requesting certificates:
Create a private/public key pair for yourself and submit a certificate signing request (CSR).
Obtain a private/public key from CA Service.
Utilize a Cloud Key Management Service (Cloud KMS) key that already exists.
Using a CSR
You need to create a CSR first before moving on. Make the following decisions after creating a CSR:
CERT_ID: The certificate's distinctive identifier.
POOL_ID: The CA pool's name.
CSR_FILENAME: The name of the file containing the PEM-encoded CSR.
Using an auto-generated key
The Python Cryptographic Authority (PyCA) module must be installed to use the auto-generated key capability. Make a certificate using the gcloud command below:
It is guaranteed by proof-of-possession of the private key that the person requesting a certificate possesses the private key for that certificate. RFC 2986 states that the CA Service will only verify proof-of-possession if the requester includes a PKCS #10 CSR. Other certificate requests, such as those by CertificateConfig, do not require proof of ownership.
Client programs that accept certificates are in charge of confirming that the certificate holder owns the certificate's private key. To defend against persistently unruly clients, defense-in-depth strategies like requiring proof-of-possession checks during certificate issues are used. Regardless of whether the CA examines proof-of-possession, the presence of such clients may be a security risk.
Revoking certificates
Learn how to revoke certificates in this section. The Certificate Authority Service supports certificate revocation (CRLs) by regularly issuing Certificate Revocation Lists. Only certificates issued by CA pools in the Enterprise tier can be revoked.
Enabling CRL publication
A CA pool's CRL publication must be enabled to revoke its certificates. While building a CA pool, CRL publication can be enabled. You can later allow CRL publication if it was first disabled.
A fresh CRL is issued daily and is suitable for seven days when CRL publication is enabled. Additionally, a new CRL is released within 15 minutes of any new certificate revocation. Run this command to allow CRL publication on a CA pool:
The CA Service takes optional reasons and allows revoking certificates by serial number or resource name. When a certificate is revoked, its serial number and reason for the revocation are listed in all upcoming CRLs until the certificate's expiration date. Within 15 minutes of cancellation, a CRL for use outside the band is generated.
Run the following command to revoke a certificate using its resource name:
The Identity and Access Management (IAM) rules that allow users to create and manage Certificate Authority Service resources are configured, modified, and removed according to the instructions in this article. All certificate authorities (CAs) in a certificate authority (CA) pool inherit any IAM policies set on that CA pool. Resources for certificates and CAs cannot be subject to IAM regulations.
Configuring IAM policy bindings
The following scenarios explain how to give users access to CA Service resources.
Administering resources
All CA Service resources can be managed by a CA Service Admin (roles/privateca.admin), and IAM policies can be applied to CA pools and certificate templates. Use the steps below to grant a user the CA Service Admin (roles/privateca.admin) role:
A user must be given the CA Service Operation Manager (roles/privateca.caManager) role at the project level to construct a CA pool and a CA. The ability to revoke certificates issued by the CAs in the CA pool is also granted by the job "CA Service Operation Manager" (roles/privateca.caManager).
Use the CA Service Certificate Manager (roles/privateca.certificateManager) role to generate certificates. Additionally, this position grants read access to the CA Service resources. Use the CA Service Certificate Requester (roles/privateca.certificateRequester) role to only permit certificate creation with reading access. Use the methods below to give the user permission to create certificates for a specific CA.
All resources in CA Service are viewable by a CA Service Auditor (roles/privateca.auditor). It permits read access to a particular CA pool when granted. The user with this role can also examine certificates and CRLs issued by the CAs in the CA pool if the CA pool is in the Enterprise tier. Give this responsibility to the people in charge of ensuring the security and efficiency of the CA pool.
This section explains how to set up IAM policy bindings in CA Service for a specific resource.
Adding IAM policy bindings
The process for changing an IAM role for a user is the same as for granting a role. You can change an existing IAM policy binding by using the add-iam-policy-binding command of the Google Cloud CLI. Use the following gcloud command to add an IAM policy to a specific CA pool:
The command remove-iam-policy-binding in the Google Cloud CLI can delete an existing IAM policy binding. Use the following gcloud command to remove an IAM policy from a specific CA pool:
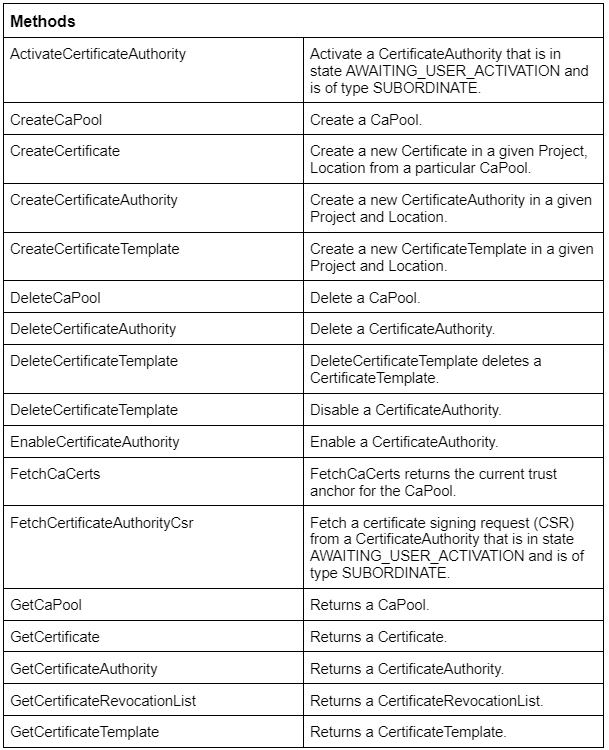
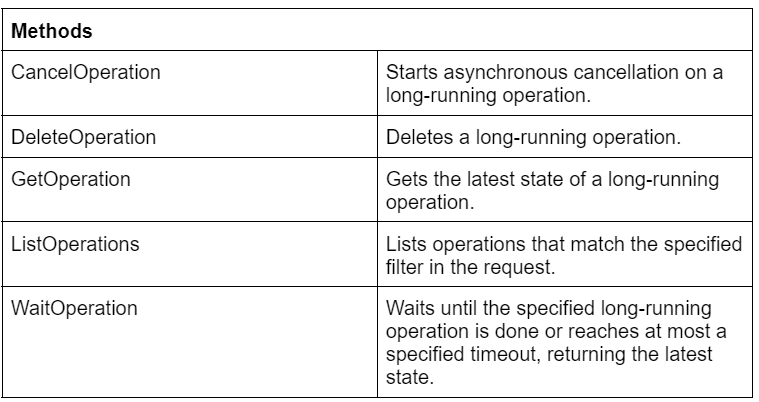
With the help of the Certificate Authority Service API, you can administer private certificate authorities (CAs) more efficiently and automatically while maintaining control over your private keys.
Service: privateca.googleapis.com
To generate RPC client stubs, the Service name privateca.googleapis.com is required.
What is the purpose of the certificate authority server?
A certificate authority server (CA server) provides a simple, efficient way to generate and store asymmetric key pairs for anything that uses a public key infrastructure for encryption, decryption, signing, or validation (PKI).
How may a certificate authority service be launched?
Services can be found by selecting Start, Administrative Tools, and then Services. Click Certificate Services from the context menu, and then click Start.
What is an example of a certification authority?
Comodo, GeoTrust, and Symantec are a few examples. Simply put, becoming a Certificate Authority (CA) involves taking control of the process of producing cryptographic pairs of private keys and public certificates.
How do I create a CA server certificate?
Enter certsrv after the IP address of the server hosting the Certification Authority in the address bar of your web browser. To request a certificate, click the link. To request an advanced certificate, click the link. To submit a certificate, click.
Conclusion
In this article, we have extensively discussed the Certificate Authority Service. We have also explained creating a certificate using the console, creating certificate authority and its pool, managing CA rotation, and more detail.


 6+ registered

