


Introduction
In April 2008, Google announced a platform that would develop and host web applications for Google-managed data centers, which came to be known as App Engine. It was the first cloud computing service for Google. Since its announcement, that is, since 2011, Google has announced multiple other cloud services which will work for its platform. GCP, being a part of Google Cloud, includes Google Workspace, Cloud Infrastructure, Enterprise versions of APIs, Android, and Chrome.

Cloud Data Fusion is one such cloud computing service that has been doing wonders since its launch. This blog provides you with the knowledge required to understand Cloud Data Fusion better and, at the same time, deals with every key aspect related to it.
Cloud Data Fusion
Cloud Data Fusion is an automatically managed, cloud-native data integration service that is used to build and manage pipelines. It has come up with an innovative drag and drop interface, already built connectors, a self-service model, and code-free data integration leading to the removal of the need for technical expertise every now and then.
It offers a lost cost of pipeline ownership, making it more reliable and more scalable. Its features such as end-to-end data lineage, integrated metadata, cloud-native security, and data protection services make it more secure and provide assurance to its customers about its capabilities of data governing.
Before you begin the whole process, take care of the points below.
- Make sure you have an account with Google Cloud and that you have created a project.
- If not enabled, enable the Cloud Data Fusion API.
- Now, create a Cloud Data Fusion Instance by using the Create Instance option.
- After that, Navigate the Cloud Data Fusion API using the Actions Option of the Instances page.
- Deploy a sample pipeline, execute it and view the results.
Now, your account is ready to get into the whole process. Follow the blog to learn about the major key aspects of Cloud Data Fusion.
Creating an Instance
To Create an Instance, you need to follow the steps below.
- As soon as you enable the API, you will see an Instances page in the console. Using that page, you will create and manage new instances.
- Click on Create Instance option and give a name to that.
- Add a description and specify the region.
- Also, specify the version and edition of Cloud Data Fusion you would prefer.
- If you want to add accelerators, you can choose Add Accelerators option, which is optional. Also, there are a few advanced options you can choose as per your requirements. Those options are optional.
- At last, click on Create button, and that will take up to 30 minutes to complete.
Creating a Private Instance
To create a private instance, you need to set up your VPC Network first. For that, enable the private google access for your account and then allocate an IP range as per the requirements of the instance you want to create. Now, your account is ready to create a private instance. There are two ways to create a private instance. We will discuss both ways in this blog ahead.
Creating a Private Instance in a VPC Network
The creation of a private instance in a VPC Network is very similar to creating an ordinary instance. The single difference is that in the latter case, the choice of advance options was as per the requirements. In this case, under the Advanced Options section, you have to make sure that you have enabled the Private IP option.
Creating a Private Instance in a Shared VPC Network
The steps to create a private instance in a shared VPC Network are mentioned below for your reference.
Using the commands below, you have to export certain variables.
export PROJECT=PROJECT_ID
export LOCATION=REGION
export DATA_FUSION_API_NAME=datafusion.googleapis.com
Now, to create a Cloud Data Fusion Instance using the REST API, submit the following request.
curl -H "Authorization: Bearer $(gcloud auth print-access-token)" -H "Content-Type: application/json" https://$DATA_FUSION_API_NAME/v1/projects/$PROJECT/locations/$LOCATION/instances?instanceId=instance_id -X POST -d '{"description": "Private CDF instance created through REST.", "type": "ENTERPRISE", "privateInstance": true, "networkConfig": {"network": "projects/shared_vpc_host_project_id/global/networks/network", "ipAllocation": "ip_range"}}'Setting Up VPC Network Peering
VPC Network Peering is used to establish network connections to your VPC connections in Cloud Data Fusion. In this way, it can access resources even through private IP addresses. To set up a fully functional VPC Network Peering, you need to set up an external connection first as part of your pre-preparation. Once you are done setting up an external connection, find your tenant Project ID. After that, follow the steps mentioned below to complete the process of setting up VPC Network Peering.

- In the Console window, you will find a VPC Network Peering page, open that.
- Select Create Peering Connection option and clock on Continue.
- Enter a name for your connection.
- Select the network in which you have created an Instance under Your VPC Network option.
- Select In another project option under Peered VPC Network.
- Enter your Tenant Project ID under the heading Project ID.
- Under the heading VPC Network Name, enter Instance Region and Instance ID.
- Under the Exchange Custom routes option, select Export Custom routes and Click Create.
You can set up IAM permissions or create a firewall rule as per the requirements of your Instance, that’s optional.
Granting Service Account User Permissions
As part of your pre-preparation, you need to have your service account name accessible to you at any time. For that, go to the Identity and Access Management page in the Console Window. Select the project from the project selector, and find and copy the necessary details from the information provided to you.
Once you are done with the pre-preparation part, follow the steps below to proceed further.
- From the Console window, select the project in whose Service Account you want to locate your Dataproc Cluster and Click Open.
- Click on the email address of your Dataproc Service Account and then open the Permission tab. You will see a list of principals that have been granted roles on the service account already.
- Click Grant Access.
- Paste the Cloud Data Fusion service account name which you copied previously in the New principal's field.
- Now, select the Service Account User role and Click on Save.
You are done with Granting Service Account User Permissions process. You can alter the changes in the grant if you want.
Using JDBC Drivers
As part of your pre-preparation, you need to access the Cloud Data Fusion Graphical Interface from the Instances page. Then, you need to upload a JDBC Driver so that it can be used further in the process.

The steps to use JDBC Drivers are mentioned below.
- Firstly, you need to go to the Cloud Data Fusion Pipeline Studio.
- Select Source or Sink and click on the Source or Sink of your choice in the left Navigation pane. A rectangle representing the source or sink will appear on the Studio canvas.
- Now, click on the Properties of the Source or Sink and open the Reference Name Field.
- Under the Reference Name Field, you need to enter the name of the driver you uploaded previously.
- Fill out the rest of the field of the Configuration Tab and select Upload.
Viewing a JDBC Driver
The JDBC drivers you have uploaded previously appear as artifacts in the Cloud Data Fusion Center. To view any JDBC driver uploaded by you, you need to access the Cloud Data Fusion Graphical Interface first. Select the Artifacts options from Filter By dropdown menu. You will see an Artifact card appearing in front of you containing the information of the JDBC driver you wanted to view.
Deleting a JDBC Driver
To delete any JDBC Driver uploaded by you, you need to access the Cloud Data Fusion Graphical Interface first. Select the Artifacts options from Filter By dropdown menu. You will see an Artifact card appearing in front of you. In that card, you will see a Trash icon. Click on that Trash icon, and your artifact will be deleted.
Using VPC Controls with Cloud Data Fusion
Using the VPC Controls with Cloud Data Fusion, you can restrict the Cloud Data Fusion API Surfaces. There are two types of Cloud Data Fusion Surfaces that can be restricted using the VPC Controls, namely Control Plane Surface and Data Plane Surface. Both of these types are discussed further.
Restricting the Cloud Plane Surfaces
You can restrict the Cloud Plane Surfaces by setting up the private connectivity to its Google APIs and services using datafusion.googleapis.com. For detailed knowledge, you can refer to our blog on
Restricting the Data Plane Surfaces
To restrict the Data Plane Surfaces, you can refer to the steps below.
- Firstly, you need to create a new private zone using Cloud DNS. In that, you need to mention Zone type as private, Zone name as datafusiongoogleusercontentcom, DNS name as datafusion.googleusercontent.com, and select that private network you chose before when you created that private instance.
- In the DNS Zone section, you will find Zone details fields named, NS and SOA records. Use ADD RECORD SET option to add records you want to restrict as per Data Plane Surface Standards.
- Click on Add Item every time you want to add some new records.
Viewing Pipeline Logs

As part of your pre-preparation, you need to enable Cloud Logging using the Logging and Monitoring option under the Instances page. Get your unique Pipeline RunID from the Pipeline Studio using the Table Tab. Now, to view Pipeline Logs, you need to follow the steps mentioned.
- Open the Logs Explorer page present under the Cloud Logging section of the Console Window.
- Under the Cloud Dataproc Cluster field of the Filters menu, paste the unique RunID and Click Open.
Filtering Logs
You will use Filter menus to filter your logs. These menus can be used to filter logs at various severity levels or by using components such as datafusion-pipeline-logs.
Downloading Logs
To download all the uploaded logs, you need to click on the Download Logs present on the Instances page of the Console Window.
Access Controls using IAM
Under this module, we will discuss the various Access Controls that are made available to us using IAM. This module covers Grant Roles, Required Permissions, Cloud Data Fusion roles, Cloud Data Fusion API permissions, and a few permissions for common tasks.
Grant Roles
Users are granted roles at the project level using the Google Cloud Console, the Resource Manager API, or the Google Cloud CLI. For detailed explanations of all these, you can refer to our blog on Cloud Life Sciences (beta), where you can get a brief explanation of these grant roles.
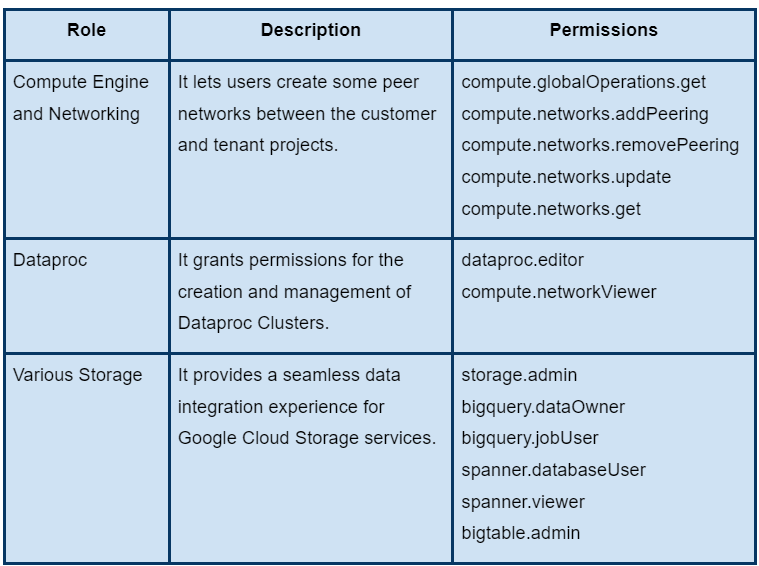
Required Permissions
The following table describes the permissions required to run the Cloud Data Fusion. These permissions are granted automatically as soon as you enable the Cloud Data Fusion API.
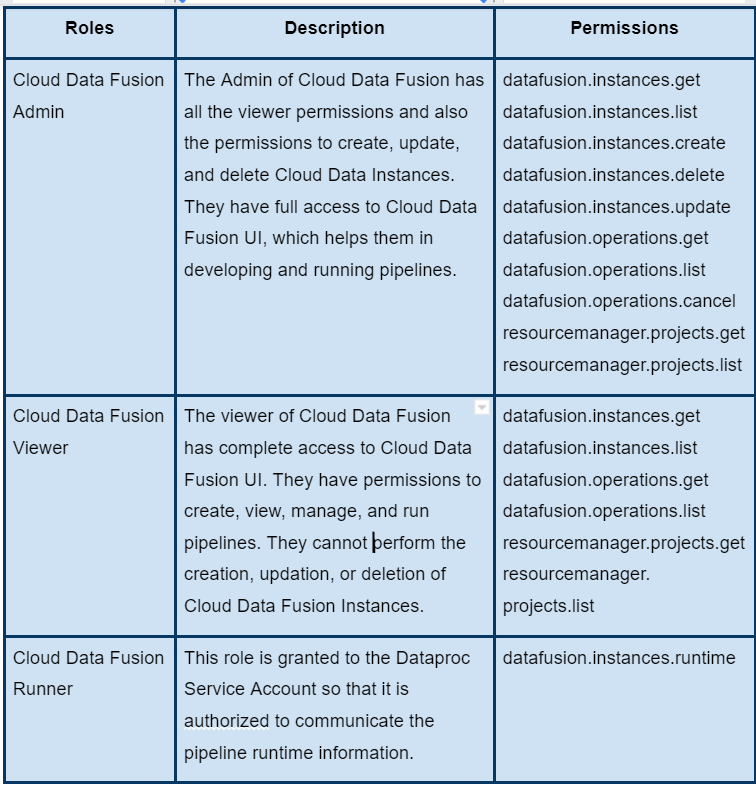
Cloud Data Fusion Roles
The table below contains the roles offered by Cloud Data Fusion. The lowest level resource to which a project can be granted is a Project.
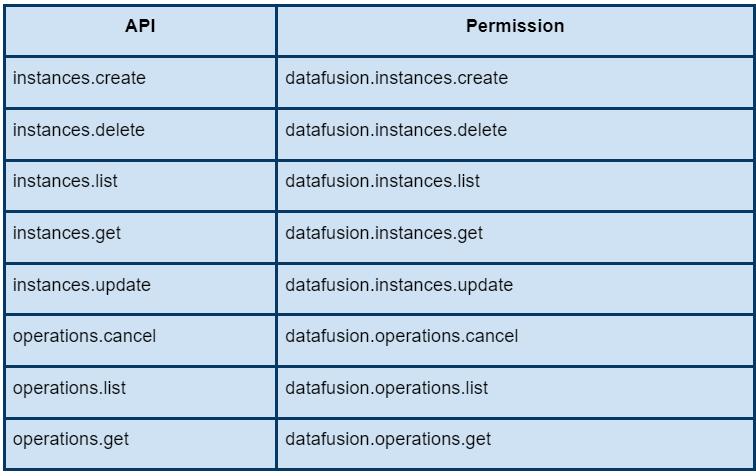
Cloud Data Fusion API Permissions
The following table shows the permission required to run Cloud Data Fusion API.
Permissions for Common Tasks
The table below provides you with the information required to perform some common tasks.


 8+ registered

