Table of contents
1.
Introduction
2.
Creating an Azure DNS zone and record using the Azure portal
2.1.
Prerequisites
2.2.
Steps
2.2.1.
Sign in to the Azure portal
2.2.2.
Create a DNS zone
2.2.3.
Create a DNS record
2.2.4.
Test the name resolution
2.2.5.
Clean up resources
3.
Creating an Azure DNS zone and record using Azure PowerShell
3.1.
Prerequisites
3.2.
Use Azure Cloud Shell
3.3.
Create the resource group
3.4.
Create a DNS zone
3.5.
Create a DNS record
3.6.
View records
3.7.
Test the name resolution
3.8.
Clean up resources
4.
Frequently Asked Questions
4.1.
What is the public DNS zone in Azure?
4.2.
How do I use nslookup in PowerShell?
4.3.
What command creates a new DNS resource record?
5.
Conclusion
Last Updated: Mar 27, 2024

Creating a public Azure DNS Zone using azure portal & powershell

Author Sanjana Yadav
0 upvote
Career growth poll
Do you think IIT Guwahati certified course can help you in your career?

Introduction

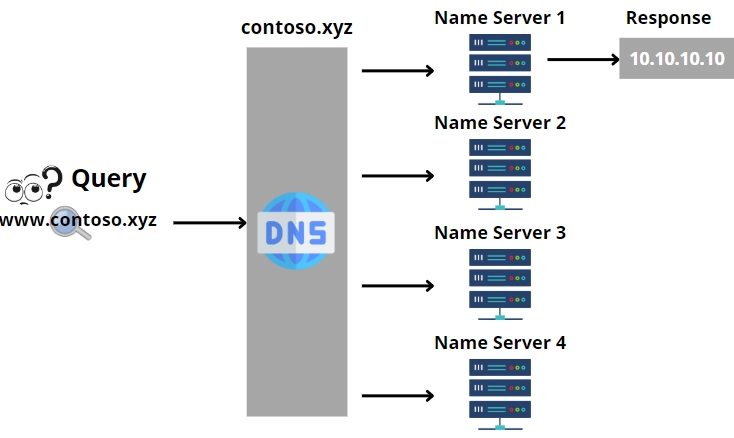
You have a variety of alternatives when it comes to resolving names using DNS.  Microsoft Azure DNS is one of such options.

Azure DNS may be configured to resolve host names in your public domain. For example, You may set up Azure DNS to host the contoso.xyz domain and resolve www.contoso.xyz to the IP address of your web server or web app, if you acquired the contoso.xyz domain name from a domain name registrar.

In this section, you will create a test domain and an address record that will resolve www to the IP address 10.10.10.10.

We can achieve this using a graphical method like the Azure portal or a scripting tool like PowerShell.

To begin hosting your domain on Azure DNS, you must first create a DNS zone for that domain.

Then, each DNS record for your domain is created within this DNS zone. 

Finally, you must establish the domain's name servers to publish your DNS zone to the Internet. 

Each of these processes for both methods is described in detail below.

Creating an Azure DNS zone and record using the Azure portal

Prerequisites

An Azure account having an active subscription.

Steps

Sign in to the Azure portal

Sign in to the Azure portal using your Azure credentials.

Create a DNS zone

A DNS zone holds a domain's DNS records. To begin hosting your domain name in Azure DNS, you must first build a DNS zone for that domain name.

To set up a DNS zone:

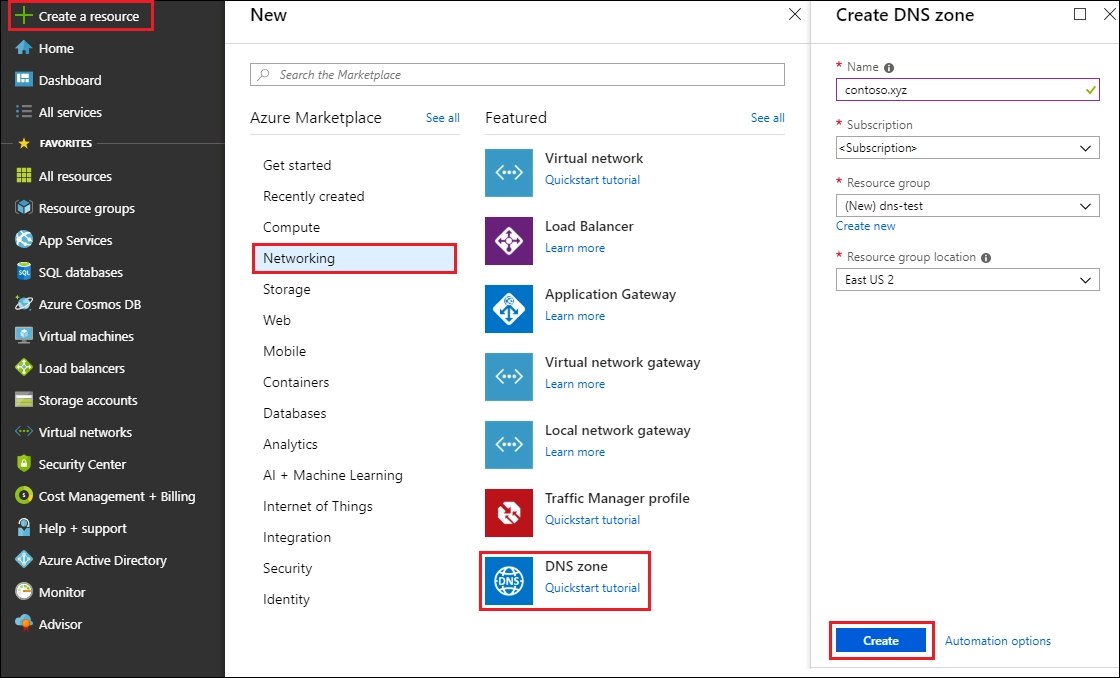
  • Select Create a resource in the top left corner, Networking, and DNS zone.
     
  • Enter or pick the following settings on the Create DNS zone page:
     
  • Name: For this example, type contoso.xyz. Any value that is not already specified on the Azure DNS servers can be used as the DNS zone name. A domain purchased from a domain name registrar would have a real-world value.
     
  • Resource group: Select Create new, type MyResourceGroup, and select OK. The name of the resource group must be unique inside the Azure subscription.
     
  • Select Create.

Src: https://docs.microsoft.com/en-us/azure/dns/media/dns-getstarted-portal/openzone650.png 

It may take a few minutes to set up the zone.

Create a DNS record

Within the DNS zone, you create DNS entries or records for your domain. To resolve a host name to an IPv4 address, create a new address record or 'A' record.

To make an 'A' record, follow these steps:

  1. In the Azure portal's All resources section, open the contoso.xyz DNS zone under the MyResourceGroup resource group. To find it faster, type contoso.xyz into the Filter by name box.
     
  2. Select + Record set at the top of the DNS zone page.
     
  3. Enter or select the following values on the Add record set page:
    1. Name: Enter www. The record name is the host name that you wish to resolve to the provided IP address.
       
    2. Type: Select A. Although 'A' records are the most prevalent, other record types exist for mail servers ('MX'), IP v6 addresses ('AAAA'), and so on.
       
    3. TTL: Type 1. The DNS request's time-to-live determines how long DNS servers and clients can cache a response.
       
    4. TTL unit: Select Hours. This is the TTL value's time unit.
       
    5. IP address: Enter 10.10.10.10 for this example. This is the IP address to which the record name resolves. In a real-world scenario, you would provide your web server's public IP address.

Configuring the Azure DNS name servers at a domain name registrar is not necessary because this quickstart example is only for testing purposes. With an actual production domain, you'll want anyone on the Internet to be able to access your web server or app by resolving the host name. You must go to your domain name registrar and change the name server records with the Azure DNS name servers.

Test the name resolution

Now that you have a test DNS zone with a test 'A' record, you can use the tool called nslookup to test the name resolution.

To test DNS name resolution, perform the following steps:

  1. Under the All resources section in the Azure portal, open the contoso.xyz DNS zone in the MyResourceGroup resource group. To find it faster, type contoso.xyz into the Filter by name box.
     
  2. Copy one of the name server names from the Overview page's name server list.

Src: https://docs.microsoft.com/en-us/azure/dns/media/dns-getstarted-portal/viewzonens500.png 

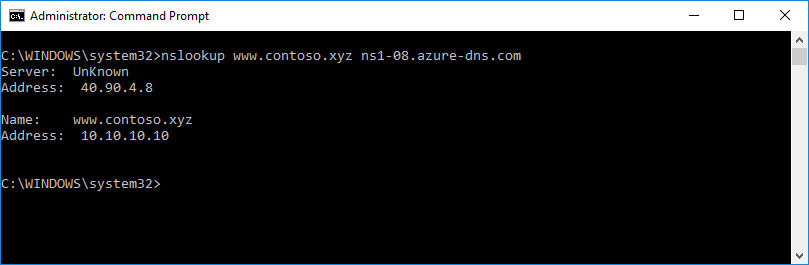
3. Enter the following command into a command prompt

nslookup www.contoso.xyz <name server name>

For instance:

nslookup www.contoso.xyz ns1-08.azure-dns.com

You should see something similar to this:

Src: https://docs.microsoft.com/en-us/azure/dns/media/dns-getstarted-portal/nslookup.png 

A command prompt window is shown in the screenshot, with an n s lookup command and values for Server, Address, Name, and Address.

Clean up resources

When you no longer require the resources created in this quickstart, delete the MyResourceGroup resource group. Select Delete resource group from the MyResourceGroup resource group.

Creating an Azure DNS zone and record using Azure PowerShell

Prerequisites

An Azure subscription that is active. Create a free account.

Azure PowerShell or Azure Cloud Shell is installed locally.

Use Azure Cloud Shell

Azure Cloud Shell is a browser-based interactive shell environment hosted by Azure. To interact with Azure services, you may use either Bash or PowerShell using Cloud Shell. Using the Cloud Shell preconfigured commands, you may execute the code in this article without installing anything on your local machine.

To launch Azure Cloud Shell, follow these steps:

  • Select Try It in the code block's upper-right corner. When selecting Try It, the code is not instantly copied to Cloud Shell. 
     
  • To launch Cloud Shell in your browser, navigate to https://shell.azure.com or click the Launch Cloud Shell icon.
     
  • In the Azure portal, click the Cloud Shell button in the upper right menu.

To run the code in this article, on Azure Cloud Shell, follow these steps:

  • Start Cloud Shell.
     
  • To copy the code, click the Copy button on a code block.
     
  • Ctrl+Shift+V on Windows and Linux, or Cmd+Shift+V on macOS, to paste the code into the Cloud Shell session.
     
  • To run the code, press Enter.

Create the resource group

Create a resource group to hold the DNS zone before creating the DNS zone:

New-AzResourceGroup -name MyResourceGroup -location "eastus"

Create a DNS zone

The New-AzDnsZone cmdlet is used to create a DNS zone. The example below establishes a DNS zone called contoso.xyz in the resource group MyResourceGroup. Create a DNS zone using the example, replacing the values with your own.

New-AzDnsZone -Name contoso.xyz -ResourceGroupName MyResourceGroup

Create a DNS record

The New-AzDnsRecordSet cmdlet is used to construct record sets. The example below sets a record with the relative name "www" in the DNS Zone "contoso.xyz" and resource group "MyResourceGroup." The record set's fully qualified name is "www.contoso.xyz." The record type is "A," the IP address is "10.10.10.10," and the TTL is 3600 seconds.

New-AzDnsRecordSet -Name www -RecordType A -ZoneName contoso.xyz -ResourceGroupName MyResourceGroup -Ttl 3600 -DnsRecords (New-AzDnsRecordConfig -IPv4Address "10.10.10.10")

View records

To get a list of the DNS records in your zone, type:

Get-AzDnsRecordSet -ZoneName contoso.xyz -ResourceGroupName MyResourceGroup

Test the name resolution

Now that you have a test DNS zone with a test 'A' record, you can use nslookup to test the name resolution.

To test DNS name resolution, perform the following steps:

  1. To obtain a list of name servers for your zone, use the following cmdlet:
Get-AzDnsRecordSet -ZoneName contoso.xyz -ResourceGroupName MyResourceGroup -RecordType ns

2.Copy one of the name server names from the previous step's output.

3.Open a command prompt and type the following command:

nslookup www.contoso.xyz <name server name>

Example,

nslookup www.contoso.xyz ns1-08.azure-dns.com.

You should see something similar to this:

Src: https://docs.microsoft.com/en-us/azure/dns/media/dns-getstarted-portal/nslookup.png 

www.contoso.xyz resolves to 10.10.10.10, precisely as you specified. This result confirms that name resolution is functioning properly.

Clean up resources

When you no longer use the resources produced in this example, remove the resource group:

Remove-AzResourceGroup -Name MyResourceGroup

Frequently Asked Questions

What is the public DNS zone in Azure?

Azure DNS is a DNS domain hosting service. It uses Microsoft Azure infrastructure to offer name resolution. You may manage your DNS records on Azure by utilizing the same credentials, APIs, tools, and pricing as your other Azure services.

How do I use nslookup in PowerShell?

Supply a machine name as the -Name option to the Resolve-DnsName cmdlet. It will look for a record with the matching machine name on the locally allocated DNS server and provide the record details. Technically, the -Name argument isn't even required. The command will still function without it.

What command creates a new DNS resource record?

The Add-DnsServerResourceRecord cmdlet adds a resource record to a DNS server for a Domain Name System (DNS) zone. You can include many sorts of resource records. For various record kinds, use different switches. See Managing Resource Records for additional information on resource records.

Conclusion

In this article, we have learned to create a public Azure DNS Zone using the Azure portal as well as  Powershell. With the help of the above discussion, we learned how to interact with Azure DNS zones and the records contained within them.

We hope this blog has helped you enhance your Azure Data Lake Analytics knowledge. To learn more about Microsoft Azure, refer to our articles on Microsoft Azure Certification – Coding Ninjas Blog.  

Refer to our guided paths on the Coding Ninjas Studio platform to learn more about DSA, DBMS, Competitive Programming, Python, Java, JavaScript, etc. 

Refer to the links problemstop 100 SQL problemsresources, and mock tests to enhance your knowledge.

For placement preparations, visit interview experiences and interview bundle.

Do upvote our blog to help other ninjas grow. Happy Coding!

Live masterclass