Do you think IIT Guwahati certified course can help you in your career?
Introduction
In this blog, we will grasp knowledge about how we can create an OpenGL Context in pyglet. Pyglet is a Python library that provides an object-oriented application programming interface for developing games and other multimedia applications. Pyglet is a BSD(Berkeley Software Distribution) -a licensed program that runs on Microsoft Windows, macOS, and Linux. Reading this blog will help you understand Creating an OpenGL Context, so let's get started.
Contexts and configs
In pyglet, you draw to an OpenGL context when you draw on a window. Every window has
its context, which is established when it is formed. The context attribute gives you access to the window's context.
The context is generated using an OpenGL configuration (or "config") that specifies the context's attributes, such as the color format, the number of buffers accessible, etc. The config used to build a context can be accessed via the context's config attribute.
For instance, let's make a window with the default configuration and look at some of its properties:
In OpenGL Context, the system may support various alternative sets of configurations depending on the display device being used. A computer with two video cards, for example, may not support the identical formats on both cards. Another example of using X11 remotely is that the display device is more compatible with many configurations than the local driver. Merely a single video card on the local computer may enable several configurations for two monitors plugged in.
A Display in Pyglet is a group of "screens" attached to a single display device. The display device on Linux corresponds to the currently active X11 display. There is only one display on Windows and Mac OS X.
Access to the display is provided through the pyglet.canvas module (s). To get the default display, use the get display() function:
//setting display to access the display
 display = pyglet.canvas.get_display()
You can also try this code with Online Python Compiler
In OpenGL Context, you can count the linked displays when you've obtained a display. A screen is a physical display medium attached to a display device, such as a computer monitor, television, or projector. Most computers only have one screen, although dual-head workstations and laptops connected to a projector are typical examples of PCs with multiple screens.
Dual-head workstations have the following screens listed:
//setting boundary condition for screen and printing it in range
for screen in display.get_screens():
... print(screen)
…
//defining the x,y coordinates and width and height of the screen
XlibScreen(screen=0, x=1480, y=0, width=996, height=720, xinerama=1)
XlibScreen(screen=0, x=0, y=1480, width=720, height=996, xinerama=1)
You can also try this code with Online Python Compiler
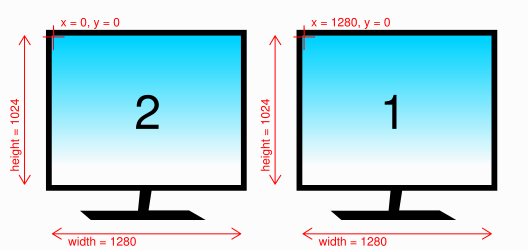
The returned screens from the above code are XlibScreen; XlibScreen is a subclass of the screen because this workstation runs on Linux. The screen and xinerama qualities are unique to Linux, while the x, y, width, and height attributes are universal and represent the geometry of the screen, as illustrated below.
The "default" screen, the first screen returned by get_screens(), is always present. The default screen, depending on the operating system, usually features the taskbar (on Windows) or menu bar (on OS X). get_default_screen() gives you immediate access to this screen.
OpenGL configuration options
When setting or selecting a Config, you do it based on its properties. A fixed subset of the options supplied by AGL, GLX, WGL, and their extensions are supported by pyglet. These restrictions are imposed on all OpenGL configurations in particular:
1. Buffers are always RGB or RGBA color components; they are never palette indexed.
2. A buffer's "level" is always 0. (this parameter is mainly unsupported by modern OpenGL drivers anyway).
3. The translucent color of a buffer cannot be changed (again, this GLX-specific option is not well supported).
4. Pbuffers aren't supported (equivalent functionality can be achieved more simply and efficiently using frame buffer objects).
The following properties are set for the visible area of the buffer, often known as the color buffer:
buffer_size
The number of bits in a single sample. The most common values are 24 and 32, which allocate 8 bits to each color component. It's also feasible to use a buffer size of 16, which corresponds to 6, 5, and 5 bits of green, red, and blue, respectively.
alpha_size, blue_size, green_size, blue_size
The above numbers represent the number of bits dedicated to each color component. The driver determines the red, green, and blue sizes depending on the buffer size property; thus, you should avoid changing them.
sample_buffers and samples
Sets the buffer to multisampling (MSAA), which uses multiple color samples to determine the color of each pixel, resulting in a higher-quality, antialiased image.
stereo
It makes different right and left buffers to make it functional with stereo hardware. This option requires specialized video technology, such as stereoscopic glasses. When glDrawBuffers is utilized, you must manually render to each buffer.
double_buffer
Make different front and back buffers. Drawing commands are immediately visible on the screen without double-buffering, and the user will see a visual flicker as the image is redrawn in front of them.
aux_buffers
Each auxiliary buffer has the same settings as the color buffer. Typically, up to four extra buffers can be constructed. If you don't need any additional buffers, enter 0.
Depth-of-field, simple antialiasing, motion blur, and other compositing operations can all be done with the accumulation buffer. Although it is being phased out in favor of floating-point textures, it is still a viable option for achieving these effects on older hardware.
depth_size
For 3D rendering, a depth buffer is frequently necessary. 24 bits is a typical depth size. If you don't need a depth buffer, enter 0.
stencil_size
The stencil buffer is needed to mask the other buffers and run volumetric shadowing methods. The standard stencil size is 8 bits; however, you can specify 0 if you don't need it.
Setting Versions
Setting versions in OpenGL Context is an important aspect as it gives the flexibility to set your version; you can request a higher-level context if you want to work directly with OpenGL. You'll need this if you want to use the modern OpenGL programmable pipeline. Please keep in mind that many of pyglet's core modules still employ old OpenGL capability (such as the text, graphics, and sprite modules). Currently, requesting a higher version context prevents these modules from being used.
major_version
For example, OpenGL 3.x or 4.x context will be either 3 or 4.
minor_version
It gives a minor version of the context. There is a chance that the OpenGL driver may return a higher version than requested in some instances.
forward_compatible
If you set this to True, the driver will be asked to remove legacy OpenGL capabilities from the context. This is something Khronos does not encourage.
The default configuration
Pyglet will use a template config containing the following properties if you create a Window without specifying the context or config:
Attribute
Value
double_buffer
True
depth_size
24
Simple context configuration
Only settings provided by the system can be used to construct a context. Because enumerating and comparing the properties of all potential configs is a time-consuming task, pyglet offers a more user-friendly interface based on "template" configs.
Construct a Config and set only the characteristics you care about to get the config you want. The context can then be created by passing this configuration to the Window function.
To make a window with an alpha channel, follow this code:
//Defining alpha_size to make the window with an alpha channel
configuration = pyglet.gl.Config(alpha_size=16)
window = pyglet.window.Window(config=configuration)
You can also try this code with Online Python Compiler
It's occasionally essential to establish the context yourself instead of relying on the Window function Object() { [native code] }. Use get the best config() in this example to get a "full" config, which you can then use to create the context:
On some devices, not all configurations will be possible. If the hardware does not support the specified attributes, the call to get the best config() will throw a NoSuchConfigException. It will never return a configuration that does not satisfy or exceed the template's attributes.
If newer hardware features are available, you can utilize this to support them, but you can also accept a lower configuration. For instance, the following code produces a window with multisampling if possible, but not otherwise:
//defining template with sample_buffer and samples
template = pyglet.gl.Config(sample_buffers=1, samples=4)

// using try and except for configuration with templet as input
try:
    configuration = screen.get_best_config(template)

except pyglet.window.NoSuchConfigException:
    template = gl.Config()
    configuration = screen.get_best_config(template)
window = pyglet.window.Window(config=configuration)
You can also try this code with Online Python Compiler
For most applications, allowing the pyglet to choose the optimum configuration based on a template is enough; nevertheless, some sophisticated programmers may prefer to describe their algorithm for selecting a set of OpenGL properties.
The get_matching_configs() method can enumerate the configs of a screen. As a basic requirement, you must provide a template. You can still use an "empty" template (one with no attributes defined) to get a list of all the screen's supported settings.
All setups using either an auxiliary or accumulation buffer are printed in the following example:
//setting display
display = pyglet.canvas.get_display()

//setting screen
screen = display.get_default_screen()

//searching for config in screen
for config in screen.get_matching_configs(gl.Config()):

//if found move onto printing config
    if config.aux_buffers or config.accum_red_size:
//printing config
        print(config)
You can also try this code with Online Python Compiler
Enumeration allows you to rapidly identify the maximum value of an attribute (for example, the whole samples per pixel) or offer a list of possible settings to the user and enable more advanced configuration selection methods.
Sharing objects between contexts
In pyglet, each window has its OpenGL context. The matrix stacks and current flags are unique to each context's OpenGL state. Contexts can, however, choose to share their objects with one or more other contexts. Objects that can be shared include:
Textures
Display lists
Shader programs
Vertex and pixel buffer objects
Framebuffer objects
Sharing items has two purposes. One is to allow objects to be saved only once on the video card, even if several windows use them. The second purpose is to prevent having to generate the objects every time a context is recreated.
Rather than simply destroying the old one and losing all of your previously generated objects, you can:
Create a new context that shares object space with the previous one and then destroy it. All of the old objects are retained in the contemporary context.
You have to tell Pyglet which other context it should take from object space when you construct a Context. The most recently built context will be used by default (when using the Window function to create the context). In the Context function, you can supply another context or none (to establish a new object space).
It's useful to keep track of which object space an item was created in. For example, when you load a font, pyglet caches and reuses the textures used, but only if the font is loaded on the same object space as the font. The simplest technique is to set your characteristics on the ObjectSpace object.
In the example below, an attribute on the object space indicates that game objects have been loaded. You can check for this attribute if the context is recreated to see if you need to load them again:
// defining context
context = pyglet.gl.current_context

//defining object space
object_space = context.object_space

//setting true value for space when loaded
object_space.my_game_objects_loaded = True
You can also try this code with Online Python Compiler
On ObjectSpace, avoid using attribute names that start with "pyglet," as they may conflict with an internal module.
Frequently Asked Questions
What is the main purpose of OpenGL?
OpenGL (Open Graphics Library) is a graphics hardware-software interface. Over 250 different function calls make up the interface, which may be used to create complex two- and three-dimensional scenarios from simple geometric primitives like points, lines, and polygons.
What language does OpenGL use?
OpenGL is an API for creating 3D graphics. An OpenGL application is commonly developed in C or C++; OpenGL is not a programming language. With OpenGL, you can create appealing, realistic 3D graphics with little effort.
Is OpenGL cross-language?
OpenGL programming is cross-platform and multi-language. They just need to be adjusted for the OpenGL standard, not for different operating systems or graphics hardware.
Conclusion
In this article we have extensively discussed creating an OpenGL Context; further, we have discussed its functions and addressed displays, screens, configuration options, and setting versions with coded examples.
After reading about creating an OpenGL Context in pyglet, are you not feeling excited to read/explore more articles on the topic of the pyglet framework? Don't worry; Coding Ninjas has you covered. To learn, see Operating System, Unix File System, File System Routing, and File Input/Output.


 6+ registered

