


Introduction
Most of us have thorough knowledge about the various concepts used in Android and Java, but there is no strategy to measure or exhibit such skills unless you have a few projects. The best way to get a hold of the concepts is to use them in your projects, the more you explore, the more you learn.
In theoretical concepts, you don’t stumble across any concept as you don’t implement them while when you work in the Android Studio, you will encounter numerous bugs. Don’t worry; you will be able to eradicate them all, eventually. This is the proper channel of learning. In the previous two articles, we have discussed the procedure for creating a Calculator App and a Tic-Tac-Toe App. Both, the projects were logic-driven and we didn’t work on any database, while in the real-world, majority of applications need a database.
A Database is required for storing and processing the data. Earlier, databases were based on queries, but nowadays, we have databases that are run via procedural languages also. There are numerous in-built functions that allow manipulation of data efficiently.
A database can be of numerous types, depending upon the scalability of your project you can pick the most suitable one. A database can be connected to a cloud, making it accessible worldwide or just a device-hosted database, which is restricted to the host device only. For creating a Quiz App, we prefer an SQLite database; it is a host-driven database and can’t be accessed elsewhere.
SQLite is widely known as an in-process software library that serves as a serverless, self-contained, zero-configurationally, transactional SQL database engine. SQLite is preferred over other databases as it is zero-configured, which implies that there are no pre-requisites for configuring it in your system. The source code for SQLite is open-source and is publically accessible to the growth of developers.
In contrast to the other databases, the SQLite engine is not a standalone process. Developers are allowed to link it statically or dynamically in coherence with their requirements within the application. SQLite makes direct access to the storage files. The demand for SQLite is exponentially increasing, the convince provide by this engine leads to this growing demand. However, the size is restricted but the functions and features are quite extended.
Top reasons for picking SQLite
- SQLite is written in ANSI-C and provides a simplified and user-friendly API.
- SQLite does not call for any segregated server for data manipulation or storage or any system to operate (serverless).
- SQLite comes with zero-configuration costs; this implies there is no pre-required setup or administration needed.
- SQLite is very compact and lightweight, less than 400KiB with full configuration. This can be reduced to even less than 250KiB by omitting the optional features.
- SQLite is a self-contained database. Therefore, you don’t need to add any external dependencies.
- The entire SQLite database can be preserved in a single cross-platform disk file.
- SQLite transactions follow the ACID paradigm; this allows simultaneous closed transactions from multiple processes or threads.
- SQLite supports a wide range of query language features present in SQL92 (SQL2) standard.
- SQLite can be set-up on UNIX (Linux, Mac OS-X, Android, iOS) and Windows (Win32, WinCE, WinRT) machines.
Phase 1: Designing the layouts
For the quiz app, we design a home screen that displays the latest high-score of the user and displays the various categories of quizzes that the user may pick and then begin the Quiz. For every question, the second layout gets recycled, from the list of questions the TextView is set according to the question number, and a stopwatch is reset after each question, the user can view his score, the number of questions, the category is chosen, difficult level and so on. You can append additional parameters according to your requirement. You can even alter the colours used by changing the hex code in the attributes.
The XML code given below is for designing the start screen with the optional sections and the high score:
<?xml version="1.0" encoding="utf-8"?>
<RelativeLayout xmlns:android="http://schemas.android.com/apk/res/android"
    xmlns:app="http://schemas.android.com/apk/res-auto"
    xmlns:tools="http://schemas.android.com/tools"
    android:layout_width="match_parent"
    android:layout_height="match_parent"
    android:background="@color/colorBackground"
    android:padding="16dp"
    tools:context=".StarttScreen">
    <TextView
        android:layout_width="wrap_content"
        android:layout_height="wrap_content"
        android:layout_centerHorizontal="true"
        android:layout_marginTop="30dp"
        android:text="Coding Ninjas Quiz"
        android:textColor="@android:color/black"
        android:textSize="35sp" />
    <TextView
        android:id="@+id/text_view_highscore"
        android:layout_width="wrap_content"
        android:layout_height="wrap_content"
        android:layout_above="@id/button_start_quiz"
        android:layout_centerHorizontal="true"
        android:layout_marginBottom="32dp"
        android:text="Highscore: 0"
        android:textSize="20sp" />
    <Button
        android:id="@+id/button_start_quiz"
        android:layout_width="200dp"
        android:layout_height="wrap_content"
        android:layout_centerInParent="true"
        android:background="#303F9F"
        android:textSize="24sp"
        android:textColor="#FFFFFF"
        android:text="Start Quiz" />
    <Spinner
        android:id="@+id/spinner_category"
        android:layout_width="wrap_content"
        android:layout_height="wrap_content"
        android:layout_alignStart="@+id/button_start_quiz"
        android:layout_below="@+id/button_start_quiz"
        android:layout_marginTop="16dp"
        android:layout_alignLeft="@+id/button_start_quiz" />
    <Spinner
        android:id="@+id/spinner_difficulty"
        android:layout_width="wrap_content"
        android:layout_height="wrap_content"
        android:layout_alignStart="@+id/button_start_quiz"
        android:layout_below="@+id/spinner_category"
        android:layout_marginTop="16dp"
        android:layout_alignLeft="@+id/button_start_quiz" />
</RelativeLayout>
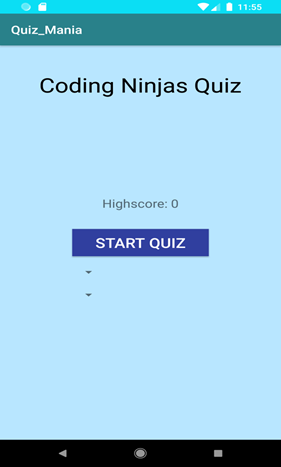
Image Source: Screenshot from Android Emulator
The XML code given below is for designing the question screen with timer and the instantaneous score:
<?xml version="1.0" encoding="utf-8"?>
<RelativeLayout xmlns:android="http://schemas.android.com/apk/res/android"
    xmlns:app="http://schemas.android.com/apk/res-auto"
    xmlns:tools="http://schemas.android.com/tools"
    android:layout_width="match_parent"
    android:layout_height="match_parent"
    tools:context=".MainActivity">


<TextView
    android:id="@+id/text_view_score"
    android:layout_width="wrap_content"
    android:layout_height="wrap_content"
    android:freezesText="true"
    android:text="Score: 0"
    android:textColor="@android:color/black" />
<TextView
    android:id="@+id/text_view_question_count"
    android:layout_width="wrap_content"
    android:layout_height="wrap_content"
    android:layout_below="@id/text_view_score"
    android:freezesText="true"
    android:text="Question: 1/x"
    android:textColor="@android:color/black" />
<TextView
    android:id="@+id/text_view_category"
    android:layout_width="wrap_content"
    android:layout_height="wrap_content"
    android:layout_below="@id/text_view_question_count"
    android:freezesText="true"
    android:text="Category: "
    android:textColor="@android:color/black" />
<TextView
    android:id="@+id/text_view_difficulty"
    android:layout_width="wrap_content"
    android:layout_height="wrap_content"
    android:layout_below="@id/text_view_category"
    android:freezesText="true"
    android:text="Difficulty: "
    android:textColor="@android:color/black" />
<TextView
    android:id="@+id/text_view_countdown"
    android:layout_width="wrap_content"
    android:layout_height="wrap_content"
    android:layout_alignParentEnd="true"
    android:freezesText="true"
    android:text="00:30"
    android:textColor="@android:color/black"
    android:textSize="40sp"
    android:layout_alignParentRight="true" />
<TextView
    android:id="@+id/text_view_question"
    android:layout_width="match_parent"
    android:layout_height="wrap_content"
    android:background="#42C6D5"
    android:layout_above="@id/radio_group"
    android:layout_marginBottom="16dp"
    android:freezesText="true"
    android:text="Which of these is a high -level programming language?"
    android:textAlignment="center"
    android:textColor="@android:color/black"
    android:textSize="20sp"
    android:gravity="center_horizontal" />
<RadioGroup
    android:id="@+id/radio_group"
    android:layout_width="wrap_content"
    android:layout_height="wrap_content"
    android:layout_centerVertical="true">
    <RadioButton
        android:id="@+id/radio_button1"
        android:layout_width="wrap_content"
        android:layout_height="wrap_content"
        android:freezesText="true"
        android:text="Java" />
    <RadioButton
        android:id="@+id/radio_button2"
        android:layout_width="wrap_content"
        android:layout_height="wrap_content"
        android:freezesText="true"
        android:text="JavaScript" />
    <RadioButton
        android:id="@+id/radio_button3"
        android:layout_width="wrap_content"
        android:layout_height="wrap_content"
        android:freezesText="true"
        android:text="HTML" />
</RadioGroup>
<Button
    android:id="@+id/button_confirm_next"
    android:layout_width="match_parent"
    android:background="#000000"
    android:layout_height="wrap_content"
    android:layout_below="@id/radio_group"
    android:layout_marginTop="16dp"
    android:freezesText="true"
    android:textSize="20dp"
    android:textColor="@android:color/holo_blue_bright"
    android:text="Confirm" />
</RelativeLayout>
Image Source: Screenshot from Android Emulator
FAQs on the above mentioned UI designs:
What is the difference between <RadioGroup> and <RadioButton> tag?
A radio button is a dual-configuration button that can be marked checked or unchecked, indicating the assigned subjects. If the user clicks on an unchecked radio button, it becomes checked and vice-versa. Once checked, the user is not allowed to uncheck a radio button.
Radio buttons are embraced collectively in a RadioGroup, this confines the user to cheque any one button from the given radio group. It is used if you want to limit the selected option to just one, among the options provided. Radio buttons are widely used in taking the consumers gender while creating registration forms. If one of the radio buttons is checked, automatically all the radio buttons present in that radio group are unchecked. Therefore, they are referred as multiple exclusion set.
What is the difference between a Radio Button and a Check Box?
- Radio buttons restrict the user to pick any one of the options from a given radio group, whereas check boxes allow a user to select one or multiple options to be selected simultaneously from a given set.
- Radio button work with dual-configuration, namely- True & False. Checkbox work with triple-configuration, namely- Checked, unchecked & indeterminate.
- The radio button is a single control unit, while the check box is a multiple control unit.
- Radio buttons are indicated by tiny discs. In contrast, checkboxes are present as tiny squares on the user-interface.
- Radio buttons are used when there are only two possible outcomes such as the nationality of a person is Indian or not, whereas, Checkboxes are used when there can be multiple true possibilities such as a person can know English, Hindi, Japanese all at the same time.
What is the role of an android:freezesText=”true” attribute?
The attribute:android:freezesText=”true” is also a dual-state Boolean attribute. If it is set to true, it preserves the state of the TextVIew to the last completed text. Many a time, when we change the screen orientation from landscape mode to portrait mode or vice-versa, the text entered by the user in the TextView is lost. This happens even if the fragment is traced from the Back-stack. Therefore, the freezesText is set to true, to avoid the loss of entered text during any of the two situations.
By default this attribute is disabled for a TextView, while for an EditText it is always enabled, irrespective of the Boolean value of the attribute. The definition from developers.Google states, “If set, the text view will include its current complete text inside of its frozen icicle in addition to meta-data such as the current cursor position”. We have used this in our Quiz App so that in case the user rotates the screen, his score or other valuable information remains preserved.
What is the difference between MarginStart/MarginEnd and MarginLeft/MarginRight?
As the growth of Natural language processing (NLP) began, apps developers began to develop multi-lingual apps or apps in various regional languages. Therefore, a slight modification was introduced in the margin attribute of the Android Studio.
Android supports RTL layouts from API 17 and newer, which means from Android 4.2 (Jelly Bean). When we design layouts for supporting both RTL and LTR then we cannot use layout_marginleft and layout_marginRight.In such cases, we have to use layout_marginstart and layout_maginend.
When we use the attribute marginLeft, it refers to the left (fixed) margin of the element in the LTR view. Whereas, if you use marginStart, this margin applies to the start(relative). In the case of the LTR, the view is the left of the element, while for RLT is the right of the element.
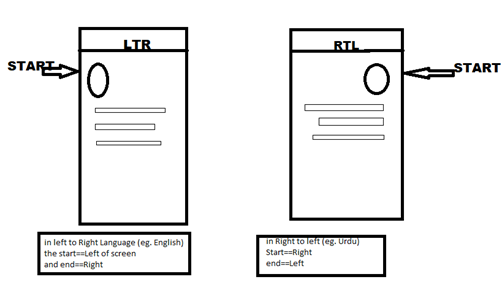
Image indicates the start of the screen with respect to LTR and RLT
Image source: StackOverflow

 9+ registered

