Do you think IIT Guwahati certified course can help you in your career?
🎇Introduction
Documenting requests to a web service is known as Discovering APIs in Ready API. ReadyAPI monitors HTTP traffic and records requests as we work with a web service. The logged recommendations can be utilized to generate a test case or an API Definition.
🎇Reason for using API Discovery
The fundamental goal of Discovering APIs in Ready API is to develop a test case that simulates user behavior rapidly. ReadyAPI collects data on the sent requests as we engage with a service. We can filter the recorded requests and generate a test case utilizing only those requests that were submitted to the given web service by specifying an API definition.
If a web service does not have a definition, we can build one using Discovering APIs in Ready API. In this scenario, we examine the web service and then develop an API definition using the data gathered from the recorded queries.
🎇Discovery Methods
We can find APIs using the internal ReadyAPI browser, an external browser, or a client application that routes traffic through the ReadyAPI proxy.
💢Internal Browser
ReadyAPI's internal browser works similarly to any other Internet browser, sending queries and receiving responses before displaying the resulting web page. When we record requests in this manner, we will receive all requests issued to the server, not just those to the database. We could, for example, record specific requests for graphics on the web page we load, the login procedure, and the web page displayed after the login. Following the recording, one can select the requests they require.
Requests from the internal browser include the necessary user agent so that the server can react appropriately.
💢Using Proxy
We can configure Discovering APIs in Ready API to function as a proxy to capture requests that cannot be replicated using a browser. Only the requests sent through the proxy are then recorded. Any program can be configured to send these requests. Because most programs just use the API to obtain the relevant data, we will receive far less unnecessary information. Discovering APIs in Ready API is capable of recording both HTTP and HTTPS queries.
🎇Tutorial for Record Test Case
In this lesson, we will record a simple interaction with a website and use that interaction to construct a test case.
💢Step 1: Open the Discover API Dialog Box
Select File, then New Empty Project.
In the flyout menu, select Discover API.
Select Use the built-in browser and click Add API.
To start recording, click Add API.
💢Step 2: Specify the Definition
Discovering APIs in Ready API will prompt us to enter an API definition. It allows us to filter the recorded requests, so only those sent to the selected web services are displayed.
We can specify either the URL or the path to the definition file. In this lesson, we will utilize the Swagger Petstore service as an example:
We will click the GET method that matches the /pet/findByStatus resource in the pet Everything about your Pets section and then clicks Try it out.
The editor will prompt us to choose one of the available status parameter values. Choose available and then click Execute.
Find the response body by scrolling down to the Responses section. It holds a list of pets represented by the Pet object. Then we will copy the id element's value.
We will go to the store Access to Petstore orders area, select the POST method for the /store/order resource, and then click Try it out.
We will be able to see a sample request body by the editor. We will copy the pet ID and paste it into the petId parameter. Then enter 1 for the quantity parameter. To send the request, click Execute.
The following stage in the tutorial will be to develop a test case based on the recorded requests.
💢Step 4: Create a Test
We can create a test case after recording the scenario:
Click the Generate services button.
Check the Generate Test Case option in the Generate Services dialogue.
Click OK and input the names of the test suite and test cases.
Choose Close REST Discovery and press OK:
Discovering APIs in Ready API will generate a test case based on the following recorded requests:
🎇Tutorial for Discovery
This lesson will record a small interaction with only a web service in which we do not yet have an API definition.
💢Step 1: Open the Discovery Dialog
Open the REST Discovery dialogue to begin recording queries to our service.
Choose File > New Empty Project and then.
In the flyout menu, choose Discover API.
Select Using the built-in browser, then go to Add API.
ReadyAPI will prompt us to enter an API definition to filter the recorded requests. Click the Record without Definition button.
ReadyAPI will launch the Recording Overview dialogue and begin recording requests.
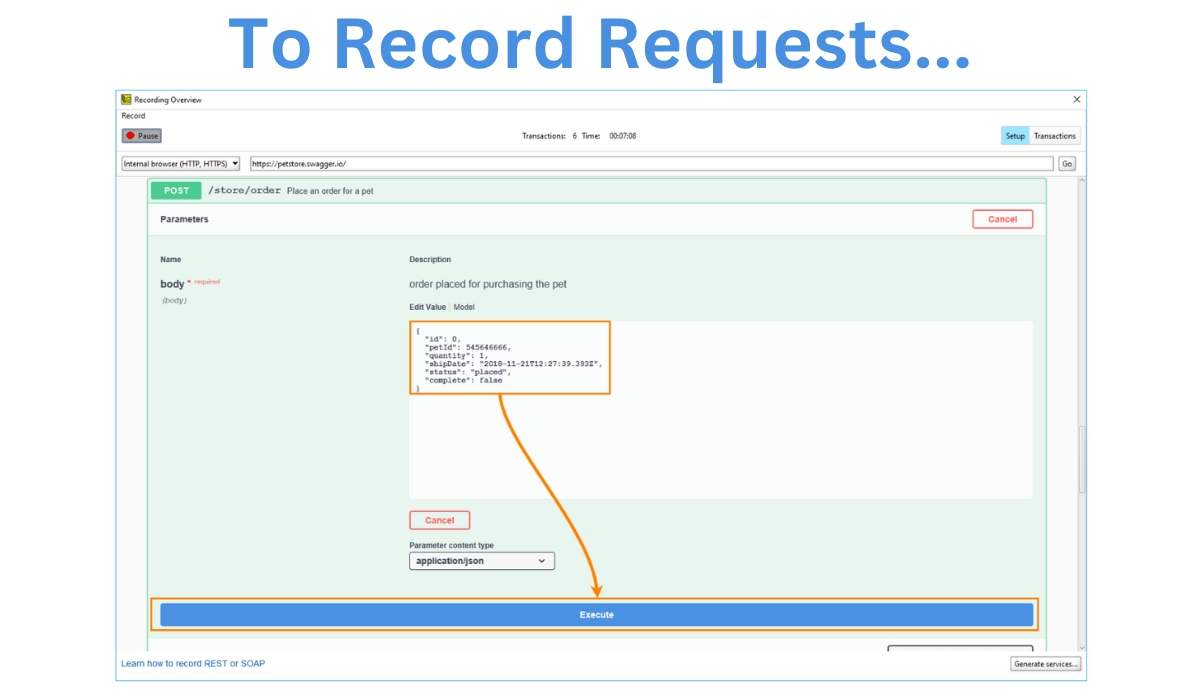
💢Step 2: Record Requests
The recording is active when we enter the Recording Overview dialogue.
Pause the recording by clicking on the "Pause" button.
Click POST in the pet Everything About Your Pets. It is a resource to help us expand our /pet operation.
The editor includes the request values as examples by default.
Click Try it out to get a request body containing sample values.
To restart the recording, click "RECORD."
To send the request, click Execute. Discovering APIs in ReadyAPI will record the interaction as the website sends the request and displays the response. ReadyAPI now records one request in the Recorded requests field.
The API definition will be created in the following tutorial stage.
💢Step 3: Create Service Definitions
After we have recorded the actions, create service definitions from them.
Examine the recorded requests and responses by going to the Transactions page.
ReadyAPI displays the recorded request. We can study the details of the documented processes by clicking on requests and responses.
Make sure we pick the request we sent. Click the Generate services button.
Select the Generate Test Case option in the Generate Services window to generate a ReadyAPI Test for the API we recorded.
Click OK and input the names of the test suite and test cases.
The resources will be added to the project, and ReadyAPI will display the information dialogue. Close REST Discovery and Press OK.
We have recorded the API request to the web application and can now replay it in ReadyAPI.
Frequently Asked Questions
What exactly is a Discovery API?
The Discovery API is a read-only batch API that allows applications to retrieve lists of Mode resources and metadata about each help.
What is the distinction between a ready API and a REST API?
ReadyAPI! performs much more natively but comes with licensing fees, whereas REST-assured does not. If you're only testing REST APIs, any will suffice.
What exactly is a ready API tool?
ReadyAPI is a no-code API testing platform aimed at simplifying your testing procedures.
How many different kinds of API are there?
APIs are classified into four types often used in web-based applications: public, partner, private, and composite.
Conclusion
In the article “Discovering APIs in Ready API,” we have started our discussion with the Reason for using API Discovery. Further continued our conversation with Discovery Methods in the article of Discovering APIs in Ready API. Tutorial for Record Test Case and Tutorial for Discovery are the two tutorials we have seen in the article of Discovering APIs in Ready API.


 9+ registered

