Displaying Text in Pyglet
Pyglet gives the font module for effectively rendering high-quality antialiased Unicode glyphs. Pyglet can use the installed font on the working system, or you can give your font with your application. Take a note that it does not support all font formats, click here to check the list of supported formats.
Text rendering is achieved with the text module that can display word-wrapped formatted text. It also provides support for interactive editing of text on-screen with a caret.
Simple Text Rendering
Let's understand with an example how to create a window that displays "I love Coding Ninjas" centered vertically and horizontally:
window = pyglet.window.Window()
label = pyglet.text.Label('I love Coding Ninjas',
                          font_name='Times New Roman',
                          font_size=35,
                          x=window.width//2, y=window.height//2,
                          anchor_x='center', anchor_y='center')

@window.event
def on_draw():
    window.clear()
    label.draw()

pyglet.app.run()

You can also try this code with Online Python Compiler
In the above example, the font name and font size are given directly in the constructor. And the other parameters are for setting the bold and italic styles and the color of the given text. Moreover, the position of the text is given by x and y coordinates.
The values of these coordinates are given by anchor_x and anchor_y parameters. The final drawing of the text to the screen is done with the pyglet.text.Label.draw() method. Labels also can be added to a graphics batch.
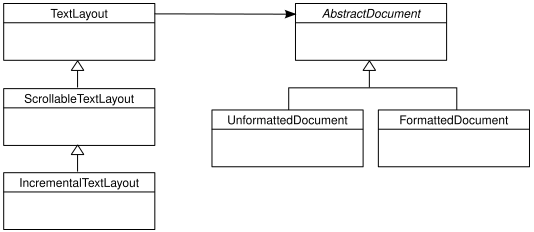
The document/layout model
The Label() class shown above gives a simplified interface to pyglet's entire text rendering capabilities. The underlying TextLayout() and AbstractDocument classes give a "model/view" interface to all of pyglet's text features.
Source Image-Link
Document
The Document is the "model" part of the architecture and describes the style and content of the text that has to be displayed.
There are mainly two document classes: UnformattedDocument and FormattedDocument.
UnformattedDocument models a document that contains text in just one style; on the other hand, FormattedDocument permits the style to change in the text.
Layout
The actual rendering of a document and layout is done through the TextLayout() classes. This kind of split exists to reduce the complexity of the code and to permit a single document to be displayed in more than one layout simultaneously, or you can say, many layouts can display one document.
Formatted Text
The FormattedDocument class keeps style information for every single character in the text instead of a single style for the entire document. Styles can be modified and accessed by name. Let's understand with an example:
# Get the font name used at character index 0
font_name = document.get_style('font_name', 0)


# Set the font name and size for the first 5 characters
document.set_style(0, 5, dict(font_name='Arial', font_size=12))
You can also try this code with Online Python Compiler
Custom Elements
Any Visual elements and Graphics can be inserted inline into a document using insert_element(). For example, inline elements use to render HTML images included with the IMG tag. There is currently no support for absolutely-positioned elements or floating. The constructor of InlineElement offers the width and height, which are separated into the ascent above the baseline, and descent beneath the baseline, of the element.
User-editable text
Pyglet implements the various features required to implement interactive text editing, while it does not include any complete GUI widgets for applications. These can be used as a basis for a complete GUI system or to present an easy and simple text entry field, as shown in the examples/text_input.py example.
For example, creates a document, a layout, and a caret and attach the caret to the window to listen for events:
import pyglet
window = pyglet.window.Window()
document = pyglet.text.document.FormattedDocument()
layout = pyglet.text.layout.IncrementalTextLayout(document, width, height)
caret = pyglet.text.caret.Caret(layout)
window.push_handlers(caret)
You can also try this code with Online Python Compiler
Loading System Fonts
The layout system automatically loads fonts as per requirements. You can also modify and load fonts to implement your own algorithm.
You must know the family name to load a font. You can get this name in the font dialog of any application. For example, all OS have the "Times New Roman" font. You also must have to give the font size to the load.
# Loading "Times New Roman" at 20pt
times = pyglet.font.load('Times New Roman', 20)
You can also try this code with Online Python Compiler
If you really don't care about the fonts and you just want to display a readable text on the output screen, then you can give None as the family name, which will load a default font.
sans_serif = pyglet.font.load(None, 16)
You can also try this code with Online Python Compiler
The default font of some Operating Systems is Arial on Windows XP and Helvetica on Mac OS X.
Font Sizes
You must mention the font size where it is to be rendered when loading a font in points. Points are a conventional unit used in both print media and display. There are numerous conflicting definitions for the actual length of a point; however, pyglet uses the PostScript definition: 1 point = 1/72 inches.
Font Resolution
The rendered size of the font on the display screen relies upon the display resolution. pyglet uses a default DPI of ninety-six on all OS. Most Mac OS applications use a DPI of 72, so the font sizes will not match up on that OS. However, application developers can be confident that font sizes remain constant in pyglet across platforms.
Determining Font Size
After a font size is loaded completely at a particular size, you can query its pixel size with its attributes, as shown in the diagram below:

Source Image- Link
Loading Custom Fonts
You can also load custom fonts on your own in your application if it is not already installed in your operation system. You have to make sure you have the license to distribute the font. You can view terms in your operating system's font viewer, and they are often specified within the font file itself.
There are two steps using which you can load a custom font:
- Let pyglet know about the new font name or font files.
- And, Load the font by its family name.
OpenGL font considerations
Text is drawn using textured quads in pyglet. Each font has a set of 1 or more textures, into which glyphs are uploaded as they're needed. For most applications, this minor detail is transparent and unimportant; however, a few of the details of these glyph textures are defined below for advanced users.
All glyph textures use the GL_TEXTURE_2D target, so you have to ensure that a higher priority target like GL_TEXTURE_3D isn't enabled before trying to render text.
Frequently Asked Questions
How can I change my text font to Bold and italic variants with keyword parameters?
You can change your font to bold and italic by using the below code:
times_bold = pyglet.font.load('Times New Roman', 16, bold=True)
times_italic = pyglet.font.load('Times New Roman', 16, italic=True)
times_bold_italic = pyglet.font.load('Times New Roman', 16,
                                     bold=True, italic=True)
You can also try this code with Online Python Compiler
How can I load a custom font into my operating system?
Suppose you have the New Actor font in a file named actor.ttf. Then the below code will load an instance of that font:
pyglet.font.add_file('actor.ttf')
new_actor = pyglet.font.load('New Actor')
You can also try this code with Online Python Compiler
What are the advantages of using Pyglet?
Pyglet has the advantage of multi-monitor desktops and multiple windows. It can load images, music, sound, and video in nearly all formats. It permits us to apply it for both industrial and different open-source projects.
Conclusion
In this article, we have extensively discussed the topic of Displaying Text in Pyglet and its components in detail. We hope that this blog has helped you enhance your knowledge regarding the subject of Displaying Text in Pyglet and if you would like to learn more, check out our articles on Web Applications.
Still, the knowledge never stops, have a look at more related articles: Pyglet, Pygame, and many more. Do upvote our blog to help other ninjas grow.
A ninja never stops learning, so to feed your quest to learn and become more advanced and skilled, head over to our practice platform Coding Ninjas Studio to practice advanced-level problems. Attempt mock tests, read interview experiences, interview bundles, and much more!
You can refer to programming fundamentals and SQL practice questions to sharpen your skills. If you need guidance at any stage while learning, then you can go to our Guided path.
Happy coding!
See you in the next blog, until then, keep learning and keep improving.


 9+ registered

