Do you think IIT Guwahati certified course can help you in your career?
Introduction
Pytorch is an open-source deep-learning framework that can be used in Python and C++ interfaces. In Deep Learning, the algorithms work to mimic the functioning of a human brain. Dog vs Cat Classifier is a type of hello world program for someone who has just started deep learning.
In the article “Dog vs Cat Classifier using Pytorch”, we will discuss the dog vs cat classifier and an implementation where we will be building a model to predict an image of a dog or a cat.
Pytorch
In Python, Pytorch is an open-source deep-learning framework that can be used in Python and C++ interfaces. Pytorch and Tensorflow are two deep-learning frameworks that are most commonly used in Python. Dog vs Cat Classifier is one of the examples in which we can identify the images of cats or dogs.
There are several reasons to choose Pytorch for classification of dogs and cats, here are as follows:
By using Pytorch, classification can be implemented easily which makes the code concise and more readable.
Pytorch also increases the capabilities of debugging by which the error can be resolved easily.
It works for both training and validating the model with the given datasets. In dog vs cat classifier, these datasets will be images of dogs and cats.
It offers the deployment options by which the models can be exported and runs efficiently.
Dog vs Cat Classifier
The dog vs Cat classifier is nothing more than a hello world project while learning deep learning. By learning a dog vs class classifier using Pytorch, you will be able to build a classification using deep learning with the help of the Pytorch library.
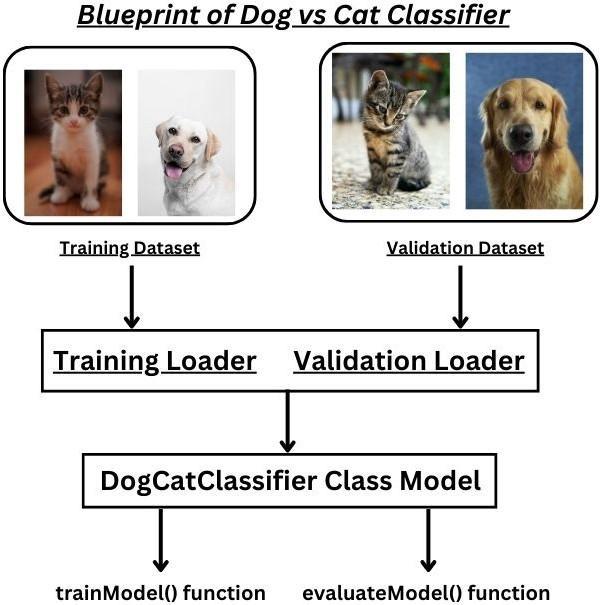
In dog vs cat classifier, we will train the model to validate and test the given model. There are some steps which we have to follow in order to get what we want, including data preparation, model creation, training and evaluation as shown in the below image:
Implementation of Dog vs Cat Classifier
In this section of article “Dog vs Cat Classifier using Pytorch”, we will do an implementation where we will validate and test the data sets. The data sets are nothing but the images of dogs and cats which will help us for the validation and testing.
Library Installation
First, you have to make sure that libraries like torch and torchvision are installed on the computer. You can install torch and torchvision with the below command:
pip install torch torchvision
Library Import
Now after installation, you can import the necessary libraries as shown in below code:
Code
Python
Python
import torch
import torch.nn as nn
import torch.optim as optim
import torchvision
import torchvision.transforms as transforms
You can also try this code with Online Python Compiler
Now you have to download some images of dogs and cats for both testing and validation. Now, also you have to organise them into the folder in the below given structure:
Explanation
Here the images of dogs and cats in the train and validation should be different, so that training model and the images on which the validation is done is different from each other.
Data Preprocessing
Now after adding images, you have to prepare the data by using train_loader and the val_loader. Here is the code below for the same:
Code
Python
Data Preprocessing
# Data augmentation and normalisation for training
transform = transforms.Compose([
    transforms.RandomResizedCrop(224),
    transforms.RandomHorizontalFlip(),
    transforms.ToTensor(),
    transforms.Normalize(mean=[0.485, 0.456, 0.406], std=[0.229, 0.224, 0.225]),
])

train_dataset = torchvision.datasets.ImageFolder(root= './my_dataset/train', transform=transform)
train_loader = torch.utils.data.DataLoader(train_dataset, batch_size=64, shuffle=True, num_workers=4)

val_dataset = torchvision.datasets.ImageFolder(root= './my_dataset/validation', transform=transform)
val_loader = torch.utils.data.DataLoader(val_dataset, batch_size=64, shuffle=False, num_workers=4)

# Assuming that you have GPU support, check if CUDA is available
device = torch.device('cuda:0' if torch.cuda.is_available() else 'cpu')
Explanation
In the above code, we preprocess the dataset by using train_loader and val_loader which basically loads the datasets for train_dataset and val_dataset for the training and validating, from its corresponding file paths.
Model Creation
After preparing the data, we can define the model by creating a class as given in the below code:
Code
Python
Python
class DogCatClassifier(nn.Module):
    def __init__(self):
        super(DogCatClassifier, self).__init__()
        self.resnet = torchvision.models.resnet18(pretrained=True)
        num_features = self.resnet.fc.in_features
        self.resnet.fc = nn.Linear(num_features, 2)  # 2 output classes: dog and cat

    def forward(self, x):
        return self.resnet(x)
You can also try this code with Online Python Compiler
In the above code, class DogCatClaffier is initialised so that it can be used for the functions like train_model and evaluate_model.
Training the Model
Now here comes the first main part of our article “Dog vs Cat Classifier using Pytorch”, to train the model on the given datasets (images of dogs and cats)in the “validate” folder. Here is code below for the same:
Code
Python
Python
def train_model(model, criterion, optimizer, num_epochs=10):
    for epoch in range(num_epochs):
        model.train()
        running_loss = 0.0
        for i, (inputs, labels) in enumerate(train_loader):
            inputs, labels = inputs.to(device), labels.to(device)

            optimizer.zero_grad()

            # Forward pass and compute loss
            outputs = model(inputs)
            loss = criterion(outputs, labels)

            # Backward pass and update weights
            loss.backward()
            optimizer.step()

            running_loss += loss.item()

        print(f'Epoch {epoch + 1}/{num_epochs}, Loss: {running_loss / len(train_loader)}')

train_model(model, criterion, optimizer, num_epochs=8)
You can also try this code with Online Python Compiler
In the above code, train_model is a function which basically trains the model on the given datasets created using the DogCatClassifier class. An iteration from 1 to 8 is done which are the numbers of passes for the training.
Validating Datasets
After training the model, here the second main part of our article “Dog vs Cat Classifier using Pytorch” comes, to evaluate or validate the given datasets in the “validate” folder. The validation of the given data sets will be measured in the terms of accuracy, so the output we will be seeing is the accuracy.
Code
Python
Python
def evaluate_model(model, dataloader):
    model.eval()
    correct = 0
    total = 0

    with torch.no_grad():
        for data in dataloader:
            images, labels = data
            images, labels = images.to(device), labels.to(device)
            outputs = model(images)
            _, predicted = torch.max(outputs.data, 1)
            total += labels.size(0)
            correct += (predicted == labels).sum().item()

    print(f'Accuracy on the evaluation set: {100 * correct / total:.2f}%')

evaluate_model(model, val_loader)
You can also try this code with Online Python Compiler
In the above code, train_model is a function which basically evaluates the model on the given datasets created using the DogCatClassifier class. The accuracy is supposed to be evaluated here, to find how accurate the model is trained and works on the datasets
Execution of Code
Here the implementation of Dog vs Cat Classifier using Pytorch is completed, the code can be executed using below command:
python dog_vs_cat_classifier.py
Output
Explanation
The output that you can expect depending on the datasets you’ve provided to the loaders for both training and validation i.e. accuracy on the validation set is 92.50%.
Frequently Asked Questions
What is Data Preprocessing?
In deep learning, we prepare the loaders to load the datasets before doing any processing on them. In dog vs cat classifier, we load the loaders for training and validating datasets to reduce the further time.
Why to use the Pytorch library?
Pytorch provides good flexibility and high speeds for deep neural networks and can be very beneficial in applications such as image classification, object detection, and generative tasks.
What are deep learning libraries in Python?
There are many libraries available for deep learning in Python, some of them are the following: TensorFlow, Pytorch, scikit-learn, OpenCV, Torch, Microsoft Cognitive Toolkit, and Theano.
In which IDEs Pytorch can be used?
There are various IDEs (Integrated Development Environments) where you can do implementation, such as Microsoft Visual Studio Code, Sublime Text, Pycharm, Jupyter Notebook, and Notepad.
Conclusion
The library Pytorch is used to find the accurate images of dogs and cats and this is what we can call Dog vs Cat Classifier using Pytorch. So In the article “Dog vs Cat Classifier using Pytorch”, we discussed what is the dog vs cat classifier and then we discussed the implementation of dog vs cat classifier using pytorch where we trained the datasets and validated some more datasets to find out the accuracy.
Here are more articles that are recommended to read:


 9+ registered

