


Introduction
The WordPress Editor is a brand-new way to publish. It allows you to easily construct media-rich pages and articles while also controlling their layout. Every element on a page has its block, so you can focus on creating rather than worrying about the alignment and arrangement of text, quotes, and photos.
Each block can be moved, edited, and customized, and the editor will display visual elements precisely as they appear on your site. You may double-check that before you hit "Publish" by using the Preview button.
The Basics of the WordPress Editor
The Block Editor will be used whenever you build a page, a post (or a custom post type). When you first launch it, a tutorial modal appears, and you may learn the essentials by following it through the four slides it provides. When you close it, you'll see the basic editor.
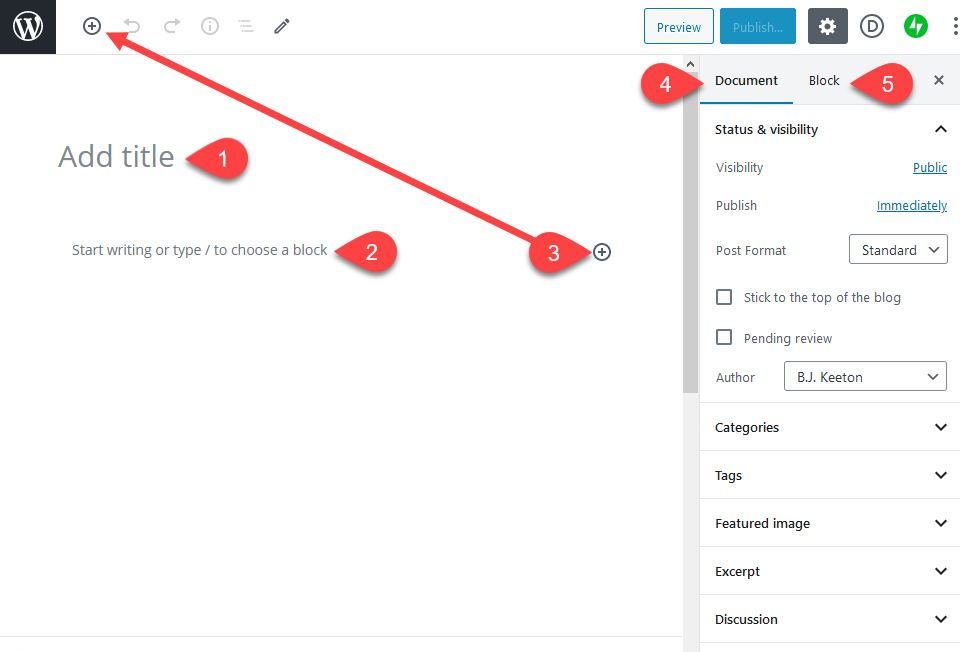
There are five basic parts in the WordPress Block Editor. Various plugins can offer more functionality, but these provide the foundation functions you'll need every day.
source: elegantthemes.com
- Title block
- Block/Content Area
- Add Block Button
- Document Options Tab
- Block Options Tab
The Title Block
The primary H1 tag for your post or page is the title block. It will also produce the post's permalink slug, which you can alter after saving the post at least once. CSS selectors like .post-title and .entry-title will take their cues from this. (However, your SEO plugins allow you to control what appears in search engines.)
This is the only block in the WordPress editor that can't be moved or removed. You'll need to utilize CSS or an external page builder to make further changes.
Block/Content Area
In their most basic form, content areas are portions of a website where blocks can be added and altered. Because content already has a clear definition in WordPress, we may refer to these as block regions to prevent ambiguity. Headers, footers, sidebars, and any other relevant template section outside the article text containing blocks are examples of block areas.
Add Block Button
You can click the + in a circle to add a new block at any moment. You'll see a dropdown menu where you may select the type you want to insert. They all work the same way, so you'll get the same alternatives if you choose one to the right, beneath, or in the corner of the screen.
Block Options Tab
This tab lets you see the options for any block you've selected. When you click into a paragraph block, you can only change the choices for that particular block. Other blocks, as well as the document itself, remain unchanged.
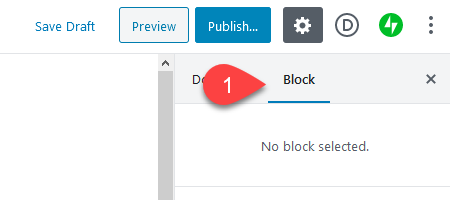
A Block tab can be found in the top-right area of the WordPress editor. You'll get a contextual set of options for that block type if you have a block selected. However, any adjustments you make will only affect the block you've chosen.
source: elegantthemes.com
In this tab, you can, for example, change the thumbnail size of a picture, add a colorful backdrop to a paragraph to create an alert, or change the font size in a heading. The options adjust to the individual block you select if you have the Block tab open.
Each block will have specific parameters that only apply to that sort of block that you can alter (and will only render in that specific block). However, every block has an Advanced section on the tab that allows you to apply CSS classes to it. Then, using external stylesheets and code, you can style them as you see fit.
Document Options Tab
You'll find everything you need under this tab, including categories, tags, permalinks, comment on/off toggles, etc. Plugins may add choices to this section, but they apply to the entire page or post.
The Document Options tab is located to the left of the Block Options tab. You can change the categories and tags of your article here, add a featured image, change the URL slug, add an excerpt for theme/SEO purposes, and enable or disable comments.
We are done with the blog. Let's move to faqs.


 9+ registered

