Introduction
We all deal with a lot of information in our daily life. Sending and receiving attachments are a small part of it. Even on a trip, we still exchange data and other information with others. We usually exchange this information using several applications. But did you ever wonder about its back-end processes?
This article will discuss how we generally encode attachments and work with data sources using Ready API. We will start our discussion by getting a gest about working with data sources. Afterward, we will detect them using some tests and add attachments to our Ready API.
At last, we’ll discuss how to get the current date using Ready API. So please stick with us to the end to get some exciting information!

Working With Data Sources
We cannot talk about “how to add any attachments” without knowing where these attachments are stored on the computer.
Data sources mean the location where the data being used originates. We can use it to create data-driven tests. Generally, data sources only provide the information they take from the source to any test step that needs it. They do not modify the data in any way or control it. We use Groovy scripts to do this.
We have several ways to implement this using script:
⭐We can run the script as a Groovy Script test step.
⭐In functional tests, we can run the script as a setup or teardown script on the test case level.
👉Now let’s look at some operations that can be performed on data sources.
Combining Multiple Data Source Values
The first operation we generally prefer is combining multiple data source values.
A data source combines the value into a single string and writes them to the test case custom property.
// Get values from a data source.
def yourstateName = context.expand( '${DataSource#StateName}' )
def yourstateCode = context.expand( '${DataSource#StateCode}' )

// Get the project's XmlFragment property.
def fragment = context.expand( '${#Project#XmlFragment}' )

// Combine the text of all properties.
def newValueofProperty = fragment + yourstateName + yourstateCode

// Write the result text to the test case property.
testRunner.testCase.setPropertyValue( 'ResultText', newValueofProperty )
Randomizing Data Source Rows
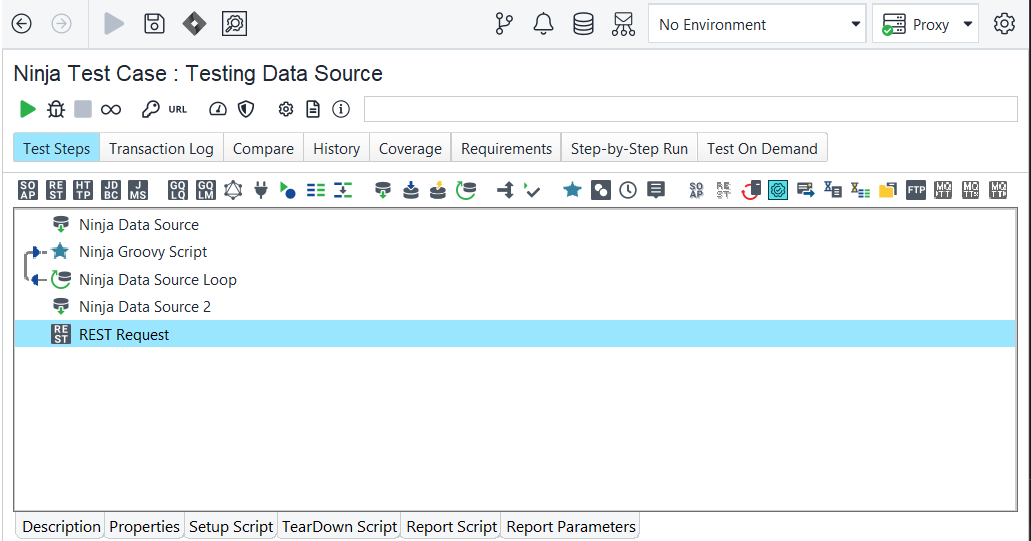
Now discussing the second operation that we use on the data sources. Most data sources in ReadyAPI return values in sequence. We can use groovy scripts to randomize the order of the returned values each time you run a test. Here is how we organize our test to do this:
⭐The original Data Source test step with the data you want to randomize.
⭐The Groovy Script test step creates a list with the data from the data source.
👉Use the following script:
// Create a list if necessary.
// If our data source returns multiple properties, we can create a list for each property we need.
if( context["allRows"] == null ) context["allRows"] = []

// Append the data source row value to the list.
context["allRows"] << context.expand( '${NinjaDataSource#outputProperty}' )
⭐The Data Source Loop test step iterates through the original data source so that you can get all the data it returns.
⭐The Groovy Data Source test step provides random data for our test.
👉We can use the following script:
// To shuffle the list before returning values.
// We will see a separate Groovy Script test step if you do not want to shuffle the list at each iteration.
Collections.shuffle( context["allRows"] )

// Get the value of the current row.
def row = testRunner.testCase.testSteps["NinjaDataSource 2"].currentRow

// Now return the value as long as it is within the list.
if ( row + 1 <= context["allRows"].size() )
{
    result["randomRow"] = context["allRows"][row]
}⭐Your test steps use the data and a data source loop to iterate it.
👉Now, this is what your test case will look like:
