Do you think IIT Guwahati certified course can help you in your career?
Introduction
Do you ever ponder how we can swiftly deploy our machine learning? To address this issue, we can use TorchServe. TorchServe is a production-ready solution for serving and scaling PyTorch models.
This article will explain the process of exporting models for serving with TorchServe.
TorchServe
TorchServe enables users to serve and scale PyTorch models in production effortlessly. Users can deploy PyTorch models to cloud environments using this flexible and user-friendly tool. TorchServe wraps a PyTorch deep learning model in REST APIs, allowing seamless integration with web applications and services. Additionally, TorchServe enhances inference performance for large models by supporting batch inference.
Features of TorchServe
TorchServe has many features, some of which are:
TorchServe simplifies deploying machine learning models by creating an easy-to-use API for others to interact with.
TorchServe efficiently handles a large number of user requests.
TorchServe helps you to monitor and log model performance, customize settings, and version different models.
TorchServe also supports containerization for easy deployment.
TorchServe regularly checks the health of running models and automatically substitutes unhealthy ones.
Steps to Export Models for Serving using TorchServe
There are multiple steps involved in exporting models for Serving in TorchServe. We will go step by step and understand how to export our models effectively.
Install TorchServe
We need to install Java on our computer because TorchServe runs on Java. You can download and install the JDK (Java Development Kit) from Oracle's official website. To confirm Java is installed entirely on your computer, use the following code in the command line.
java -version
If you are operating on google cloud, execute the following command to confirm.
Python
Python
! java -version
You can also try this code with Online Python Compiler
After installing Java into your system, you have to install PyTorch. After installing PyTorch on your system, we will install TorchServe and Torch Model. TorchServe and TorchModel are two primary components used to deploy and serve PyTorch models in production environments.
You can install TorchServe and TorchModel by running the following command:
In this, we are using a pre-trained model. Run the following command to install the 'transformers' package. It will allow you to work with various pre-trained models from Hugging Face. We will further use GPUs so that we will install the 'nvgpu' package also.
Python
Python
pip install transformers nvgpu
You can also try this code with Online Python Compiler
Hugging Face delivers a sentiment analysis model called ‘BERTweet’. We must include the tokenizer and model installed on our computer to boost its functionality. Execute the command below to load them:
Python
Python
from transformers import AutoTokenizer, AutoModelForSequenceClassification

# tokenizer
tokenizer = AutoTokenizer.from_pretrained("finite automata/between-base-sentiment-analysis")

# model
model = AutoModelForSequenceClassification.from_pretrained("finite automata/between-base-sentiment-analysis")
You can also try this code with Online Python Compiler
In your notebook, you can see that we have preserved the tokenizer and model under the names 'my_tokenizer' and 'my_model.'
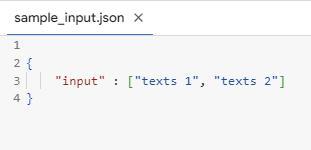
Create JSON Request and Label Mapper file
Before deploying the model, we need to create a JSON file. This file will merge when we request the model endpoint.
Let's build an additional JSON file named "index_to_name.json" to direct our model's outcome. While training the model, we generally encounter coded labels. However, using this 'index_to_name.json,' we can effectively convert those coded labels into human-readable strings.
Create the Model Handler
The model handler works like a pipeline that transforms the data we acquire through an HTTP request into the desired output. It's responsible for creating predictions using our model. But if we have a specific way of processing the input data for the desired output, we must create our handler. To make our handler, we should follow this good practice: Extend the base handler provided by TorchServe. Create a file named "handler.py." Then, we must run the following command to build our custom handler.
Python
Python
class ModelHandler(BaseHandler):
    def initialize(self, context):
        "Initialize function loads the model and the tokenizer
        Args:
            context (context): It is a JSON Object containing information
            pertaining to the model artifacts parameters.
        """
        properties = context.system_properties
        self.manifest = context.manifest
        logger.info(f'Properties: {properties}')
        logger.info(f'Manifest: {self.manifest}')
You can also try this code with Online Python Compiler
We're creating a new class called ModelHandler, inheriting from BaseHandler. BaseHandler already has essential prediction functions. When creating our handler, we modify these functions: initialize (loading model and tokenizer), preprocess (preparing input), inference (making predictions), and postprocess (transforming output) according to the needs.
Now let's create the initialization function for our handler.
Python
Python
class ModelHandler(BaseHandler):

    def initialize(self, context):

        "Initialize function loads the model and the tokenizer

        Args:

            context (context): It is a JSON Object containing information

            pertaining to the model artifacts parameters.

        """
        properties = context.system_properties

        self.manifest = context.manifest

        logger.info(f'Properties: {properties}')

        logger.info(f'Manifest: {self.manifest}')
You can also try this code with Online Python Compiler
We have created an initialize function. When we use it, we pass in a 'context,' just a bunch of information about our model. A JSON object stores this information with two main parts: 'system_properties' and 'manifest.' For now, we'll use this 'handler' to work with the model and check what's inside 'context.system_properties' and 'context.manifest' by looking at the logs.
Serving the Model in the Localhost
We must build a file called the '.mar' model archive to operate the model on our computer. This file will stock all the critical elements of the model in one location. We use this file to register our model with TorchServe, allowing us to share the model easily.
Create a folder called 'model_store' and go to the working directory and run the following command:
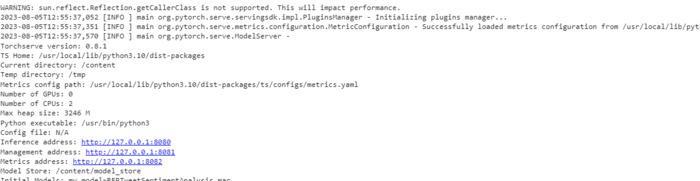
Once we have developed the model archive, our next step is registering the model into TorchServe. We must conduct the command below to register and serve the model using TorchServe to perform.
The model server will start doing the task on our computer. Using the "model-store" option, we will decide where to get the models. To save the models, we'll use "--models MODEL_NAME=<PATH_TO_MAR_FILE>," and we can choose any name for the model.
We have three addresses: Inference, Management, and Metrics. These addresses reserve the URLs we operate for different objectives. We use the Inference address to develop predictions from the model. The Management address enables us to manage the models. And the Metrics address allows us to access the model metrics.
Model Handler
We have only defined a small part of the initialization function for our model handler so far. We stopped there and showed you how to serve the model first because it helps build and debug the model handler.
Run the below code for Initialization Function
Note - Try to run the code in GPU if it is available.
Python
Python
def initialize(self, context):

    "Initialize function loads the model and the tokenizer
    Args:
        context (context): It is a JSON Object containing information
        pertaining to the model artifacts parameters.
    Raises:
        RuntimeError: Raises the Runtime error when the model or
        tokenizer is missing
    """

    properties = context.system_properties
    self.manifest = context.manifest
    model_dir = properties.get("model_dir")

    # use GPU if available
    self.device = torch.device(
        "cuda:" + str(properties.get("gpu_id"))
        if torch.cuda.is_available() and properties.get("gpu_id") is None
        else "cpu."
    )
    logger.info(f'Using device {self.device}')

    # load the model
    model_file = self.manifest['model']['modelFile']
    model_path = os.path.join(model_dir, model_file)
    if os.path.isfile(model_path):
        self.model = AutoModelForSequenceClassification.from_pretrained(model_dir)
        self.model.to(self.device)
        self.model.eval()
        logger.info('Successfully loaded model from {model_file}')
    else:
        raise RuntimeError('Missing the file')

    # load tokenizer
    self.tokenizer = AutoTokenizer.from_pretrained(model_dir)
    if self.tokenizer is not None:
        logger.info('Successfully loaded tokenizer')
    else:
        raise RuntimeError('Missing tokenizer object')

    # load mapping file
    mapping_file_path = os.path.join(model_dir, 'index_to_name.json')
    if os.path.isfile(mapping_file_path):
        with open(mapping_file_path) as f:
            self.mapping = json.load(f)
        logger.info('Successfully loaded file')
    else:
        logger.warning('Mapping file is missing)
    self.initialized = True
You can also try this code with Online Python Compiler
Now, we will use the preprocessing function. This function takes a request, unpacks the information, and preprocesses it.
We can analyze the design of the request object pushed into the preprocess operation by adding a log in our model handler. We'll send a POST request with our sample_input.json file to localhost:8080/predictions/<MODEL_NAME> to achieve this.
The request object is a list containing a dictionary {'body': sample_input.json}. Let's complete the preprocessing operation.
Python
Python
def preprocess(self, requests):
    "Tokenize the input text using the model tokenizer and convert
    it into a PyTorch tensor
    Args:
        requests: the requests object in the form
         [{'body' or ('data'): input.json file}]
    """
    # unpack the data
    data = requests[0].get('body')
    if data is None:
        data = requests[0].get('data')
    inp_x = data.get('input')
    # tokenize
    tokenized_inp = self.tokenizer(inp_x,
                                    padding=True,
                                    return_tensors='pt')
    logger.info('Tokenization is completed!')
    return tokenized_inp
You can also try this code with Online Python Compiler
We have one more function left to create, called the postprocess function. This function is essential because it helps us convert the output of our model into a list of words.
Python
Python
def postprocess(self, outputs: list):
    """
    map the model's integer output to their corresponding string labels using the mapping available in index_to_name.json
    Args:
        outputs (list): model outputs
    Returns:
        List: the corresponding string labels
    """
    preds = [self.mapping[str(label)] for label in outputs]
    logger.info(f‘PREDICTED LABELS: {preds}')
    return [preds]
You can also try this code with Online Python Compiler
Now, let's check if we served our model correctly without any problems. We can use the following command to check if the deployed TorchServe API is available.
Python
Python
! curl http://localhost:8080/ping
You can also try this code with Online Python Compiler
You can send a GET request to localhost:8080/ping. It returns the status of the server to you.
Frequently Asked Questions
What is TorchServe?
TorchServe is a PyTorch open-source model serving library that makes deploying machine learning models for inference in real-world settings easier.
How can a PyTorch model be exported for TorchServe?
When exporting a PyTorch model for TorchServe, torch.jit.trace or torch.jit.script generates a TorchScript representation of the model's state dictionary (parameters).
What is TorchScript?
TorchScript is a method for serializing and refining PyTorch models for deployment and inference that is more effective. To enable quicker execution and deployment across several platforms, it transforms PyTorch models into a transportable intermediate representation.
How can we start a TorchServe instance?
A configuration file containing the model(s) to serve, the host and port settings, and other details is usually created before starting a TorchServe instance. After that, you issue the TorchServe command while specifying the configuration file's location.
What are the advantages of deploying models with TorchServe?
To enable effective and concurrent model execution, TorchServe automatically handles model loading, inference, and scaling. PyTorch models may be more easily deployed in production while maintaining excellent performance thanks to its multi-model serving, batching, and GPU support capabilities.
Conclusion
This article discusses TorchServe and its unique features that make it attractive to developers. We discuss different steps involved in exporting models for serving using TorchServe. We explore how we can export our model to our local machine. We even learned how we can create a Model Handler. We also discussed how we can save our model and test it and identify the status of our network.
Do check out the link to learn more about such topic
You can find more informative articles or blogs on our platform. You can also practice more coding problems and prepare for interview questions from well-known companies on your platform, Coding Ninjas Studio.


 6+ registered

