


Introduction
In this blog, we will look into the two most common and frequently used tools in Blender’s modeling and animation phases. These tools are Extrude and Snap. But before jumping onto these topics, let's first understand what is a Blender.
What is a Blender?
Blender is a free, open-source program that is capable of bringing artists’ imagination to real-world visible to human eyes through two-dimensional, three-dimensional, or multi-dimensional graphics.
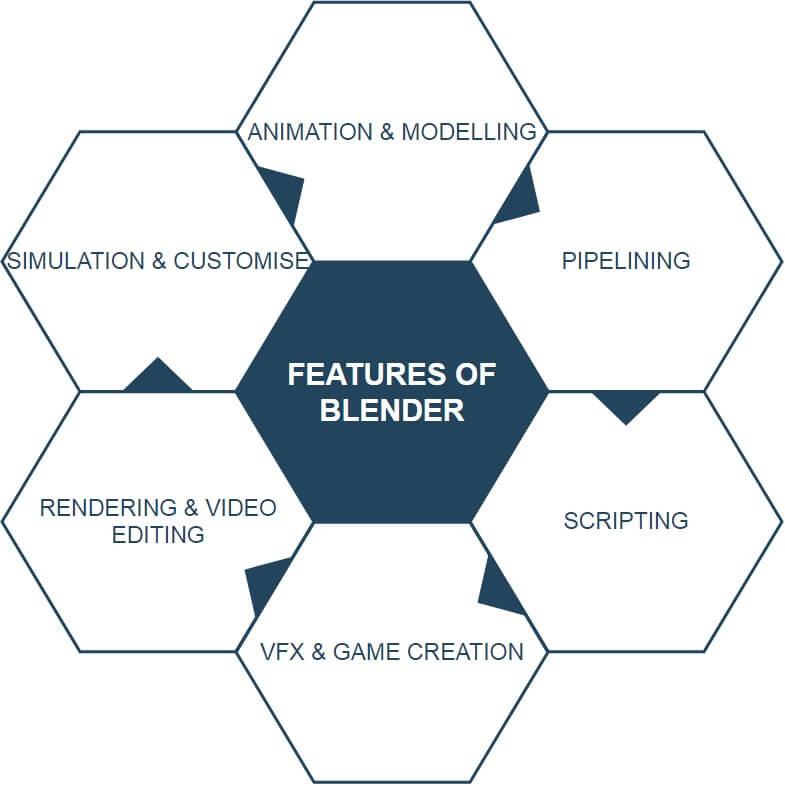
Features of Blender
But, it was not always that way. It was developed as an ‘in-house’ application by Dutch animation Studio ‘NeoGeo’. After that, it became shareware. Later, it was put into GNU General Public Licence in 2002 by Ton Roosendaal- ‘driving force behind creating Blender’.
Extrude tool
In the simplest sense, Extrude tool takes edges, surfaces, or groups of surfaces and extrudes them into 3-D. The properties are duplicated, and thus, it helps in easy model creation promptly.
Below are the steps on how to use the ‘Extrude’ tool:
Step 1: References to enable Extrude Mode
This can be done in many ways, that is, either by switching mode to Edit, by using Shortcut key ‘E’ from the keyboard, selecting Mesh in Menu, or by using the toolbar.
In this article, we will perform extruding using the ‘Edit’ mode.
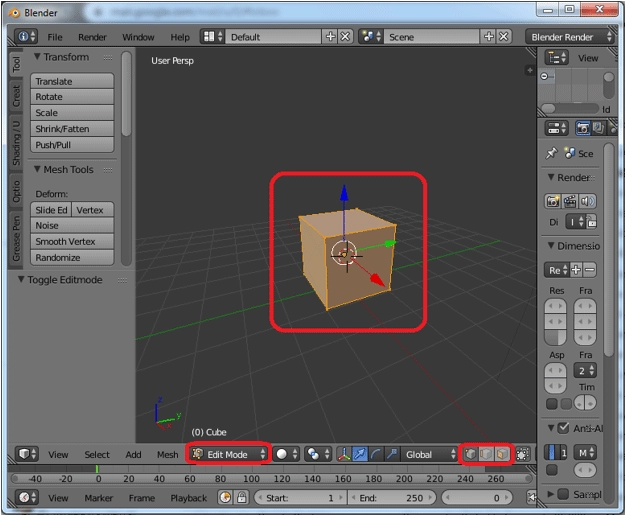
Step 2: Enabling’ Edit’ Mode
Firstly, we will change the environment from Edit Mode to ‘perform Edits’. Now, we will have radio buttons for various properties, such as edges, surfaces, and groups of surfaces, available on the same bar. Based on the necessities of creation, we switch between ‘Object’, ‘Edit’, and ‘performing Edits’ modes.
Step 3: Vertices’ Extrusion
We will start with extruding vertices for the model. For this, we will choose the first radio button, select the vertices to be extruded, and press ‘E’ from the keyboard. This will create a new vertex. With the help of the cursor, we will move new vertices to the desired location.
The edge between already present vertices and newly created vertices connects them, as shown in the figure below.
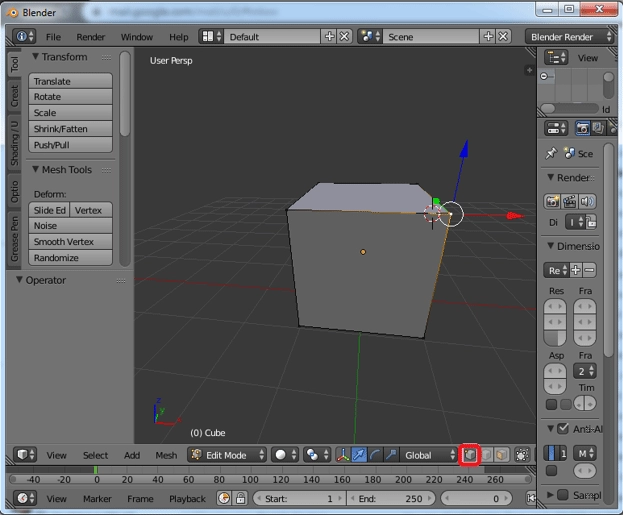
Step 4: Edges’ Extrusion
Now, it’s the turn for edges to be extruded. The selection of radio buttons has to go to edges from vertices. Edges that are to be extruded must be selected. Press ‘E’ from the keyboard to create a new edge on top of the existing one. The cursor is used to make desired changes in the location of new edges.
The new face is created between already present edges and newly created edges connect them, as shown in the figure below.
It is essential to know that we can extrude vertices and edges together. For this, we will long-press the ‘Alt’ key and select whichever vertices and edges we want to extrude at once. After that, we need to press ‘E’ from the keyboard to extrude the selection made. Using the cursor, we can change the location of extruded properties as per the requirements.
Step 5: Faces’ Extrusion
To perform this extrusion, we have to select the ‘face’ radio button. Then, to extrude, press ‘E’ from the keyboard. Using the cursor, the location of the new extruded face is changed.
As shown in the image below, all other edges will also create surrounding faces, 4 in number on each side.

It is important to note that we can extrude vertex, edge, or face individually. Though this way of extrusion is time-consuming, it is still used as per the requirements of the project.
Step 6: Directions’ Extrusion
Extrusion can follow up in any direction in 3D- x, y, and z. To activate extrusion and duplicate properties, we will press the ‘E’ key and ‘Z’ key to release. In case, we want to change the height of extruded properties manually, we will press ‘2’.
TIP: Avoid clicking ‘E’ twice as this will duplicate the properties twice, which will result in an error afterward.
Snap tool
Most straightforwardly, the ‘Snap’ tool actually functions to help you move things more precisely and make things snap to different lengths inside of your blender models. Basically, it adds precision to your model.
In this article, we will look into two types of operations’ Snap’ performs, that is, one using the Snap menu and the other will be Transform Snapping.
Using Snap Menu
References to enable the ‘snap’ tool: This can be done in many ways, that is, either by switching mode to pose, by using the Shortcut key ‘Shift+S’ from the keyboard, selecting Snap-in Menu. There comes several options with this menu that will move the cursor or selection to desired geometric location.
The table below briefly describes the options under the ‘Snap’ Menu-
| Selection to Grid | It will snap the presently chosen property to the closest grid point. |
| Selection to Cursor | It will change the location of every chosen property to where the cursor is located. |
| Selection to Cursor (offset) | In case, more than one property is selected, no individual movement takes place. But, they are moved at once to the geometric location, referring to the position of the 3D cursor. |
| Selection to Active | It will move the chosen property to the active object’s origin. |
| Cursor to Selected | It will change the location of the cursor to the center of the presently selected property. |
| Cursor to Center | The cursor will be placed at universal origin (0,0). |
| Cursor to Grid | The cursor will be placed at the closest grid point. |
| Cursor to Active | The cursor will be placed at the origin of the last selected property. |
Transform Snapping
This type of snap operation is used to perform transformations, i.e., rotate, scale, and translate.
References to enable ‘Snap’ Operations: This can be done in many ways, that is, either by switching mode to pose, by using the Shortcut key ‘Shift+Tab’ from the keyboard, and selecting Snap-in Menu.
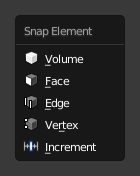
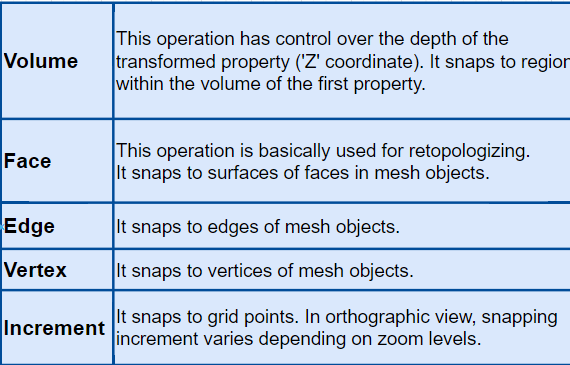
1. SNAP ELEMENT OPERATIONS
The table below describes various snap operations in the ‘Snap Element’ Menu-
 |
 |
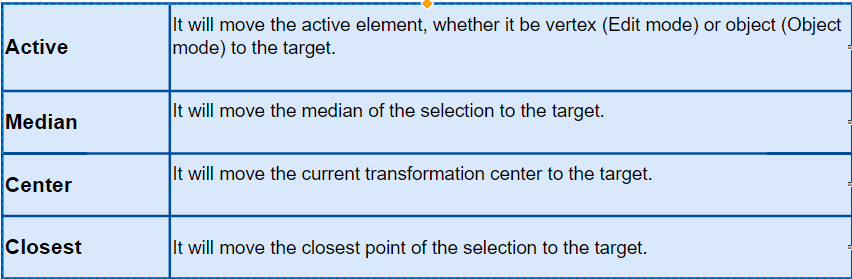
2. SNAP TARGET OPERATIONS
Target Operations come to the active state when either of the properties such as vertex, face, edge, or volume is chosen.
The table below describes various snap operations in the ‘Snap Target’ Menu-
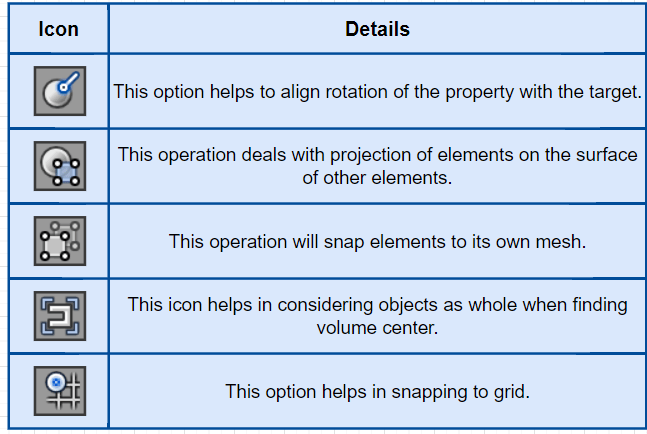
3. ADDITIONAL SNAP OPTIONS
FAQs
What makes working with Blender so easy?
There are multiple reasons which make Blender user-friendly and convenient to use. They are- default shortcuts, interface mode, visual analysis, and stimulation.
What all can be done using Blender?
Animation films, VFX scenes, Gaming concepts and models, Engineering presentations, working on new mechanical designs, and learning for students are some of the vital functions of Blender.
Will this be able to help create career opportunities?
Definitely, Blender comes with vast opportunities in various fields- 3D design, VFX, and gaming concepts.


 9+ registered

