What is a Haar-Cascade Classifier?
We use Haar-Cascades in Machine Learning for Object Detection. Alfred Haar first proposed Haar-Cascade in 1909.
In a grayscale image, each pixel has a value from 0 to 255, where 0 represents total black, and 255 represents a whole white pixel
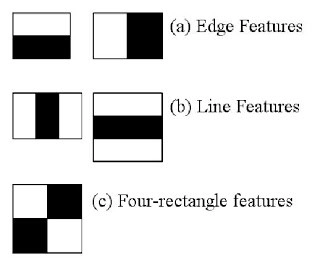
To detect features from a person’s face, we first obtain the Haar Features using convolutional kernels.

The edge-features kernel can effectively detect the vertical & horizontal edges in an image. The line-features kernel is adequate in determining the lines in an image; a line is basically where light pixels are between dark pixels or vice-versa. Similarly, the four-rectangle kernel is also used to detect some essential features in an image.
After applying the convolutional kernels, the features that we get are the values received by subtracting the sum of pixels under the white rectangles from the pixels under the black rectangles.
Feature Detection using Haar Cascades
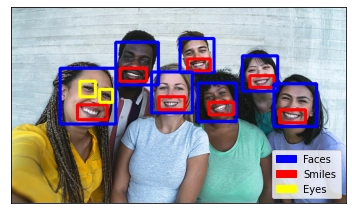
This section will detect features like faces, smiles, and eyes in a group picture using Haar Classifiers in OpenCV.

Original Image
Using the CascadeClassifer() method, we can use the already pre-trained models and find features on the person’s face. All the haar-cascades are available at this github-link.
Step 1: Importing Necessary Libraries
import numpy as np
import cv2
import matplotlib.pyplot as plt
import matplotlib.patches as mpatchesStep 2: Loading pre-trained haar-cascade object classifiers
smile_cascade = cv2.CascadeClassifier(cv2.data.haarcascades + 'haarcascade_smile.xml')
face_cascade = cv2.CascadeClassifier(cv2.data.haarcascades + 'haarcascade_frontalface_default.xml')
eye_cascade = cv2.CascadeClassifier(cv2.data.haarcascades + 'haarcascade_eye.xml')Step 3: Reading the image
img = cv2.imread('group-photo.jpg')

# Using cvtColor we'll convert the image from RGB colorspace to grayscale
gray = cv2.cvtColor(img, cv2.COLOR_BGR2GRAY)Step 4: Object Detection
# Detecting all the faces in the image
faces = face_cascade.detectMultiScale(gray, 1.1, 2)

# Looping through the faces
for(x, y, w, h) in faces:
    img = cv2.rectangle(img, (x,y), (x+w,y+h), (255,0,0), 3)
    roi_gray = gray[y:y+h, x:x+w]
    roi_color = img[y:y+h, x:x+w]

    # Detecting smile on the face
    smiles = smile_cascade.detectMultiScale(roi_gray, minNeighbors=10)
    for(sx, sy, sw, sh) in smiles:
        cv2.rectangle(roi_color, (sx,sy), (sx+sw,sy+sh), (0,0,255), 3)

    # Detecting eyes on the face
    eyes = eye_cascade.detectMultiScale(roi_gray)
    for(ex, ey, ew, eh) in eyes:
cv2.rectangle(roi_color, (ex,ey), (ex+ew,ey+eh), (0,255,255), 3)Step 5: Plotting results of the detection
plt.xticks([])
plt.yticks([])

face_patch = mpatches.Patch(color='blue', label='Faces')
smile_patch = mpatches.Patch(color='red', label='Smiles')
eye_patch = mpatches.Patch(color='yellow', label='Eyes')

plt.legend(handles=[face_patch, smile_patch, eye_patch], loc='lower right', fontsize=10)

imgplot = plt.imshow(cv2.cvtColor(img, cv2.COLOR_BGR2RGB))
Also read, Sampling and Quantization


