Table of contents
1.
Introduction
2.
Normal FAB
3.
Mini FAB
4.
FAQs
5.
Key Takeaways
Last Updated: Mar 27, 2024
Easy

Floating Action Button

Career growth poll
Do you think IIT Guwahati certified course can help you in your career?

Introduction

Floating Action buttons are a bit different from the regular buttons. They are UI implemented for primary or promoted actions. There are four basic types of Floating Actions buttons, namely.

  • Normal Floating Action buttons
  • Mini Floating Action buttons
  • Extended Floating Action buttons
  • Theming Floating Action buttons

This article will discuss the two most commonly used Floating Action buttons, Normal Floating Action buttons and Mini Floating Action buttons.

Normal FAB

The Normal FAB(Floating Action buttons) are not contracted or expanded and are of regular size. The Normal FAB is of 56 dp radius.

First, we will have to add the following dependency to the app>source>build.gradle file

implementation “com.google.android.material:material:1.3.0-alpha02”

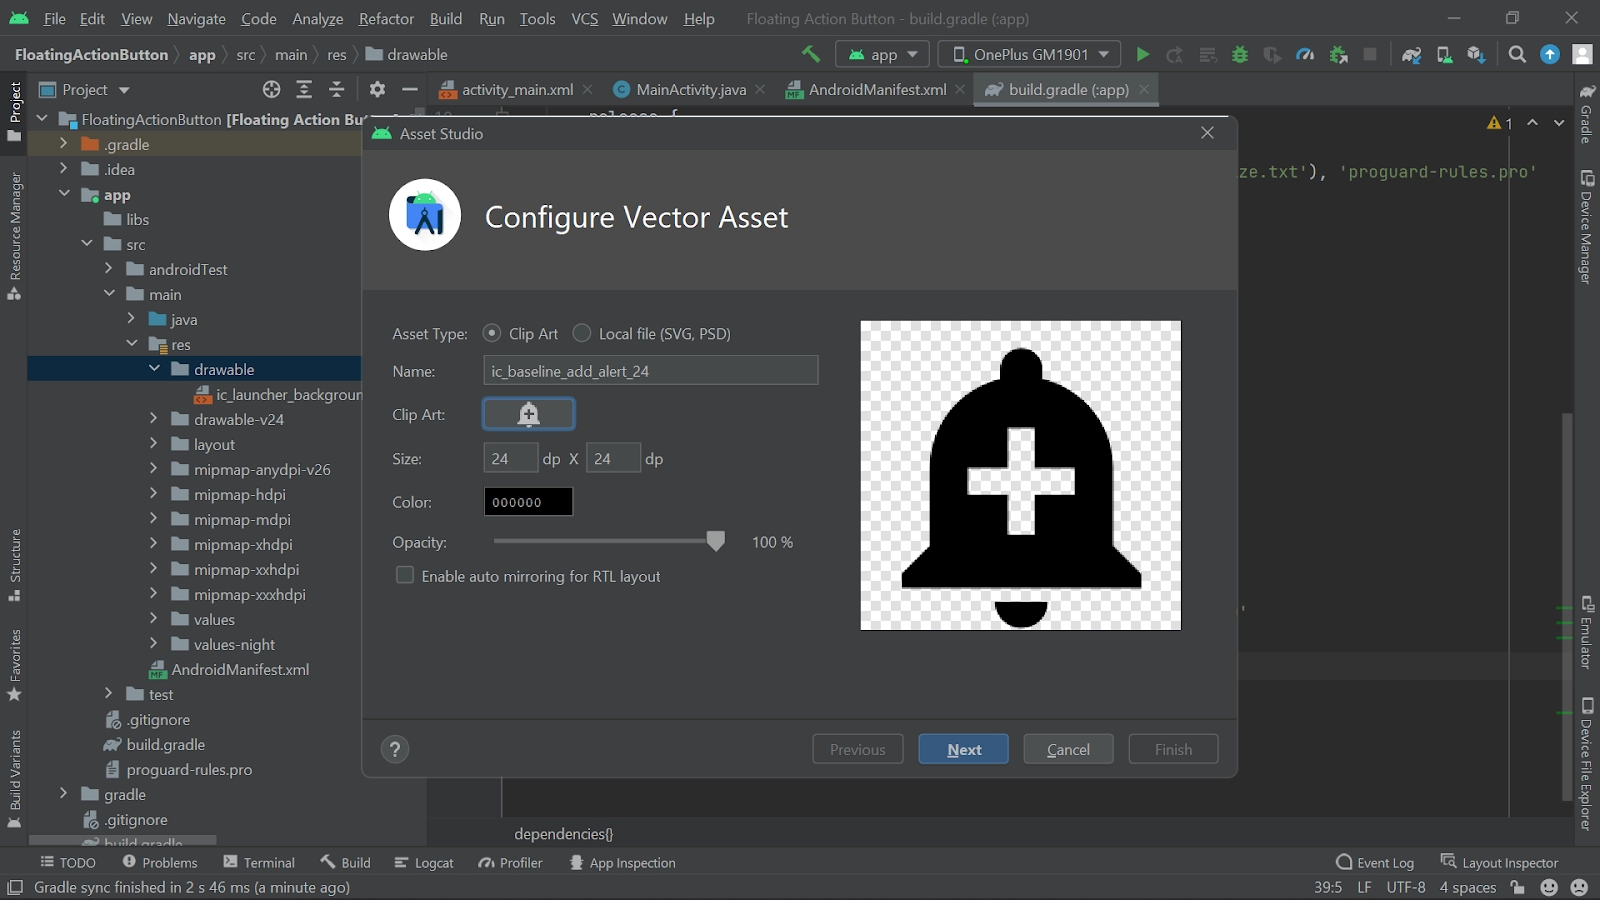
Second, we add a shape to the button using a vector asset to app>res>drawable folder.

Third, we will add the following code to the activity_main.xml file,

activity_main.xml

<?xml version="1.0" encoding="utf-8"?>
<androidx.constraintlayout.widget.ConstraintLayout
    xmlns:android="http://schemas.android.com/apk/res/android"
    xmlns:tools="http://schemas.android.com/tools"
    xmlns:app="http://schemas.android.com/apk/res-auto"
    android:layout_height="match_parent"    
    android:layout_width="match_parent"
    tools:ignore="HardcodedText">
    tools:context=".MainActivity" 
<com.google.android.material.floatingactionbutton.FloatingActionButton
        android:id="@+id/add_fab"
        android:layout_width="wrap_content"
        android:layout_height="wrap_content"
        android:layout_gravity="end"
        android:layout_marginEnd="16dp"
        android:layout_marginBottom="16dp"
        android:src="@drawable/ic_baseline_add_alert_24"
        app:fabSize="normal"
        app:layout_constraintBottom_toBottomOf="parent"
        app:layout_constraintEnd_toEndOf="parent" />
    <TextView
        android:id="@+id/add_alert_action_text"
        android:layout_width="wrap_content"
        android:layout_height="wrap_content"
        android:layout_marginEnd="8dp"
        android:text="Add Alert"
        app:layout_constraintBottom_toBottomOf="@+id/add_fab"
        app:layout_constraintEnd_toStartOf="@+id/add_fab"
        app:layout_constraintTop_toTopOf="@+id/add_fab" />
</androidx.constraintlayout.widget.ConstraintLayout>


Fourth, we will add the following code to the MainActivity.java file,

MainActivity.java

package com.example.floatingactionbutton;


import android.os.Bundle;
import android.view.View;
import android.widget.TextView;
import android.widget.Toast;
import androidx.appcompat.app.AppCompatActivity;
import com.google.android.material.floatingactionbutton.FloatingActionButton;


public class MainActivity extends AppCompatActivity {


    FloatingActionButton mAddFab, mAddAlarmFab, mAddPersonFab;


    TextView addAlarmActionText, addPersonActionText;


    Boolean isAllFabsVisible;


    @Override
    protected void onCreate(Bundle savedInstanceState) {
        super.onCreate(savedInstanceState);
        setContentView(R.layout.activity_main);


        mAddFab = findViewById(R.id.add_fab);


        addAlarmActionText = findViewById(R.id.add_alert_action_text);
        
        isAllFabsVisible = false;


        mAddFab.setOnClickListener(
                new View.OnClickListener() {
                    @Override
                    public void onClick(View view) {
                        Toast.makeText(MainActivity.this, "Alert Added", Toast.LENGTH_SHORT).show();
                    }
                });


    }
}
You can also try this code with Online Java Compiler
Run Code

Mini FAB

All the steps for the Mini Floating Action button are the same as the Normal Floating Action button, we just have to make the following changes to the activity_main.xml file. The Mini FAB is of 40 dp radius.

activity_main.xml

<?xml version="1.0" encoding="utf-8"?>
<androidx.constraintlayout.widget.ConstraintLayout
    xmlns:android="http://schemas.android.com/apk/res/android"
    xmlns:tools="http://schemas.android.com/tools"
    xmlns:app="http://schemas.android.com/apk/res-auto"
    android:layout_height="match_parent"    
    android:layout_width="match_parent"
    tools:ignore="HardcodedText">
    tools:context=".MainActivity" 


    <com.google.android.material.floatingactionbutton.FloatingActionButton
        android:id="@+id/add_fab"
        android:layout_width="wrap_content"
        android:layout_height="wrap_content"
        android:layout_gravity="end"
        android:layout_marginEnd="16dp"
        android:layout_marginBottom="16dp"
        android:src="@drawable/ic_baseline_add_alert_24"
        app:fabSize="mini"
        app:layout_constraintBottom_toBottomOf="parent"
        app:layout_constraintEnd_toEndOf="parent" />
    <TextView
        android:id="@+id/add_alert_action_text"
        android:layout_width="wrap_content"
        android:layout_height="wrap_content"
        android:layout_marginEnd="8dp"
        android:text="Add Alert"
        app:layout_constraintBottom_toBottomOf="@+id/add_fab"
        app:layout_constraintEnd_toStartOf="@+id/add_fab"
        app:layout_constraintTop_toTopOf="@+id/add_fab" />


</androidx.constraintlayout.widget.ConstraintLayout>


MainActivity.java

package com.example.floatingactionbutton;


import android.os.Bundle;
import android.view.View;
import android.widget.TextView;
import android.widget.Toast;
import androidx.appcompat.app.AppCompatActivity;
import com.google.android.material.floatingactionbutton.FloatingActionButton;


public class MainActivity extends AppCompatActivity {


    FloatingActionButton mAddFab, mAddAlarmFab, mAddPersonFab;


    TextView addAlarmActionText, addPersonActionText;


    Boolean isAllFabsVisible;


    @Override
    protected void onCreate(Bundle savedInstanceState) {
        super.onCreate(savedInstanceState);
        setContentView(R.layout.activity_main);


        mAddFab = findViewById(R.id.add_fab);


        addAlarmActionText = findViewById(R.id.add_alert_action_text);


        isAllFabsVisible = false;


        mAddFab.setOnClickListener(
                new View.OnClickListener() {
                    @Override
                    public void onClick(View view) {
                        Toast.makeText(MainActivity.this, "Alert Added", Toast.LENGTH_SHORT).show();
                    }
                });


    }
}
You can also try this code with Online Java Compiler
Run Code

FAQs

  1. What are Floating Action Buttons?
    Floating Action buttons are a bit different from the regular buttons. They are UI implemented for primary or promoted actions.
  2. What is Kotlin?
    Kotlin is a general-purpose, cross-platform programming language. It is used for Android development. It is designed such that it interoperates efficiently with Java.
  3. What is Java?
    Java is an object-oriented, class-based, high-level programming language. It is based on the concept of WORA (write once use anywhere) for developer ease.
  4. What are Normal Floating Action Buttons?
    The Normal FAB(Floating Action buttons) are not contracted or expanded and are of regular size. The Normal FAB is of 56 dp radius.
  5.  What can I do with Android Studio?
    Android Studio is a unified platform for Application Development. It provides structured code modules for independent testing, debugging, and building.

Key Takeaways

This blog covered all the necessary points about Floating Action buttons in Android Development. We further looked at the codes to learn how to implement these buttons.

Don’t stop here; check out Coding Ninjas for more unique courses and guided paths. Also, try Coding Ninjas Studio for more exciting articles, interview experiences, and fantastic Data Structures and Algorithms problems.

Live masterclass