Common animation patterns
Most UX or motion designers discover that some animation patterns are employed repeatedly when building a UI. This section contains some of the most often used animation patterns and directs you to resources where you may learn more.
Animated list or grid
This pattern includes animating the addition or removal of elements from a list or grid.
Shared element transition
The user picks an element—often an image—from the page in this pattern, and the UI animates the selected piece to a new page with additional information. Using the Hero widget in Flutter, we can simply design shared element transitions between routes (pages).
Staggered animation
Animations that are broken down into smaller motions and have some of the motion delayed. The tiny animations might be consecutive or overlapped partially or fully.
Tweens and their Applications
Tweens are one of the essential notions in Flutter animations or in animating anything in Flutter. Tweening is an abbreviation for "in-betweening."
For example, We have a blue box with a yellow backdrop that we must animate to alter the color. An abrupt color shift now appears to the user as unappealing. The transition must be painless. However, we are unable to depict all of the hues in between. In these circumstances, we establish a ColorTween, which provides us with all of the values between blue and yellow so that we may show them.
A Tween is a value between two values, such as colors, numbers, alignments, and nearly anything else.
The tween value does not have to be obtained directly by the widget. The animation is given a tween, which provides the proper values at the right moment.
We can use Tween<T> to specify the Tween in Flutter or utilize premade classes like ColorTween, mainly built for this.
Example:
ColorTween {
    begin: color.green,
    end: color.blue,
}
To learn more about Flutter, check out Flutter guided path on Coding Ninjas Studio.
Animation Controllers
As the name implies, an animation controller is a method of controlling (triggering, flinging, or stopping) an animation. The controller's primary job, however, is to drive the animation. This implies that it will cause the animation's value to change and return a new value from the Tween based on the animation's advancement.
Every Flutter animation requires the creation of at least two elements:
- A tween to produce animation values
- An AnimationController as a parent
An AnimationController provides the animation's progression from 0 to 1, whereas the animation provides the actual tween value anticipated by the widget. Once the navigation is complete, the animation controllers must be removed. The AnimationController also allows us to modify the animation's behavior. We can, for example, use controller.repeat() to repeat the animation. However, it should be noted that the Flutter animations we build are not bound to a single object but rather may be used by any widget in the hierarchy as needed.
That's all! You should now have a strong knowledge of the fundamental components. Let's get started on our animation right away!
Making a basic Flutter animation
Let's begin by creating a Flutter project.
If you haven't installed Flutter yet, check out our Flutter installation blog on Coding Ninjas Studio.
Creating a Project
To begin, click File -> New -> Flutter project and then Flutter application.
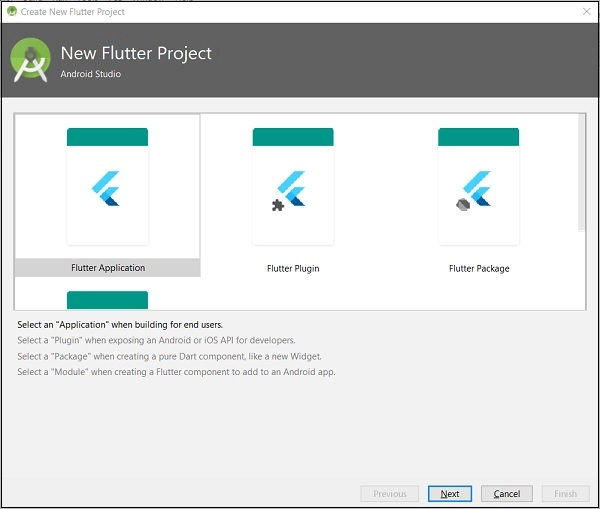
Leave everything else alone and press the Finish button.
Basic Code setup
Let's remove the code from main.dart and replace it with the code shown below:
import 'package:Flutter/material.dart';
void main() => runApp(MyApp());
class MyApp extends StatelessWidget {
 // This widget serves as the foundation of your application.
 @override
 Widget build(BuildContext context) {
   return MaterialApp(
     title: 'Flutter Demo',
     theme: ThemeData(
       // This is your application's theme.
      primarySwatch: Colors.blue,
     ),
     home: MyHomePage(),
   );
 }
}

class MyHomePage extends StatefulWidget {
 @override
 _MyHomePageState createState() => _MyHomePageState();
}

class _MyHomePageState extends State {
 @override
 Widget build(BuildContext context) {
   return Scaffold(
     appBar: AppBar(
       title: Text("Animation Demo(Coding Ninjas)"),
     ),
   );
 }
}
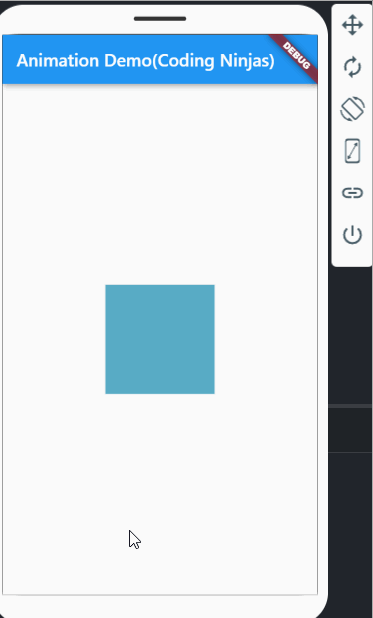
This results in a blank screen with an AppBar:
Configuring AnimationControllers and Animations
We must define our animations and the controller that will control the animations. Before we begin, we must add a vsync mixin to our AnimationController class.
This mixin adds 'ticks' to the controller that allow it to update values over time. Finally, we configured our animation controller and animations in the following manner:
late AnimationController controller;
late Animation colorAnimation;
late Animation sizeAnimation;

@override
void initState() {
 super.initState();
 controller = AnimationController(vsync: this, duration: Duration(seconds: 2));
 colorAnimation = ColorTween(begin: Colors.blue, end: Colors.yellow).animate(controller);
 sizeAnimation = Tween<double>(begin: 100.0, end: 200.0).animate(controller);
}
When creating a widget, the first method that runs is initState(). We initialize our variables here. We supply the vsync argument to the controller, which the SingleTickerProviderStateMixin provides we introduced to the State class. We've also set the animation's length to 2 seconds.
Next, we'll use the Tweens we discussed before for this animation.
ColorTween(begin: Colors.blue, end: Colors.yellow)
This generates a tween that begins with blue and finishes with yellow and any hues. We utilize the animate() function, handing it to our AnimationController, to build an animation. We'll perform the same for the sizeAnimation animation, starting with 100.0 and ending with 200.0.
Building the Box
We may use the Container() widget to make a box by specifying its height, width, and color.
@override
Widget build(BuildContext context) {
 return Scaffold(
   appBar: AppBar(
     title: Text("Animation Demo(Coding Ninjas)"),
   ),
   body: Center(
     child: Container(
       height: sizeAnimation.value,
       width: sizeAnimation.value,
       color: colorAnimation.value,
     ),
   ),
 );
}
The current value of the animation may be obtained by simply using the animationName.value. We've also included the Center widget to help you centre the box on the screen.
Starting the Animation
We may utilize the controller we established before since it controls any animations linked to it to begin the animation. Controller.forward() is the easiest method to do it, and controller.reverse() is the simplest way to reverse it (). However, the controller also provides us with additional possibilities, such as controller.repeat(), which loops the animation indefinitely, and controller fling() is a function that flings (runs an animation fast regardless of time). If you try to execute the animation right now, it will fail since we are not recreating the box as the animation settings change.
Rebuilding the box on animation value change
As previously said, we construct the box using the setState() method. The question is, when do we rebuild the box? Is it before, during, or following the animation? When the progression value changes, we want to reload the animation (animation goes a step ahead). The AnimationController is in charge of tracking the animation's progress. We may use it to determine when the animation is updated.
We will add a listener to the controller and rebuild on change.
// In initState
controller.addListener(() {
 setState(() {});
});
And we're done!
Frequently Asked Questions
How to show notifications with animation in Flutter?
You can use elegant notification dependency to show notifications animation. To utilize this elegant notification package, you must include it as a dependency in the pubspec.yaml file.
dependencies:
elegant_notification: ^1.5.2
Flutter animations, are they smooth?
Flutter has many cross-platform development tools, including extensive support for smooth and responsive animations.
What is vsync in Flutter animation?
vsync essentially maintains track of the screen so that Flutter does not generate the animation when the screen is not visible.
What are hero animations?
You've undoubtedly seen a lot of hero animations. A screen, for example, may show a list of thumbnails depicting things for sale. Selecting an item takes you to a new screen with more information and a "Buy" button. In Flutter, flying an image from one screen to another is referred to as a hero animation. However, the same action is frequently referred to as a shared element transition.
Conclusion
In this article, we extensively discussed what Flutter animation is and how to use it in the Flutter project.
We hope that this blog has helped you enhance your knowledge regarding Flutter animation, and if you would like to learn more, check out our articles on the difference between Flutter and react native, richtext widget in a Flutter, Flutter interview questions, the growing demand for Google’s Flutter. Do upvote our blog to help other ninjas grow. Happy Coding!


 6+ registered

