Steps to Implement Flutter Calendar
Let's go over how to make and show a flutter calendar step by step.
Step 1: Make a new Flutter project in the IDE you're using and name it.
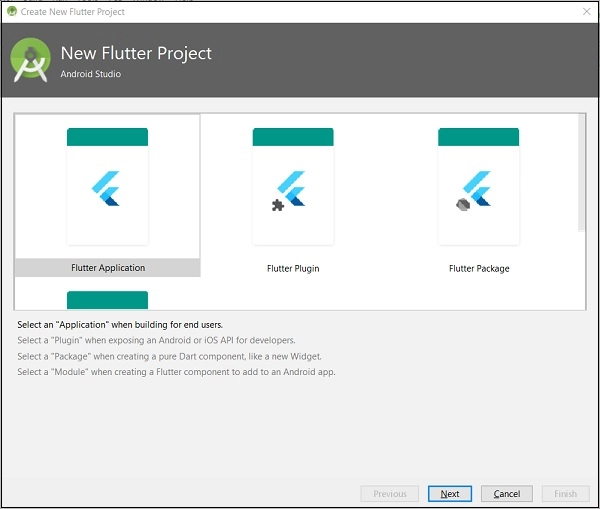
Source: https://www.tutorialspoint.com/flutter/images/flutter_application_next.jpg
Leave everything else alone and press the Finish button.
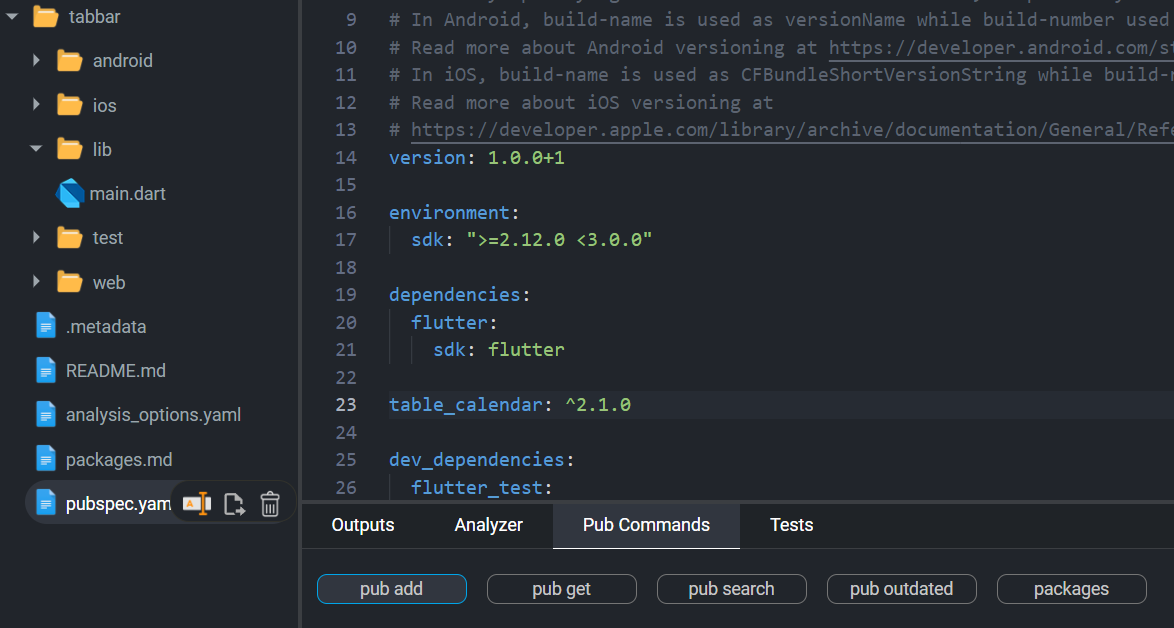
Step 2: Navigate to the lib folder and open the pubspec.yaml file in the project. The table calendar dependency must be added to this file as follows:
  flutter:
    sdk: flutter
  table_calendar: ^2.1.0
Step 3: After adding the dependency mentioned above, we must execute the following command to obtain the necessary packages:

Step 4: Then, in the dart file, import the dependency as follows:
import 'package:table_calendar/table_calendar.dart';

Step 5: The flutter calendar widget must then be added as a child of any widget. Here, we'll make the flutter calendar widget a child of the scaffold widget.
 @override
  Widget build(BuildContext context) {
    return MaterialApp(
      debugShowCheckedModeBanner: false,
      home: Scaffold(
        body: SafeArea(
          child: TableCalendar(
            firstDay: DateTime.utc(2010, 10, 20),
            lastDay: DateTime.utc(2040, 10, 20),
            focusedDay: DateTime.now(),
            headerVisible: true,
            daysOfWeekVisible: true,
            sixWeekMonthsEnforced: true,
            shouldFillViewport: false,
            headerStyle: HeaderStyle(titleTextStyle: TextStyle(fontSize: 20, color: Colors.deepPurple, fontWeight: FontWeight.w800)),
            calendarStyle: CalendarStyle(todayTextStyle: TextStyle(fontSize: 20, color: Colors.white, fontWeight: FontWeight.bold)),
          ),
        ),
      ),
    );
  }
Step 6: Now, we can write our logic and style the flutter calendar to display it.
Example
Let's see an example of having features like updating focused day. Follow the steps below to implement it.
Step 1: Create a dart file in lib folder and name it basics_example.dart, and paste the code given below.
import 'package:flutter/material.dart';
import 'package:table_calendar/table_calendar.dart';

class TableBasicsExample extends StatefulWidget {
  @override
  _TableBasicsExampleState createState() => _TableBasicsExampleState();
}

class _TableBasicsExampleState extends State {
  CalendarFormat _calendarFormat = CalendarFormat.month;
  DateTime _focusedDay = DateTime.now();
  DateTime? _selectedDay;
  @override
  Widget build(BuildContext context) {
    return Scaffold(
      appBar: AppBar(
        title: Text('TableCalendar(Coding Ninjas)'),
      ),
      body: TableCalendar(
        firstDay: DateTime.utc(2010, 10, 20),
        lastDay: DateTime.utc(2040, 10, 20),
        focusedDay: _focusedDay,
        calendarFormat: _calendarFormat,
        selectedDayPredicate: (day) {
          // Use `selectedDayPredicate` to determine which day is currently selected.
          // If this returns true, then `day` will be marked as selected.
          // Using `isSameDay` is recommended to disregard
          // the time-part of compared DateTime objects.
          return isSameDay(_selectedDay, day);
        },
        onDaySelected: (selectedDay, focusedDay) {
          if (!isSameDay(_selectedDay, selectedDay)) {
            // Call `setState()` when updating the selected day
            setState(() {
              _selectedDay = selectedDay;
              _focusedDay = focusedDay;
            });
          }
        },
        onFormatChanged: (format) {
          if (_calendarFormat != format) {
            // Call `setState()` when updating calendar format
            setState(() {
              _calendarFormat = format;
            });
          }
        },
        onPageChanged: (focusedDay) {
          // No need to call `setState()` here
          _focusedDay = focusedDay;
        },
      ),
    );
  }
}
Step 2: Insert the code given below in the main.dart
import 'package:flutter/material.dart';
import 'package:intl/date_symbol_data_local.dart';
import '/basics_example.dart';

void main() {
  initializeDateFormatting().then((_) => runApp(MyApp()));
}

class MyApp extends StatelessWidget {
  @override
  Widget build(BuildContext context) {
    return MaterialApp(
      title: 'TableCalendar(Coding Ninjas)',
      theme: ThemeData(
        primarySwatch: Colors.orange,
      ),
      home: StartPage(),
    );
  }
}

class StartPage extends StatefulWidget {
  @override
  _StartPageState createState() => _StartPageState();
}

class _StartPageState extends State {
  @override
  Widget build(BuildContext context) {
    return Scaffold(
      appBar: AppBar(
        title: Text('TableCalendar(Coding Ninjas)'),
      ),
      body: Center(
        child: Column(
          mainAxisAlignment: MainAxisAlignment.center,
          children: [
            const SizedBox(height: 20.0),
            ElevatedButton(
              child: Text('Open Calendar'),
              onPressed: () => Navigator.push(
                context,
                MaterialPageRoute(builder: (_) => TableBasicsExample()),
              ),
            ),
            const SizedBox(height: 20.0),
          ],
        ),
      ),
    );
  }
}
Output
When we start the program in the device or emulator, we should see something like the picture below.
Frequently Asked Questions
How can we obtain the previous month on the flutter calendar?
We may utilise the subtract method to retrieve the previous month's Date.
DateTime pastMonth = DateTime. now(). subtract(Duration(days: 30));
In dart, how do you obtain today's Date?
The DateTime class may be used to acquire the current Date and the DateFormat class to format the Date.
What must information be supplied to the TableCalendar?
We can supply custom events to TableCalendar widget. To do so, use eventLoader property - we will be given a DateTime object, to which we need to assign a list of events.
What is Flutter Date Range Picker?
Using the Flutter Date Range Picker, users may quickly pick a single date, numerous dates, or a date range. To limit date choices, you may provide a minimum and a maximum number of days for the user to pick. You may also blackout or restrict days so that the user cannot select them.
Conclusion
In this article, we have extensively discussed Flutter Calendar. We start with a brief introduction of the Flutter Calendar and then discuss the steps to implement it.
After reading about the Flutter Calendar, are you not feeling excited to read/explore more articles on the topic of Flutter? Don't worry; Coding Ninjas has you covered. To learn, see the difference between Flutter and react native, richtext widget in a Flutter, Flutter interview questions, and the growing demand for Google’s Flutter.
Refer to our Guided Path on Coding Ninjas Studio to upskill yourself in Data Structures and Algorithms, Competitive Programming, JavaScript, System Design, and many more! If you want to test your competency in coding, you may check out the mock test series and participate in the contests hosted on Coding Ninjas Studio! But if you have just started your learning process and are looking for questions asked by tech giants like Amazon, Microsoft, Uber, etc., you must look at the problems, interview experiences, and interview bundle for placement preparations.
Nevertheless, you may consider our paid courses to give your career an edge over others!
Do upvote our blogs if you find them helpful and engaging!
Happy Learning!


 6+ registered

