


Introduction
In this article, we will learn how to use the drawer widget in Flutter. A Flutter drawer is a side screen that is not visible. When shown, it is a sliding left menu that usually comprises significant links in the application and takes up half of the screen. To make a layout with a Material Design drawer in Flutter, combine the Drawer widget with a Scaffold.

Let’s get Started
Now we will make a drawer in a flutter. Open your favorite IDE and let’s start coding.
The steps in this recipe are as follows:
I. Construct a Scaffold
II. Include a drawer
III. Assemble the contents of the drawer.
IV. Use a program to close the drawer
Step 1: Construct a Scaffold
Wrap the Flutter drawer in a Scaffold widget to add it to the app. The Scaffold widget gives Material Design Guidelines-compliant apps a consistent visual framework. Special Material Design components, like Drawers, AppBars, and SnackBars, are also supported.
Scaffold(
  drawer: // Add a Drawer here in the next step.
);
Step 2: Include a drawer
To the Scaffold, add a drawer now. A drawer can be any widget, however, it's frequently ideal to use the Material Design-compliant Drawer widget from the material library.
Scaffold(
  drawer: Drawer(
    child: // Populate the Drawer in the next step.
  ),
);
Step 3: Assemble the contents of the drawer.
Add content to the Flutter Drawer now that it's up and running. Use a ListView for this example. While a Column widget might be used instead, ListView is more convenient because it allows users to scroll through the flutter drawer if the content takes up more space than the screen permits.
Add a DrawerHeader and two ListTile widgets to the ListView. See the list of recipes for further information on working with Lists.
Drawer(
/* To the drawer, add a ListView. If there isn't enough vertical space to accommodate
   everything in the drawer, the user can scroll through the alternatives.  */
  child: ListView(
    // Important: Remove any padding from the ListView.
    padding: EdgeInsets.zero,
    children: [
      const DrawerHeader(
        decoration: BoxDecoration(
          color: Colors.blue,
        ),
        child: Text('Drawer Header'),
      ),
      ListTile(
        title: const Text('Item 1'),
        onTap: () {
          // Update the state of the app.
          // ...
        },
      ),
      ListTile(
        title: const Text('Item 2'),
        onTap: () {
          // Update the state of the app.
          // ...
        },
      ),
    ],
  ),
);
Step 4: Use a program to close the flutter drawer.
You may wish to close the Flutter drawer once a user taps something. Use the Navigator to accomplish this.
Flutter adds the drawer to the navigation stack when it is opened by the user. As a result, use Navigator.pop to close the drawer (context).
ListTile(
  title: const Text('Item 1'),
  onTap: () {
    /* Update the state of the app
       ...
       Then close the drawer  */
    Navigator.pop(context);
  },
),
Step 5: Interactive example
import 'package:flutter/material.dart';
void main() => runApp(const MyApp());

class MyApp extends StatelessWidget {
  const MyApp({super.key});

  static const appTitle = 'Drawer Demo';

  @override
  Widget build(BuildContext context) {
    return const MaterialApp(
      title: appTitle,
      home: MyHomePage(title: appTitle),
    );
  }
}

class MyHomePage extends StatelessWidget {
  const MyHomePage({super.key, required this.title});

  final String title;

  @override
  Widget build(BuildContext context) {
    return Scaffold(
      appBar: AppBar(title: Text(title)),
      body: const Center(
        child: Text('My Page!'),
      ),
      drawer: Drawer(
        /* To the drawer, add a ListView. If there isn't enough vertical room to
           accommodate everything in the drawer, the user will be able to browse through
           the alternatives. */
        child: ListView(
          // Important: Remove padding
          padding: EdgeInsets.zero,
          children: [
            const DrawerHeader(
              decoration: BoxDecoration(
                color: Colors.blue,
              ),
              child: Text('Drawer Header'),
            ),
            ListTile(
              title: const Text('Item 1'),
              onTap: () {
                /* Update the state of the app
                   Then close the drawer  */
                Navigator.pop(context);
              },
            ),
            ListTile(
              title: const Text('Item 2'),
              onTap: () {
                /* Update the state of the app
                   Then close the drawer  */
                Navigator.pop(context);
              },
            ),
          ],
        ),
      ),
    );
  }
}
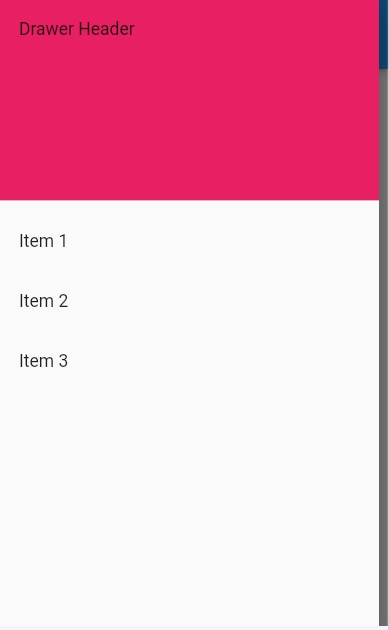
Output:
Let’s end this by learning one more interesting property i.e. How to remove that debug banner. Just set the debugShowCheckedModeBanner property to false in the MaterialApp widget to disable the DEBUG Banner that shows in the top right corner of Flutter applications.
MaterialApp(
  debugShowCheckedModeBanner: false,
)

 9+ registered

