


Introduction
From the above image, it may be clear what opacity is now. In this image, we changed the opacity of the bananas. What if we need to change the opacity of any widget in our flutter application? In this blog, we will learn to change the opacity of widgets in our application. So, let's begin.
Flutter Opacity Widget
It is a widget that makes its child partially or fully transparent. It paints its child into an intermediate buffer and then blends the child back into the scene, partially transparent.
It can be used in cases where we need to remove or add a widget on the screen on demand by just changing the opacity of that widget since it is faster than removing or adding any widget, so it also improves the performance of the application.
- Opacity value 0.0 -> less visible
- Opacity value 1.0 -> more visible
The value of opacity can vary from 0.0 to 1.0
This class is relatively costly for opacity values other than 0.0 and 1.0 since it needs to paint the child into an intermediary buffer.
Use
If we want to change the opacity of any widget, then we wrap it in the opacity widget as given below.
final widgets = [
 MyWidget(Colors.green),
 MyWidget(Colors.blue),
 MyWidget(Colors.yellow),
];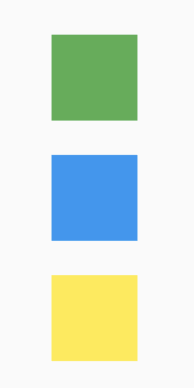
Source: medium
If we need to hide the blue-colored widget in the above-given widgets, we wrap it into an opacity widget and change the opacity to 0.0.
final widgets = [
 MyWidget(Colors.green),
 Opacity(
   opacity: 0.0,
   child: MyWidget(Colors.blue),
 ),
 MyWidget(Colors.yellow),
];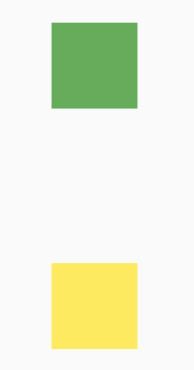
Source: medium
Now, if we need to adjust the opacity of a single image, it's much faster to change its opacity without using the opacity class directly.
For example:
Code1:
Container(color: Color.fromRGBO(255, 0, 0, 0.5))Code 2:
Opacity(opacity: 0.5, child: Container(color: Colors.red))Code 1 is much faster than Code 2 as using opacity class makes it slow.
In Code 1, the parameter 0.5 denotes the opacity, which may vary from 0.0 to 1.0. Similarly, in code 2, opacity: 0.5 denotes the image's opacity.
Properties
- child: It is the widget below the opacity widget in the tree.
- hashCode: It affects the hash code for this object. A hash code is a single integer representing the object's state that affects operator == comparisons.
- key: It controls how one widget replaces another widget in the tree.
- opacity: It is a double value that changes the child's transparency. 1.0 is fully opaque, and 0.0 is fully transparent.
Example
We will learn to use the opacity widget through an example. We will design an app in which we will add two widgets. The first widget will have an opacity of 0.5, and the second widget will have an opacity of 0.9. This will help us to compare both widgets side by side. The source code of this example is given below. The output screenshot has also been given below the source code.
Source code
import 'package:flutter/material.dart';

void main() {
  runApp(const MyApp());
}

class MyApp extends StatelessWidget {
  const MyApp({Key? key}) : super(key: key);

  @override
  Widget build(BuildContext context) {
    return const MaterialApp(
      // Hide the debug banner
      debugShowCheckedModeBanner: false,
      title: 'Kindacode.com',
      home: HomePage(),
    );
  }
}


class HomePage extends StatelessWidget {
  const HomePage({Key? key}) : super(key: key);

  @override
  Widget build(BuildContext context) {
    return Scaffold(
      appBar: AppBar(
        title: const Text('Coding Ninjas'),
      ),
      body: Column(
        children: [
          Opacity(
              opacity: 0.5,
              child: Image.network(
                'https://raw.githubusercontent.com/flutter/assets-for-api-docs/master/packages/diagrams/assets/blend_mode_destination.jpeg',
                fit: BoxFit.cover,
              )),
          Opacity(
              opacity: 0.9,
              child: Image.network(
                'https://raw.githubusercontent.com/flutter/assets-for-api-docs/master/packages/diagrams/assets/blend_mode_destination.jpeg',
                fit: BoxFit.cover,
              )),
        ],
      ),
    );
  }
}
Output
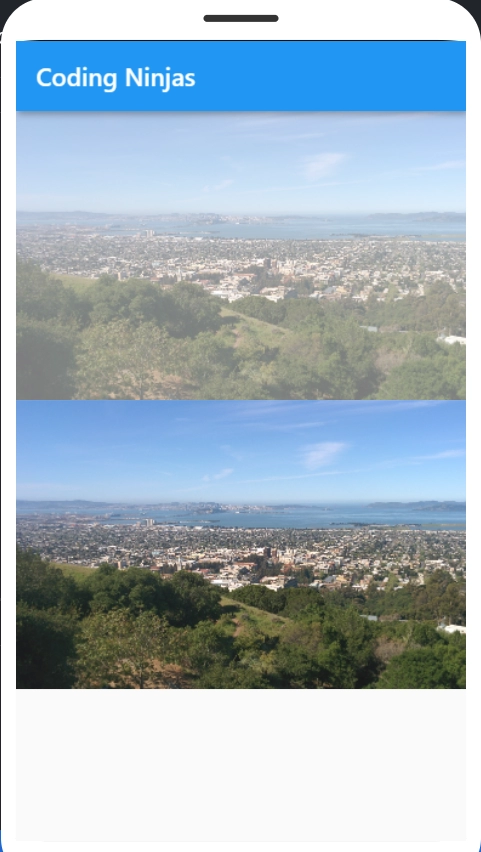
You can use the FlutLab portal to see the output of the given source code yourself.


 9+ registered

